Скачать с ютуб Leaked battery & corrosion: My attempt to restore this 386 motherboard! в хорошем качестве
Leaked battery & corrosion: My attempt to restore this 386 motherboard!
1 год назад
Скачать бесплатно Leaked battery & corrosion: My attempt to restore this 386 motherboard! в качестве 4к (2к / 1080p)
У нас вы можете посмотреть бесплатно Leaked battery & corrosion: My attempt to restore this 386 motherboard! или скачать в максимальном доступном качестве, которое было загружено на ютуб. Для скачивания выберите вариант из формы ниже:
Загрузить музыку / рингтон Leaked battery & corrosion: My attempt to restore this 386 motherboard! в формате MP3:
Если кнопки скачивания не
загрузились
НАЖМИТЕ ЗДЕСЬ или обновите страницу
Если возникают проблемы со скачиванием, пожалуйста напишите в поддержку по адресу внизу
страницы.
Спасибо за использование сервиса savevideohd.ru
Leaked battery & corrosion: My attempt to restore this 386 motherboard!
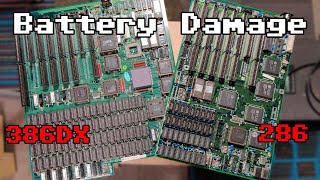
This SOYO 019L1 had a BIOS battery that leaked and corroded components and traces around the battery. In this video, I will restore the motherboard and remove the damage caused by the battery. I will clean the board, use white vinegar to neutralize the existing corrosion, and fix issues with the solder mask above the traces. If the board works after all this work, I will run a few benchmarks to check if the board performs as expected. This motherboard will be safe to store for many years without risking further damage. Supported by PCBWay: https://pcbway.com/g/lF253I PCBWay provides full feature custom PCB prototyping services, 3D printing, and much more. Check them out using my referral link above and get a 5 USD welcome bonus when you sign up as a new customer! AliExpress: Mechanic Solder Mask https://s.click.aliexpress.com/e/_Ddy... (this is the exact item I am using) Amazon US: Solder Mask US 4pcs + UV light: https://amzn.to/470ISRw DE 6pcs: https://amzn.to/3Dr49WU / https://amzn.to/43Av6lC / https://amzn.to/44XIbGB DE Green + UV light: https://amzn.to/3O9Xaqa UK: 6pcs: https://amzn.to/44GEm92 UK: Green + UV light: https://amzn.to/452Hc8n TheRetroWeb (SOYO 019L1): https://theretroweb.com/motherboards/... CPU Galaxy: 286 Board Restoration & Testing [Leaking Battery and Exploding Caps] • 286 Board Restoration & Testing [Leak... Article about replacing leaking batteries from old motherboards: https://pc-restorer.com/replacing-cmo... 00:00 Intro 01:10 PCBWay 01:42 SOYO 019L1 02:38 Remove connectors 03:33 Initial cleaning 05:33 Remove solder mask 07:24 Tinning copper traces 07:47 New solder mask 08:47 Reassemble and build 11:12 Power on 14:36 Install DOS and conclude
Comments


![286 Board Restoration & Testing [Leaking Battery and Exploding Caps]](https://i.ytimg.com/vi/kpQEhJNrJA8/mqdefault.jpg)
