Скачать с ютуб Seaming Artificial Grass - Step 6 в хорошем качестве
Seaming Artificial Grass - Step 6
4 года назад
Скачать бесплатно Seaming Artificial Grass - Step 6 в качестве 4к (2к / 1080p)
У нас вы можете посмотреть бесплатно Seaming Artificial Grass - Step 6 или скачать в максимальном доступном качестве, которое было загружено на ютуб. Для скачивания выберите вариант из формы ниже:
Загрузить музыку / рингтон Seaming Artificial Grass - Step 6 в формате MP3:
Если кнопки скачивания не
загрузились
НАЖМИТЕ ЗДЕСЬ или обновите страницу
Если возникают проблемы со скачиванием, пожалуйста напишите в поддержку по адресу внизу
страницы.
Спасибо за использование сервиса savevideohd.ru
Seaming Artificial Grass - Step 6
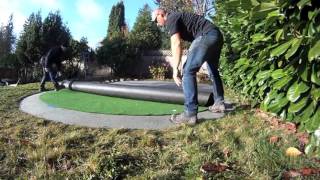
A great seam starts with the correct preparation. If you remove just one outer tuft and seam that edge, it will be extremely visible with the blades pressing together looking like a Mohawk. Removing the outer three tufts along with the factory edge will give you a vertical row of blades that line up perfectly with the piece of grass you are seaming to. If the space between the tufts on your chosen grass is 3/8 of an inch, you want the two rows being seemed together to have that same spacing between them. With the flat backing removed right up to the last tuft on your piece, you are ready to line up your second piece of grass. This piece requires extra adjustment to be properly aligned. Folding one side back to narrow our roll and waving a bit of air underneath allows a gentle repositioning. Fold the outer flap back on your seam edge and remove the outer three tufts. Be sure to keep your blade tight to the piece being seamed so that all excess backing is trimmed away with the waste. With both edges cut off align your pieces so that the Tufts land the same distance apart and they are throughout your turf. You should see an 1/8 to 1/4 inch gap max with no excess backing left behind. After thoroughly checking your seam up and down for spacing, roll out your seam tape and cut it the length of your seam. Then you want to fold both sides of the turf back 12” and lay the seam tape centred down your seam with no folds or wrinkles. Once the seam tape is in position, put a spike in the corners of your to hold it in place. Trim any excess seam tape off flush to your project edge. With the seam spacing triple checked and the seam tape secure to the base, it’s time to spread out some turftac adhesive. Work in sections, pour the glue in a zigzag pattern down the center of the seam tape in a consistent fashion. Using a flat spreader, carefully coat the end of the seam tape and spread the adhesive evenly removing all puddles and leaving behind no dry spots on the scene tape. A thin consistent coat is ideal as the adhesive expands when cured and can come up through the drainage holes in turf if applied too heavily. Please take this into consideration when gluing your seams and do not over apply. TurfTac is a strong adhesive. Try to avoid dragging rocks onto your seam tape when spreading. If you end up with a little too much glue at the end of your seam, simply drag it off into your base material and it will cause no harm. With the adhesive in place and extra hands available, it’s time to put this seam together. For a longer seam like this, you can pull both ends back and start by carefully closing the centre together. From the end of the seam, slowly bring the two pieces of grass together evenly like a zipper. Don’t let one side get ahead of the other, you risk trapping grass blades down in the glue. Work slow and keep your eyes if you inches ahead of the closure to assure perfect alignment between the two pieces as you lie them down together. With one side closed up, put some weight in the centre to prevent the grass from lifting as you work down the other side of the seam. This side was pulled farther apart to prevent it from accidentally closing up. If they are too far out, you can slowly roll them until they are manageable with both hands. Do not to allow the grass to flip over onto the glue before you are ready to lay the seam down. Working from the open end of the seam, grab both pieces of turf firmly and allow the seam to start coming together from the centre working towards the open end. Keeping your eye on where the grass meets is crucial for perfect alignment and assuring that there are no blades trapped down in the glue once your seam is laid down. With the seam complete, firmly press the ends down and work your way back down the seam with pressure to help the adhesive penetrate up into the tufts and backing. It’s always safe to double check your spacing before placing bags of infill, or 12” wide boards with bags on top of them, down your entire seam for a minimum pressing time of 45 mins. This allows the adhesive to cure and create a bond between two pieces that is inseparable. Once the TurfTac is cured and theweight is removed from your seam, you are ready to move onto the next step.
Comments