Скачать с ютуб EastTester ET5410A+ Electronic Load Review | Voltlog в хорошем качестве
EastTester ET5410A+ Electronic Load Review | Voltlog
1 год назад
Скачать бесплатно EastTester ET5410A+ Electronic Load Review | Voltlog в качестве 4к (2к / 1080p)
У нас вы можете посмотреть бесплатно EastTester ET5410A+ Electronic Load Review | Voltlog или скачать в максимальном доступном качестве, которое было загружено на ютуб. Для скачивания выберите вариант из формы ниже:
Загрузить музыку / рингтон EastTester ET5410A+ Electronic Load Review | Voltlog в формате MP3:
Если кнопки скачивания не
загрузились
НАЖМИТЕ ЗДЕСЬ или обновите страницу
Если возникают проблемы со скачиванием, пожалуйста напишите в поддержку по адресу внизу
страницы.
Спасибо за использование сервиса savevideohd.ru
EastTester ET5410A+ Electronic Load Review | Voltlog
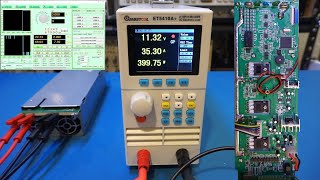
High quality PCB Services https://pcbway.com Join me in this video where we take a closer look at EastTester ET5410A+ Electronic Load which is a 400W max 150V 40A fully programmable dummy load. It comes with a 3.2 inch TFT display which greatly improves the GUI over the 7-segment display which we had on the Kunkin KP184 however the software is not exactly perfect and the build quality could be improved in some areas. Checkout the video for more details. →Get The EastTester ET5410A+ Electronic Load https://voltlog.com/y/g8d9j →User Manual EastTester ET5410A+ PDF https://voltlog.com/y/ps3xo →Timeline 00:05 Introduction 01:34 Overview 08:57 Testing 12:37 Teardown 16:54 Final Thoughts →Support the channel via Patreon, Paypal or Bitcoin http://www.voltlog.com/donations →Support the channel by clicking these links (CommissionsEarned) Aliexpress http://voltlog.com/y/kr0sa Ebay http://voltlog.com/y/jzkfp Amazon.com http://voltlog.com/y/qw4d3 Banggood.com http://voltlog.com/y/o4025 →Blog Post http://www.voltlog.com/ #ET5410A #Review #teardown There’s a few things I’m interested when looking at an electronic load: 1st is the accuracy and precision of the unit, I want my measurements to be accurate and if possible down to 1mV 1mA. If these measurements are accurate, the calculated ones like energy and capacity will also be accurate. 2nd is the functionality, ideally it should have a nice GUI giving me all the information I need, it should support remote voltage sensing. It should have easy battery testing functionality. Optionally I want a PC connection for data logging purposes. 3rd is the build quality. I want this thing to last so it has to be built well, I want it to be safe to use, I don’t want this to be an electrical shock hazard or have the risk of burning down. So we’re going to check all of these things in this video/ Unit was nicely packed and protected, I just haven’t kept the packaging to show it on video. Inside the box we get the electronic load itself, a mains IEC cable and some spare fuses with a user manual which is actually quite clear and easy to follow. Now let’s start talking about the specs of the unit: It can do 400W max. 0-150V, 0-40A so whichever voltage/current combo you choose it has to be 400W max. It has a resolution of 1mV 1mA but depending on the range it switches to 10mV, 10mA above 20V and 3A. It supports the usual operating modes of Constant Current, Constant Voltage, Constant Resistance and Constant Power. But it also adds Transients test mode, Battery test mode and very interestingly LED test mode where it simulates the characteristics of an LED diode which starts drawing current based on its forward voltage biasing. In terms of protection features, once again we have the standard ones, over voltage, over current, over power and over temperature. On the back of the unit we have the IEC mains input socket, this works with a universal input, a USB port for PC connectivity and this interesting looking pluggable screw connectors that hosts an optional RS232 interface, an optional RS485 interface, one trigger input and two outputs, one that signals test in progress and another one that signals test pass/fail result. These guys are open collector outputs which is awesome because you can pull them up to your desired voltage level. There are some additional pins in here which are unused and disappointingly this unit doesn’t appear to support remote voltage sensing. We’ll have a closer look at how this affects our measurement accuracy in a few minutes. On the front of the unit we have a 2.8 inch TFT color display with a resolution of 320x240 pixels. We have a clicky power switch, rotary encoder knob, dedicated buttons for the main functions and a bunch of additional buttons here for navigating the GUI and selecting the additional functions. The banana input connectors are spaced at about 47mm distance, that’s not standard spacing, although you probably wouldn’t use any standard spacing pluggable connectors on an electronic load. While they feel solid, they feel like cheap banana connectors. We’ll take a look later at how well these can handle higher currents and if their temperature rises.
Comments