Скачать с ютуб How to Install a Smart Home Light Switch - WiFi smart switch with RF 433Mhz remote control function в хорошем качестве
How to Install a Smart Home Light Switch - WiFi smart switch with RF 433Mhz remote control function
5 лет назад
Скачать бесплатно How to Install a Smart Home Light Switch - WiFi smart switch with RF 433Mhz remote control function в качестве 4к (2к / 1080p)
У нас вы можете посмотреть бесплатно How to Install a Smart Home Light Switch - WiFi smart switch with RF 433Mhz remote control function или скачать в максимальном доступном качестве, которое было загружено на ютуб. Для скачивания выберите вариант из формы ниже:
Загрузить музыку / рингтон How to Install a Smart Home Light Switch - WiFi smart switch with RF 433Mhz remote control function в формате MP3:
Если кнопки скачивания не
загрузились
НАЖМИТЕ ЗДЕСЬ или обновите страницу
Если возникают проблемы со скачиванием, пожалуйста напишите в поддержку по адресу внизу
страницы.
Спасибо за использование сервиса savevideohd.ru
How to Install a Smart Home Light Switch - WiFi smart switch with RF 433Mhz remote control function
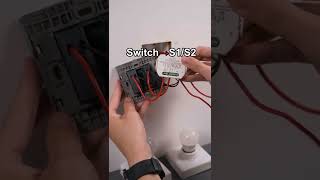
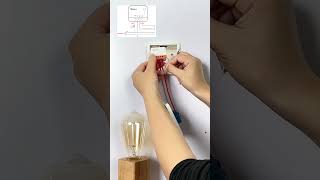
Our Official Site: https://www.qiachip.com/ Purchase Link: 1. https://www.aliexpress.com/item/40001... 2. https://www.aliexpress.com/item/40005... WiFi smart switch with RF 433 Mhz remote control function After the wiring is completed, turn on the power and operate according to the status of the smart switch indicator: 1) If the blue light of the smart switch flashes continuously at this time, it indicates that the smart switch has entered the state of waiting for connection to WiFi; then open the APP and follow the instructions to connect to WiFi. 2) If the indicator light of the smart switch is not flashing blue light, please press the button of the smart switch and keep it for more than 5 seconds until the blue light flashes continuously, then open the APP and connect to the WiFi according to the manual. Scan the QR-code of the manual or Search ‘ Smart Life ’ to download and install the device's APP How to match smart switch with 433Mhz RF remote control? This smart switch has 3 working modes to match the 433Mhz RF remote: (smart switch, hereinafter referred to as: receiver) Matching method: 1. Setting momentary Mode: Press the receiver's Learning button 1 time, the receiver's red LED will be lights up, it comes into Setting state; Press the remote's button, the receiver's red LED will flash then come off, Setting successfully. 2. Setting Toggle Mode (Common working mode): Press the receiver's Learning button 2 time, the receiver's red LED will be lights up, it comes into Setting state; Press the remote's button, the receiver's red LED will flash then come off, Setting successfully. 3. Setting Latched Mode: (Note: When you choose "Latched Mode", you need to setting two different buttons on the Remote control, the first time learn is for “ON”, the second time learn for “OFF”. For example: button A = ON, button B = OFF) Press the receiver's Learning button 3 time, the receiver's red LED will be lights up, it comes into Setting state; Press the remote's A button, the receiver's red LED will flash and then remains lit; Then press the remote's B button, the receiver's red LED will flash then come off, Setting successfully. Note: A Smart Switch can only store 12 buttons (on the remote). Saved button number of more than 12, it will cause all of the stored remote control cannot control the Smart Switch. You need reboot the power and reset the RF remote control settings (press the Smart Switch's matching button 8 times)
Comments