Скачать с ютуб Yamaha 90 Trim and Tilt Seals Replacement - April, 2020 в хорошем качестве
Yamaha 90 Trim and Tilt Seals Replacement - April, 2020
4 года назад
Из-за периодической блокировки нашего сайта РКН сервисами, просим воспользоваться резервным адресом:
Загрузить через ClipSave.ruСкачать бесплатно Yamaha 90 Trim and Tilt Seals Replacement - April, 2020 в качестве 4к (2к / 1080p)
У нас вы можете посмотреть бесплатно Yamaha 90 Trim and Tilt Seals Replacement - April, 2020 или скачать в максимальном доступном качестве, которое было загружено на ютуб. Для скачивания выберите вариант из формы ниже:
Загрузить музыку / рингтон Yamaha 90 Trim and Tilt Seals Replacement - April, 2020 в формате MP3:
Если кнопки скачивания не
загрузились
НАЖМИТЕ ЗДЕСЬ или обновите страницу
Если возникают проблемы со скачиванием, пожалуйста напишите в поддержку по адресу внизу
страницы.
Спасибо за использование сервиса savevideohd.ru
Yamaha 90 Trim and Tilt Seals Replacement - April, 2020
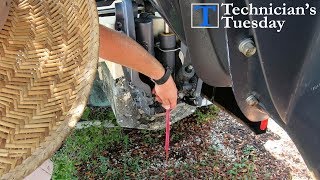
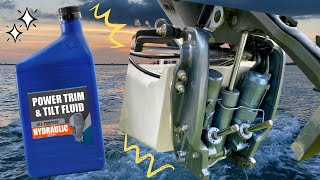
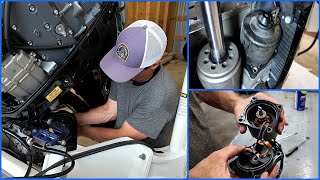
This video provides detailed instructions for replacing the trim and tilt piston seals on a 2002 Yamaha 90TLRA. If your trim or tilt seals are weeping fluid, this is your video guide. This video, while rather long, details the full procedure from removal to re-installation of the trim and tilt sub-assemblies from the trim/tilt unit. This particular unit is model 6H1-16 as stamped on the trim/tilt unit. The job is not technically challenging but does require some mechanical knowledge and ability. Allocate plenty of time for the job as it seems every DIY job takes much longer than a trade mechanic who does this on a regular basis. Shown are: 1. TRIM: remove and reinstall the trim sub-assemblies, replace the trim cap seals, replace sub-assembly O and backer ring. 2. TILT: remove and reinstall the tilt sub-assembly, tear down and rebuild of the tilt sub-assembly including removal of the tilt valve body and the cap, remove and reinstall the valve body parts, replace the tilt cap seal, replace the tilt valve body O and backer ring, replace the tilt valve body internal O and backer ring. 3. FREE PISTON: remove and reinstall, replace O ring. ** This video is not a rebuild of the internal valving of the trim/tilt unit. Marine Tech Tools (marinetechtools.com) : MT0004 For Tilt Cap, use with supplied S-4 pins MT0006 For Trim Caps, use with supplied S-4 pins A parts diagram may be found at crowleymarine.com or boats.net. Please check the part numbers for your specific engine model. Do not rely solely on the below listing. Trim Cylinders: (order 2 of each part, 1 is required for each trim assembly) 6H1-43822-10-00 TRIM DUST SEAL (cap) 6H1-43861-10-00 O RING (cap) 6H1-43864-00-00 O RING (trim sub-assembly) 6H1-43874-00-00 BACK UP RING (trim sub-assembly) [ I was advised thru a comment in May, 2021 that the previously listed part, 6H1-43870-00-00 BACK UP RING (trim sub-assembly), was incorrect. After checking two online parts houses, I have updated the parts list to list part 6H1-43874-00-00. The previously listed part number may have been superseded. ] Tilt Ram and Free Piston: (order 1 of each part) 6H1-43812-00-00 TILT DUST SEAL (cap) 6H1-43861-00-00 O RING (cap) 6H1-43861-10-00 O RING (two required, one for sub-assembly valve body and one for free piston) 6H1-43872-10-00 BACK UP RING (for sub-assembly valve body) 93210-18322-00 O RING (inside sub-assembly valve body) 65W-43871-00-00 BACK UP RING (inside sub-assembly valve body) Yamaha Performance Trim and Tilt Fluid, 1 qt. required, recommend 2 qts just in case Additional tools used: 24” long ½” drive breaker bar Snap ring pliers Large and small flat head screwdriver Curved jaw needle nose pliers Dental pick T30 Torx bit 5/16” Drill bits (to remove tilt valve body from ram) 17mm socket and ratchet Deep sockets (used to install seals) Rubber mallet Funnel with hose (to fill reservoir) Bench vise Turkey Baster (in place of a fluid vacuum pump) Long reach locking tweezers and rags Bucket to catch discarded oil Tidbits of information: You will see that I removed the trim sub-assemblies and the fluid from the trim cylinders before working on the tilt. That was a mistake that cost time. Loosen the trim caps but do not remove them or the fluid until after you have the tilt sub-assembly and the follower (free piston) removed. If your unit is out of fluid, you will need to add fluid to the reservoir and trim cylinders and recap them to build pressure to remove the follower (free piston). An afterthought: Instead of using a rubber mallet and deep socket to drive the seals in place as I did, it may be possible to use a bench vise with an appropriate diameter socket if you pad the vise jaws to keep from damaging the cap and are careful about aligning the socket, seal and cap as you close the jaws. I did not see any thread locker on the tilt ram to prevent the valve body from working off the ram's threads. Make sure you torque the valve body well onto the ram so that it cannot back off. The torx screw does not hold the valve body on the ram. Thanks again for watching, ~Jim
Comments