Скачать с ютуб Making handmade Leather wallet folded edges в хорошем качестве
Making handmade Leather wallet folded edges
8 лет назад
Из-за периодической блокировки нашего сайта РКН сервисами, просим воспользоваться резервным адресом:
Загрузить через ClipSave.ruСкачать бесплатно Making handmade Leather wallet folded edges в качестве 4к (2к / 1080p)
У нас вы можете посмотреть бесплатно Making handmade Leather wallet folded edges или скачать в максимальном доступном качестве, которое было загружено на ютуб. Для скачивания выберите вариант из формы ниже:
Загрузить музыку / рингтон Making handmade Leather wallet folded edges в формате MP3:
Если кнопки скачивания не
загрузились
НАЖМИТЕ ЗДЕСЬ или обновите страницу
Если возникают проблемы со скачиванием, пожалуйста напишите в поддержку по адресу внизу
страницы.
Спасибо за использование сервиса savevideohd.ru
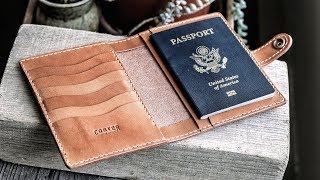
Making handmade Leather wallet folded edges
MY OFFICIAL WEBSITE to buy https://www.ivan-leather.com/ In this video will show you how to make a leather wallet gentleman and how long it takes to make so thanks to everyone for watching hope you enjoy 1. Rough cut out all pieces. 2. 1:47,Draw all turn/fold lines on back of leather. 3. 2:02 cut out Outer and main inner. 4. 2:30 Skive top of main enter. 5. 2:42 Use D/S/T on main inner top turn over. 6. 3:22 Turn # 5 above. 7. 3:43 Draw stitch line 5 mm on #5 above and use Pricking Iron to make holes, and stitch. 8. 4:57 Skive top of OUTER turn-over 9. 5:17 Use white GLUE on #8 above. 10. 5:29 Using Bone creaser suggest the turn over on #8 above, make the turn and tap down, use wing divider make a 5mm seam line. Using a Pricking Iron make pre punch stiching holes. 11. 6:12 Put D/S/T/ on the 2 T-Shaped card inserts , both L&R side on top(Grain), and place one on top of the other. 12. 6:38 Turn the two #11 over on flesh side and draw line 5mm on the (top) piece, at the bottom. Using pricking Iron make stitching holes on the flesh side, and stitch, leaving a margin on each side of aprox. 6mm. 13. 7:26 Skive the L, B, R sides of the curved bottom card slot. 14. 8:10 GLUE both outside edges of the card holder assembly, 15. 8:51 Scribe a line on main insert around the card assembly to placed D/S/T on. 16. 9:00 Place D/S/T on the main internal piece to place card slot assembly on. 17. 9:30 With card assembly in place scribe a 5mm stitch line on the fold side and Prick holes for stitching, and stitch. Repeat # 11 – 16 above. 18. 10:03 Place inner main assembly on outer flesh to flesh, align inner to left side, mark the left side of the curve at bottom of inner, slide inner to right edge of outer and align, mark the right side of the curve on bottom of inner. 19. 10:29 Cut out the piece you just marked in # 18 above. 20. 10:40 GLUE edges of inner main on LEFT Flesh side and bottom, ONLY at this time! 21. 11:05 GLUE the left side of the outer on flesh side on fold over edges. 22. 11:13 fold half of #21 above up to edge of the card holder pocket. 23. 11:25 then put D/S/T on the piece just folded in # 22 above, and fold over on-to the card holder pocket, then do same to the adjacent bottom turnover. 24. 11:58 Scribe a 5mm line on Bottom and side turnovers in 22 and 23 above. 25. 12:11 Use pricking tool and punch stitch holes on the two above turned edges and then stitch. 26. 13:19 GLUE the RIGHT side and the bottom edge of the INNER, raise the left side of the outer and inner up to about 90 deg. And align the inner with the outer on the turn edge line, and tap the glued line. 27. 13:54 Do same as # 22-23 above. 28. 14:25 Do same as #24-25. 29. 15:11 Wipe down , polish wallet use bone folder to loosen up the inside of pocket corners etc. FINISHED a nice wallet.
Comments