Скачать с ютуб How to digitize a JPEG logo using Embrilliance StitchArtist to stitch on your embroidery machine. в хорошем качестве
How to digitize a JPEG logo using Embrilliance StitchArtist to stitch on your embroidery machine.
6 месяцев назад
Из-за периодической блокировки нашего сайта РКН сервисами, просим воспользоваться резервным адресом:
Загрузить через ClipSave.ruСкачать бесплатно How to digitize a JPEG logo using Embrilliance StitchArtist to stitch on your embroidery machine. в качестве 4к (2к / 1080p)
У нас вы можете посмотреть бесплатно How to digitize a JPEG logo using Embrilliance StitchArtist to stitch on your embroidery machine. или скачать в максимальном доступном качестве, которое было загружено на ютуб. Для скачивания выберите вариант из формы ниже:
Загрузить музыку / рингтон How to digitize a JPEG logo using Embrilliance StitchArtist to stitch on your embroidery machine. в формате MP3:
Если кнопки скачивания не
загрузились
НАЖМИТЕ ЗДЕСЬ или обновите страницу
Если возникают проблемы со скачиванием, пожалуйста напишите в поддержку по адресу внизу
страницы.
Спасибо за использование сервиса savevideohd.ru
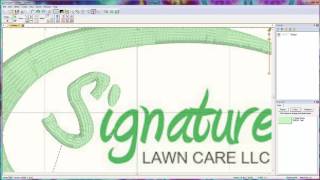
How to digitize a JPEG logo using Embrilliance StitchArtist to stitch on your embroidery machine.
Do you have a logo as an image that you need to convert to an embroidery design? If so - you will need to digitize it because there is no magic button to convert it from an image to an embroidery file. But have no fear - digitizing is not rocket science. In this video I will show you how I digitze a very basic logo. Want to learn more about Embrilliance? Check out my courses https://modern-makers-academy.teachab... #Embrilliance #StitchArtist #howtodigitze #digitizelogo #digitizing #Embrilliancesoftware #EmbrillianceStitchArtist #embroiderydigitizing #EmbrillianceSoftware #embroiderysoftware #machineembroidery Products mentioned in this video Note: some of these products are affiliate links for which I may receive a commission. • Embrilliance StitchArtist Level 1 https://www.embrilliance.com/jamaffil... • Embrilliance StitchArtist Level 2 https://www.embrilliance.com/jamaffil... • Embrilliance StitchArtist Level 3 https://www.embrilliance.com/jamaffil... More information on the blog: What is Embrilliance? https://www.machineembroiderygeek.com... How to use Embrilliance StitchArtist https://www.machineembroiderygeek.com... How to become an embroidery digitizer https://www.machineembroiderygeek.com... Video highlights: 0:00 welcome 0:22 how the image got into Embrilliance / how to import an image 0:58 checking the visibility of the image 1:08 scaling the image 1:31 zooming in 1:45 using the Bezier tool to create swoosh 2:33 editing the swoosh shape 3:07 applying stitches and changing the inclination 4:10 using the column tool to digitize the shield 5:32 editing the column 6:28 digitizing the letter E 8:00 changing colors of the objects 8:25 changing the stitch order 8:55 branching the shield 9:16 branching the E 9:29 previewing the stitch out 10:09 changing start and end points Thanks for watching! If you enjoyed this video, please LIKE and Subscribe: / @juliagriffey9315 Follow me at: Blog: https://www.machineembroiderygeek.com Facebook Page: / machineembroiderygeek Instagram: / machineembroiderygeek Pinterest: / machembroiderygeek
Comments