Скачать с ютуб Repair Kit for etrailer and Ram A-Frame Couplers Review в хорошем качестве
Repair Kit for etrailer and Ram A-Frame Couplers Review
8 лет назад
Из-за периодической блокировки нашего сайта РКН сервисами, просим воспользоваться резервным адресом:
Загрузить через ClipSave.ruСкачать бесплатно Repair Kit for etrailer and Ram A-Frame Couplers Review в качестве 4к (2к / 1080p)
У нас вы можете посмотреть бесплатно Repair Kit for etrailer and Ram A-Frame Couplers Review или скачать в максимальном доступном качестве, которое было загружено на ютуб. Для скачивания выберите вариант из формы ниже:
Загрузить музыку / рингтон Repair Kit for etrailer and Ram A-Frame Couplers Review в формате MP3:
Если кнопки скачивания не
загрузились
НАЖМИТЕ ЗДЕСЬ или обновите страницу
Если возникают проблемы со скачиванием, пожалуйста напишите в поддержку по адресу внизу
страницы.
Спасибо за использование сервиса savevideohd.ru
Repair Kit for etrailer and Ram A-Frame Couplers Review
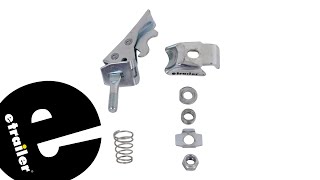
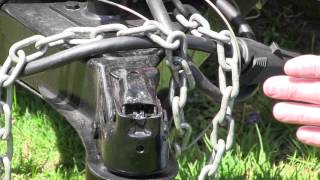
Click for more info and reviews of this etrailer A-Frame Trailer Coupler: https://www.etrailer.com/Accessories-... Check out some similar A-Frame Trailer Coupler options: https://www.etrailer.com/dept-pg-Acce... https://www.etrailer.com Don’t forget to subscribe! / etrailertv Full transcript: https://www.etrailer.com/tv-review-a-... Today, we're going to be taking a look at and also showing you how to repair an A-frame trailer coupler. Part number we're using today is CA-5100-RK. This is going to be the repair kit for the etrailer and RAM style A-frame couplers. It also works on several other types of A-frame couplers as long as they use that trigger latch design. This works for 2 inch balls, and it has a 5,000 pound weight capacity. Here's what our basic coupler mechanism's going to look like. As you can see, you've got our latch handle here. Trigger is right here. As that comes down, you can see it's going to compress this spring. It pulls up on the lower mechanism there. Our latch goes in there. That's what's going to hold it down, and our ball is going to sit right in this little recessed area, this little dented area just like that. That captures that ball right up here in the front. You can kind of see how it works there. That's going to keep everything nice and tight as we head down the road. Now, these do fail from time to time. Maybe it's rusted up and it just won't move anymore. Sometimes the springs are going to break, the latches quit working, whatever the case may be. Rather than having to go have your coupler cut off your trailer and have a new one welded on or unbolt this one and re-buy it, we can just get that latch mechanism. It's going to be a simple process as far as removing it goes and re-installation. We're just going to do it with this one. I just wanted to give you kind of an idea of how this looks. We'll open that lever up. That spring that we talked about that sometimes fails, we need to compress that down kind of like that. It's going to allow that nut to be freed up in there a little bit. Push that keeper down so we can loosen that up. Once that's off, we're going to take out the little keeper that was in there. You can see that little spring loaded spacer there. Little square spacer there. You can see that's contoured to fit that edge, and then this kind of rotates over that pin. You see that pin that fits through there This is going to rotate over that. Spring comes off, and then we'll be pulling this out. At that point, we grab our new one. Want to fit this right back down through that hole. We'll place our spring back on the bolt. Want to bring that actual coupler itself around that rod, that spacer block that's going to go up and in, little spring, got our keeper plate, and then we've got our nylon locking nut. We want to tighten that up until that bolt passes through the threads on our nylon lock nut there. Once that comes through, just align our nut up. You can see that keeper's then going to keep that from being able to rotate either way. Let that go right down on the ball of our trailer. Bring our handle closed, and then we can check that for fit. If it's a little bit too tight or if we struggle in getting our latch closed, well then we want to loosen that up maybe a turn. If it latches real super easy and then we've got some wiggle room in there, then tightening up our nut's going to be what we'll want to do to kind of tighten up that space in there. Really easy, quick, simple switch that can be made and really save you quite a bit of money.
Comments