Скачать с ютуб Sewing up a Mav Pack! в хорошем качестве
Sewing up a Mav Pack!
1 год назад
Скачать бесплатно Sewing up a Mav Pack! в качестве 4к (2к / 1080p)
У нас вы можете посмотреть бесплатно Sewing up a Mav Pack! или скачать в максимальном доступном качестве, которое было загружено на ютуб. Для скачивания выберите вариант из формы ниже:
Загрузить музыку / рингтон Sewing up a Mav Pack! в формате MP3:
Если кнопки скачивания не
загрузились
НАЖМИТЕ ЗДЕСЬ или обновите страницу
Если возникают проблемы со скачиванием, пожалуйста напишите в поддержку по адресу внизу
страницы.
Спасибо за использование сервиса savevideohd.ru
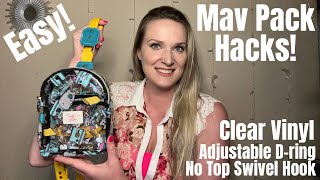
Sewing up a Mav Pack!
The Mav Pack sewing pattern can be purchased from my website https://lindshandmade.com It includes the written instructions with oodles of colored photos, printable pattern pieces, as well as additional files including FREE bonus SVGs for your homebased cutting machine and an A0 file for projector use or to have printed at a print shop. I am sewing on my domestic Juki TL 2000qi for this entire bag using tex 45 thread. For you first attempt, I would highly suggest using lighter weight materials that have been interfaced with a woven interfacing so you can get a feel for the turning process. -Fabric is "Birch in Black" by Libs Elliot from her collection "Beguiled" for Andover Fabrics. -Ombre pastel thread is from Geekyhardware.com -Ombre checkered seatbelt webbing is from Wonder Ground Fabrics -Smooth black faux leather with suede like backing is from More Me Know -Pressing mitt is from Wawak -Mini iron is the Dritz Notions Mighty Travel Steam Iron in white from Amazon -The water-based leather adhesive is Ecoweld from Tandy leather Here are your timestamps: 00:05 Intro & bag demonstration 01:11 Prep work and interfacing recommendations 02:16 Adding important landmarks to our pieces 02:56 Optionally adding leather edge paint to the strap end/accents if needed. 04:05 Prepping the d ring tabs 06:20 Sewing the strap topper and d ring anchor(s) 11:47 Attaching the strap topper and d ring anchor(s) to the back main body exterior 13:15 Creating the interior zipper pocket 19:45 Verifying the main body liner with added pocket is the correct size and trim if needed 20:20 Creating the main zipper panel 23:55 Adding the gusset to the zipper panel 27:26 Adding the gusset to the front main body 29:33 Explaining the importance of the seam allowance along the bottom for turning later 31:20 Attaching the main body liner to the front main body exterior and gusset 36:01 Turning the front main body right side out after sandwiching the liner 36:32 Closing the turning hole on the front main body and topstitching the perimeter 41:33 Attaching the back main body piece to the gusset 43:25 Attaching the main body liner with the pocket to the back main body exterior/gusset 47:12 Turning the pack right side out through the interior zipper pocket 48:04 Verifying we caught all layers when stitching the perimeter and closing the turning hole 48:52 Pressing the finished bag with a pressing mat 49:12 Gathering the materials needing for making an adjustable strap 50:40 Attaching the strap end to one end of the long portion of the webbing 51:48 Adding the strap adjuster to the long strip of webbing 52:05 Adding the oval or rectangle ring to the long strip of webbing 52:44 Attaching the short strip of webbing to the oval or rectangle ring 52:59 Adding the swivel clasp and glue to the strap accents 53:49 Sewing the strap accents onto the ends of the webbing 57:13 Attaching the completed strap to the bag and you're all done! 57:40 Tester bag examples 59:00 Shoutout to my amazing testers this round!
Comments