Скачать с ютуб Garage Floor Tiles Review and Full Install | Vevor Tiles | Tesla Garage Setup | HUGE Upgrade! в хорошем качестве
Garage Floor Tiles Review and Full Install | Vevor Tiles | Tesla Garage Setup | HUGE Upgrade!
4 месяца назад
Из-за периодической блокировки нашего сайта РКН сервисами, просим воспользоваться резервным адресом:
Загрузить через ClipSave.ruСкачать бесплатно Garage Floor Tiles Review and Full Install | Vevor Tiles | Tesla Garage Setup | HUGE Upgrade! в качестве 4к (2к / 1080p)
У нас вы можете посмотреть бесплатно Garage Floor Tiles Review and Full Install | Vevor Tiles | Tesla Garage Setup | HUGE Upgrade! или скачать в максимальном доступном качестве, которое было загружено на ютуб. Для скачивания выберите вариант из формы ниже:
Загрузить музыку / рингтон Garage Floor Tiles Review and Full Install | Vevor Tiles | Tesla Garage Setup | HUGE Upgrade! в формате MP3:
Если кнопки скачивания не
загрузились
НАЖМИТЕ ЗДЕСЬ или обновите страницу
Если возникают проблемы со скачиванием, пожалуйста напишите в поддержку по адресу внизу
страницы.
Спасибо за использование сервиса savevideohd.ru
Garage Floor Tiles Review and Full Install | Vevor Tiles | Tesla Garage Setup | HUGE Upgrade!
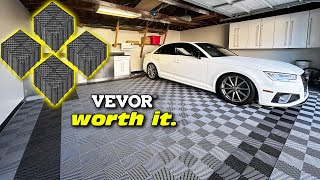
I just installed these Vevor brand floor tiles to enhance the look of my garage and I have to say I’m quite pleased with how they turned out. At my old house I placed down an epoxy floor which took me a week or so to prep the concrete floor to find out just after a few months the epoxy resin started to crack and come up from the hot tires. Rather than going through that whole mess again, I just decided to look into floor tiles. ___________________________________ $500 OFF your Tesla Here ▶︎ https://ts.la/evan87711 See MORE Accessories! ▶︎ https://emtesla.com/general-2 Vevor Garage Floor Tiles ▶︎ https://bit.ly/3U0StDt Vevor Garage Floor Tiles (Amazon) ▶︎ https://amzn.to/3vrHJof Tile Cutting Tool ▶︎ https://amzn.to/3U022Cu Small Circular Saw ▶︎https://amzn.to/4aA3KzP Tile Edge Guard ▶︎ https://amzn.to/43XILFn ___________________________________ While there are a few brands of garage floor tiles including Racedeck and Swistracks it all comes down to what you prefer and of course what your budget is. My garage size is roughly 20ft by 20ft in diameter; pushing the cost of this installation to upwards of a couple thousand dollars for the Racedeck brand alone. That's not something I was not able to swallow. I came across this Vevor brand also known as the happybuy brand on amazon which has the same look as the Racedeck but nearly at a third of the cost! While they only have a few colors to choose from, I was only wanting the black and gray colors anyways. At nearly $1.50-2.00 dollars a square foot for my two car garage the price came out to about $800.00 dollars. Which was much more manageable than the $2,000 price tag of the other brands. These tiles like the big name brand tiles out there, also support the weight of heavy vehicles like my tesla for example. They are also UV resistant, stain resistant, and are obviously open faced so any moisture can breathe through them. Looking at the tiles themselves they seem very sturdy and rigid. The bottom is even open channeled for water to pass through. The entire shipment arrived in only 1 day but it may be because I live only 5 hours from their shipping facility here in Georgia. Anyways each tile has two sides with female connecting loops and the other two sides have the male connecting pins. You can see here how easy it is to connect each one together by pushing on them. As you'll see later I just used a rubber mallet for the rest of the installation. We are going to want to have as much of a flat service as possible to prolong the life of these Vevor tiles. I started at the garage overhead door and worked my way up to the house entry door. You want to make sure you leave about a quarter inch gap between the walls for expansion. I had a design in mind similar to this one you see right here. I ended up only placing two rows of gray tiles down the middle rather than three as you'll see later in the video I ran out of gray tiles for the edge of the garage wall. Going through the rest of this timelapse as I mentioned earlier, I had to remove one line of gray tiles down the center so I could finish the side wall. I had plenty of extra black tiles to replace these with anyways. I continued to use my cutting tool working my way down the rest of the garage until I completed the edges and corners. In total for the entire project it took me about 5 hours. I think the longest part was once I had to do the corners and sides the measuring and cutting took up a lot of the time. The next day I installed this edging strip at the entry point of the garage door. Most of the high end brands have their own edging connecting stripes but unfortunately the Vevor brand does not. I found this rubber edging strip on amazon that can be tucked right at the edge of the tile. My garage overhead way is about 14 feet long and this piece is 20 ft. I took a cutting knife to create the custom length I needed. There is also this 3M sticky part on the bottom of the edge guard that adheres to the floor of the garage. I do not expect this to hold long as the heat and cold over time will probably cause this to loosen. I may have to find a better option in the future to keep this edge guard in place. I think it looks pretty good though, almost a match to the gray color tiles in the back. They also have this in the color black on amazon. But that is all for the install. Clearly you can get this done in a day by yourself but honestly I really like the way these have turned out. I think the appearance is way better than looking at a concrete floor. I’ll have to keep you all updated in the comments as to how they are holding up. Since posting this video I have had them for a few days and I’ve driven my car in and out of the garage with no signs of the tiles bending or showing signs of wear and my tesla weighs about 3,500 lbs. Garage Floor Tiles Review and Full Install | Vevor Tiles | Tesla Garage Setup | HUGE Upgrade!
Comments