Скачать с ютуб How to Make Ductless Flares That Won't Leak в хорошем качестве
How to Make Ductless Flares That Won't Leak
4 года назад
Скачать бесплатно How to Make Ductless Flares That Won't Leak в качестве 4к (2к / 1080p)
У нас вы можете посмотреть бесплатно How to Make Ductless Flares That Won't Leak или скачать в максимальном доступном качестве, которое было загружено на ютуб. Для скачивания выберите вариант из формы ниже:
Загрузить музыку / рингтон How to Make Ductless Flares That Won't Leak в формате MP3:
Если кнопки скачивания не
загрузились
НАЖМИТЕ ЗДЕСЬ или обновите страницу
Если возникают проблемы со скачиванием, пожалуйста напишите в поддержку по адресу внизу
страницы.
Спасибо за использование сервиса savevideohd.ru
How to Make Ductless Flares That Won't Leak
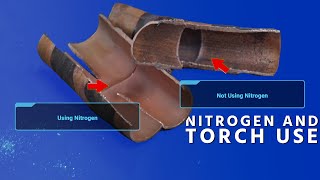
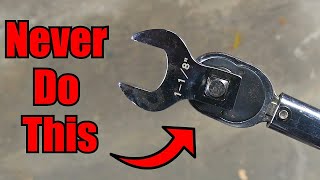
In this video, we explain how to make ductless flares that won't leak. We demonstrate how to use NAVAC flaring tools, deburr the copper, use torque wrenches, and more to make a great ductless flare. Cutting copper squarely (with a proper tubing cutter) and deburring the copper is the best practice for getting clean copper without any shavings or debris falling inside the tubing. When deburring the copper, be sure NOT to thin out the walls and to point the copper downward so that the burr can fall out rather than back inside the tubing. It's also a good idea to put the nut on the copper before you make a flare. When you make the flare, be sure to use a proper flaring tool with the correct height setting between the block and the cone. Bryan also puts a tiny bit of mineral oil on the cone to prevent galling. All you have to do is make sure that the copper is in tightly and up against the stop. Make sure the copper is backed all the way out, lock the copper in place, and hit the "forward" button to get a perfect flare with the NAVAC cordless flaring tool. Once finished, back the copper back out, and you'll see that you have a round, even, shiny flare. You can also use a properly configured flaring block; just make sure the copper is centered before you lock it into place. When you have a flare, you'll hear the clutch make a clicking noise. The flare nut should cover the entire inside of the flare, and the flare should fit its attachment location all the way around. We personally find that a tiny dab of assembly lubricant helps the flare assembly, but that practice is a bit controversial in some spaces and should be left to the manufacturer's discretion. (In this case, we demonstrate that the claim that assembly lubricant causes flare damage due to overtightening isn't necessarily true.) Before we start torquing down the flare, we need to get the flare nut finger-tight and consult the manufacturer's literature to find the proper torque specs. If you use an assembly lubricant, you'll also want to account for that when figuring out your torque specs. Bryan's favorite torque wrench is the YellowJacket kit with multiple heads, as the heads tend to come in the right sizes. Many people like using digital torque wrenches with adjustable heads, but you may get some play in the jaws of those and will have to replace the batteries from time to time. (When adjusting the jaw, it's best to pull towards the jaw, not push.) High-end digital torque wrenches with specific flare-type heads would be ideal, but they're tough to find. You may also use a traditional torque wrench with an adapter. In any case, the torque wrench should be set for the proper measurement system (often foot-pounds in the USA). Force should be applied only to the handle, and the wrench will get a lot harder to tighten and may make noise once it hits the torque specs you've set. Torquing down the flare with a proper torque wrench should be followed by a pressure test to check for leaks. The system should be pressurized to the manufacturer's specs (or the data plate's test pressures). You can also use a leak reactant bubble solution on the flares. A small ductless system is usually fine with a 30-minute pressure test. (Multi-head or larger units may need up to 24 hours with a nitrogen calculator.) The last stage of the flare creation/assembly is the evacuation and a vacuum test with a micron gauge. We typically pull down to 200 microns and make sure that the decay doesn't exceed 500 microns in 10 minutes. Read all the tech tips, take the quizzes, and find our handy calculators at https://www.hvacrschool.com/
Comments