Скачать с ютуб Shaping Preparation Sequence - Concepts & Strategies: Advanced Endodontics: Dr. Ruddle в хорошем качестве
Shaping Preparation Sequence - Concepts & Strategies: Advanced Endodontics: Dr. Ruddle
5 лет назад
Из-за периодической блокировки нашего сайта РКН сервисами, просим воспользоваться резервным адресом:
Загрузить через ClipSave.ruСкачать бесплатно Shaping Preparation Sequence - Concepts & Strategies: Advanced Endodontics: Dr. Ruddle в качестве 4к (2к / 1080p)
У нас вы можете посмотреть бесплатно Shaping Preparation Sequence - Concepts & Strategies: Advanced Endodontics: Dr. Ruddle или скачать в максимальном доступном качестве, которое было загружено на ютуб. Для скачивания выберите вариант из формы ниже:
Загрузить музыку / рингтон Shaping Preparation Sequence - Concepts & Strategies: Advanced Endodontics: Dr. Ruddle в формате MP3:
Если кнопки скачивания не
загрузились
НАЖМИТЕ ЗДЕСЬ или обновите страницу
Если возникают проблемы со скачиванием, пожалуйста напишите в поддержку по адресу внизу
страницы.
Спасибо за использование сервиса savevideohd.ru
Shaping Preparation Sequence - Concepts & Strategies: Advanced Endodontics: Dr. Ruddle
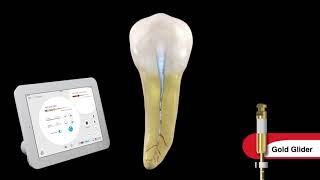
All content has been transcribed from original audio recordings. As a result, transcribed text may contain certain grammatical, spelling, or other language artifacts which don’t reflect the original audio recording. Please refer to the audio for the most accurate information and messaging. Any reproduction of the video content, audio, or transcribed text is strictly forbidden. https://www.endoruddle.com/jit/detail... Endodontic treatment can be simplified by dividing the entire procedure into a series of smaller steps. The potential to consistently shape canals and clean root canal systems is significantly enhanced when the coronal two-thirds of the canal is first pre-enlarged followed by preparing its apical one-third. * before commencing with any endeavor in life it's good to have a plan if we look at virtually any tooth on the planet we could say they range between 19 and 25 millimeters in their overall length about 10 millimeters of that overall length should be noted to be clinical crown if we subtract 10 from 19 it gives us 9 if we subtract 10 from 25 it gives us 15 you could say that roots are about 9 to 15 millimeters in their overall length if we further divide the roots into coronal middle and apical thirds then you can see that each little section is about three four or five millimeters in its overall length now how do we use this information clinically when you look at a preoperative film often times we see calcified teeth long roots curvatures small diameter canals and it seems to be threatening and a very big assignment if we learn to break the roots down as we've just described by resolving each little area we can in turn resolve the entire challenge successfully if we look at the preparation sequence then that could fulfill this kind of concept we would notice that we would use small hand files typically tens and 15s and use them about 2/3 of the way down the canal the file would be set to its expected full working length but we would never let the rubber stop reach that point by using the instrument until we have confirmed that we have enough space to accommodate a rotary shaping file then we can shape this region of a canal this is called pre enlargement this isn't crowned down and it's not stepped back with the upper 2/3 optimally prepared we can then Scout the rest of the canal and again we could use a variety of different small sized instruments typically for most patients a 10 and a 15 having removed restrictive dentin in the coronal 2/3 would be adequate we would scalp the rest of the canal this is when we would get a known working length this is when we would make sure to confirm the canal is paitent and this is when we make the decision after pre enlargement whether we can use rotary tooling or would the case best be shaped using manual instruments once we've confirmed that we have a glide path then we can shape this region of the canal three four five millimeters with an appropriate rotary shaping nickel titanium file so you can see that in some instances where we have longer length canals perhaps with more curvature and maybe there's smaller diameter we might on occasion need an O six or an O eight to reach the full working length initially when I'm doing pre enlargement I like to curve the file pretty much in the body of the file it makes it like a spring so when we're using the instrument we contact randomly more internal walls we like to use viscous ki laters when we're securing canals or set another way when we're going into areas where we've never been before that's when they're potentially most dangerous a viscous ki later can give us three major advantages it is a superior lubrication it will help emulsify and prevent the read hearin savai ttle collagenous tissue and finally the debris that we're generating with small-sized hand files this debris is more effectively held in suspension examples of vista ski laters could be pro Lube glide or RC prep when we're working these instruments in the upper two-thirds we should recognize that our rubber stops are about one millimeter thick so if you stay back about three or four stops you're staying away from the most delicate part of the anatomy remember most canals make their biggest curvatures in the apical three four or five millimeters canals notoriously divided by four k trifer kate in this region so by staying shore to this region we are then able to shape this region with sodium hypochlorite sodium hypochlorite is the preferred reagent because it's can actually digest tissue maybe after every 4 or 5 syringes the sodium hypochloride I might occasionally use 17% EDTA just to remove the smear layer as it's accumulating and you can shape then always with an aqueous solution this pre enlargement sets us up for a lot of advantages to list just a few of these advantages when we're directing files intentionally towards the apical extent of the prep we're going to have more tactile control because we removed
Comments