Скачать с ютуб Setting up Exposure Bracketing on a Canon EOS RP в хорошем качестве
Setting up Exposure Bracketing on a Canon EOS RP
3 года назад
Скачать бесплатно Setting up Exposure Bracketing on a Canon EOS RP в качестве 4к (2к / 1080p)
У нас вы можете посмотреть бесплатно Setting up Exposure Bracketing on a Canon EOS RP или скачать в максимальном доступном качестве, которое было загружено на ютуб. Для скачивания выберите вариант из формы ниже:
Загрузить музыку / рингтон Setting up Exposure Bracketing on a Canon EOS RP в формате MP3:
Если кнопки скачивания не
загрузились
НАЖМИТЕ ЗДЕСЬ или обновите страницу
Если возникают проблемы со скачиванием, пожалуйста напишите в поддержку по адресу внизу
страницы.
Спасибо за использование сервиса savevideohd.ru
Setting up Exposure Bracketing on a Canon EOS RP
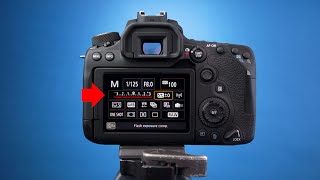
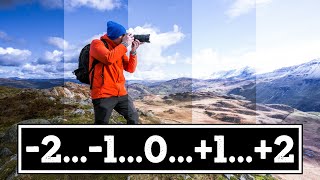
Learn how to use Automatic Exposure Bracketing (AEB) on the Canon EOS RP and shoot HDR photos ready for merging in HDR software https://www.hdrsoft.com/learn The tutorial will show you how to: - Locate the Custom Functions menu to set the Number of bracketed shots in a bracketed set - Set AEB (Automatic Exposure Bracketing) to a spacing of 2 EV using the main menu - Set the Drive mode to High Speed continuous to let the camera take all 3 photos by pressing and holding the shutter button - Merge the photos to HDR in Photomatix https://www.hdrsoft.com/photomatix-pro ~ TIMESTAMPS ~ 0:00 Intro 0:46 Locate the Custom Function menu to set the number of bracketed shots 1:20 Set the number of bracketed shots 2:10 Activate Automatic Exposure Bracketing (AEB) on the main menu 2:21 Go to the first tab shooting and to page 3 Exposure compensation/AEB 2:31 Enter the Exposure Compensation/AEB setting page 2:49 Set a spacing of 2 EV between each exposure 2:58 Locate the main dial 3:07 Roll the main dial until the two markers reach + / - 2 EV 3:36 Switch drive mode to Continuous 3:45 Use the Quick Control menu to set continuous shooting 3:56 Highlight High speed continuous 4:13 Press and hold the shutter button 4:20 Merge to HDR in Photomatix
Comments