Скачать с ютуб Restoration Of DESTROYED Ford RC Truck | Repaired and Upgraded в хорошем качестве
Restoration Of DESTROYED Ford RC Truck | Repaired and Upgraded
3 года назад
Скачать бесплатно Restoration Of DESTROYED Ford RC Truck | Repaired and Upgraded в качестве 4к (2к / 1080p)
У нас вы можете посмотреть бесплатно Restoration Of DESTROYED Ford RC Truck | Repaired and Upgraded или скачать в максимальном доступном качестве, которое было загружено на ютуб. Для скачивания выберите вариант из формы ниже:
Загрузить музыку / рингтон Restoration Of DESTROYED Ford RC Truck | Repaired and Upgraded в формате MP3:
Если кнопки скачивания не
загрузились
НАЖМИТЕ ЗДЕСЬ или обновите страницу
Если возникают проблемы со скачиванием, пожалуйста напишите в поддержку по адресу внизу
страницы.
Спасибо за использование сервиса savevideohd.ru
Restoration Of DESTROYED Ford RC Truck | Repaired and Upgraded
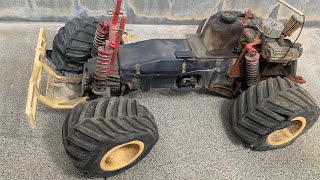
Extremely satisfying restoration video of an old Ford RC Truck. This restoration was quite involved, and took many hours between filming, cleaning, and repairing this old electric toy truck. The RC truck I restore in this video is a vintage 1980's Tamiya Ford f150 ranger step side model. It is an electric, radio controlled model car powered by a 7.2v battery pack delivering power to a 540 size electric motor. To start the restoration, I disassembled the entire truck back to a pile of parts. Some plastic parts were broken, and many screws were rusty. The tires were destroyed, and the body was dull and damaged. The plastic and aluminum parts were cleaned in soap and water, and some old adhesives had to be removed. The electronics had to be cleaned and repaired. The speed controller had some bad solder joints, and the battery plug needed to be replaced. While I was restoring these components, I decided to eliminate some connectors and replace some old wires. Luckily the electronic servos and radio receiver were functioning properly, and just needed some cleaning. I chose to replace the old rusty electric motor as these are common and not super significant to the authenticity of the truck. Next the Ford truck body needed to be restored. The plastic was extremely dull, and the color was gray while is should be gloss black. I left the original decals in tact, and proceeded to polish the plastic as well as the decals. It worked very well, and the shine and color was restored. The tires were extremely old and damaged, and beyond repair. The wheels had been spray painted at some point in the past. I was able to restore the original color of the wheels by removing the spray paint with acetone. After the paint was stripped, a fresh set of tires were installed. During reassembly, I also upgraded the shocks to modern oil-filled units. These are much smoother than the old parts, and improve performance. I was able to find some of the missing parts to complete this model on ebay. During re-assembly, grease was applied to all gears and moving components that required it, and thread lock was used where screws are likely to come loose. When the restoration and repairs were complete, I was able to enjoy running the toy truck as it was intended to be ran when new. 00:00 Introduction of the rc truck 00:18 disassembly begins 08:44 cleaning and restoring electronics 10:00 soldering 12:20 testing speed controller 12:30 cleaning electronics receiver 12:40 testing receiver and servos 15:07 cleaning parts 16:05 restoration of wheels and tires 19:02 restoring truck body 21:30 beginning reassembly 31:55 test drive
Comments