Скачать с ютуб Installing the 150gpd Water Saving Upgrade Kit | How To Tuesday в хорошем качестве
Installing the 150gpd Water Saving Upgrade Kit | How To Tuesday
9 лет назад
Скачать бесплатно Installing the 150gpd Water Saving Upgrade Kit | How To Tuesday в качестве 4к (2к / 1080p)
У нас вы можете посмотреть бесплатно Installing the 150gpd Water Saving Upgrade Kit | How To Tuesday или скачать в максимальном доступном качестве, которое было загружено на ютуб. Для скачивания выберите вариант из формы ниже:
Загрузить музыку / рингтон Installing the 150gpd Water Saving Upgrade Kit | How To Tuesday в формате MP3:
Если кнопки скачивания не
загрузились
НАЖМИТЕ ЗДЕСЬ или обновите страницу
Если возникают проблемы со скачиванием, пожалуйста напишите в поддержку по адресу внизу
страницы.
Спасибо за использование сервиса savevideohd.ru
Installing the 150gpd Water Saving Upgrade Kit | How To Tuesday
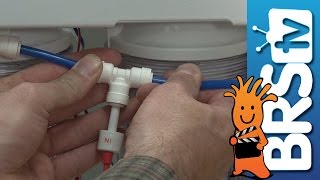
http://brs.li/150gpd Installing the 150gpd Water Saving Upgrade will essentially double the amount of product water you produce for the same amount of waste water. This means you only need to run your RO/DI unit for half as long (and thus you will use half as much waste water) as you without the kit. It does this by utilizing a process called waste water staging. Waste water staging is a popular technique in many industrial reverse osmosis applications. It allows you to add a second membrane in series to reprocess the waste water from the first membrane. Because the second membrane is being fed from the waste water of the first membrane, it will be processing higher TDS water then the first. With fairly clean water this won't have any real noticeable impact but if you have an incoming TDS that is 300TDS or higher, this will have a more noticeable impact and you will likely consume DI resin more quickly. For this reason we do not generally recommend using the kit with high TDS tap water. To install the 150gpd Water Saving Upgrade kit: 1. Install the new membrane into the membrane housing and screw on the cap 2. Snap the membrane clips to the new membrane housing. 3. Snap the new membrane housing to the existing membrane housing. 4. Remove the waste water line from the existing membrane housing. 5. Route a tube from the waste water line from the existing membrane to the feed port of the new membrane. 6. Install the waste water line that was on the existing membrane housing onto the waste water port of the new housing. 7. Remove the product water line that connects the existing membrane housing to the auto shut off valve. 8. Cut two new product water lines and connect the product water lines together by running a line from each product water output to the included tube divider (Y fitting). 9. Connect the combined output of the tube divider to the product water input of the auto shut off valve. That is it, you are done! Connect with us on Facebook: / bulkreefsupply Check out our pics on Instagram: / bulkreefsupply Legal Stuff The purpose and content of this video is to provide general information regarding the products and their applications as presented in the video. Aquatic sales solutions, inc. And its officers, directors, employees and agents disclaim all express or implied warranties, in any way, related to the products and their application as presented in this video, make no representation or warranty regarding the products and the application as presented in this video and shall not be liable for any direct or indirect losses or damages of any type, including but not limited to punitive damages, or from personal injury or death resulting from or in any manner related to the video, and the products in and contents of the video. The viewer expressly agrees that aquatic sales solutions, inc. and its officers, directors, employees and agents shall not be liable for any damages or losses related to the products in and content of the video and hereby agrees to hold the foregoing harmless from any such losses or damages.
Comments