Скачать с ютуб DIY AC Air Cooler! Homemade AC Air Cooler! (No Added Humidity) - Box Fan conversion Air Conditioner в хорошем качестве
DIY AC Air Cooler! Homemade AC Air Cooler! (No Added Humidity) - Box Fan conversion Air Conditioner
3 года назад
Из-за периодической блокировки нашего сайта РКН сервисами, просим воспользоваться резервным адресом:
Загрузить через ClipSave.ruСкачать бесплатно DIY AC Air Cooler! Homemade AC Air Cooler! (No Added Humidity) - Box Fan conversion Air Conditioner в качестве 4к (2к / 1080p)
У нас вы можете посмотреть бесплатно DIY AC Air Cooler! Homemade AC Air Cooler! (No Added Humidity) - Box Fan conversion Air Conditioner или скачать в максимальном доступном качестве, которое было загружено на ютуб. Для скачивания выберите вариант из формы ниже:
Загрузить музыку / рингтон DIY AC Air Cooler! Homemade AC Air Cooler! (No Added Humidity) - Box Fan conversion Air Conditioner в формате MP3:
Если кнопки скачивания не
загрузились
НАЖМИТЕ ЗДЕСЬ или обновите страницу
Если возникают проблемы со скачиванием, пожалуйста напишите в поддержку по адресу внизу
страницы.
Спасибо за использование сервиса savevideohd.ru
DIY AC Air Cooler! Homemade AC Air Cooler! (No Added Humidity) - Box Fan conversion Air Conditioner
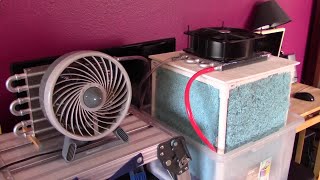
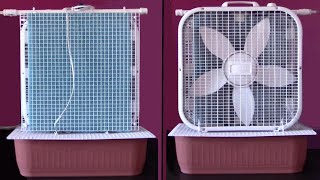
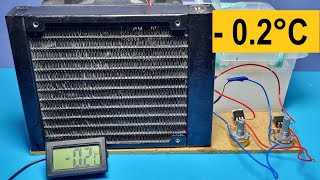
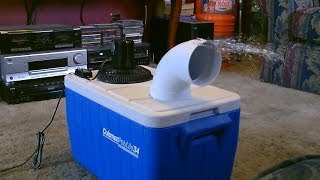
Powerful DIY AC Air Cooler! Homemade AC Air Cooler with Air Conditioner "like" feel! (no added humidity). Easy Box-Fan Conversion! this thing blows a ton of cool air! the air temp dropped 10 degrees (85F to 73F) in 60 seconds! and within 5 minutes it was blowing 66F air. super easy to make too. all you need is 7 things... a box fan, bucket, small (AC or DC) water pump (4.8w 12v one used), 3/8" ID clear vinyl tubing (10 to 15 feet), scrap styrofoam, zip ties and two 'tube and fin' {hayden model 405} 'all aluminum' transmission coolers). the sheet of corrugated plastic (for the side panels) is optional but highly recommended. only tools needed are a screwdriver, utility knife, kitchen knife and tin snips *no power tools. build time: about 2 hours. to use it just drop ice, ice packs, and cold water (from fridge if possible) in a bucket or ice chest and drop in the pump. the cold water cools the fins fast. within 30 second they are freezing. then power-up the fan. (low for coldest temps) and you've got a lot of 'instant' cold air. box fans move a lot of air (even on low) so my living room (shown in video) was much colder in just a couple of minutes. (note that the fins are relatively wide-spaced on those hayden units so the fan pulls air through them like they're not even there - the fans speed is not affected). A Few Notes: once completed the unit is very stable and the fins feel like their 'cemented' to the fan. it attaches very tight. (the physical properties of styrofoam allow that to happen). as the zip ties are tightened up the fins and fan grill are pulled together tightly against the blocks causing a type of bond. it holds everything secure so there's no movement, sound, shake or anything. they also allows the whole unit to be made without altering either the fan or the fins in any way. both stay in like-new condition. also, no sealants, caulks, glues, drilling, brackets or anything like that is needed. that's good if you want to move the unit to another fan at a later time. disassembly time is only 30 seconds (all you do is cut off the zip ties and pull the side panels off). *side panels are just held on with double sided sticky tape. if you like the video please rate, comment, sub (click bell) and share it around 🙂 other stats/extra info - the fins are light - combined maybe a pound. (no copper). also drains easy - serpentine horizontal pattern versus vertical. black tube and clamps come with the transmission coolers so no need to buy them. don't use 3/8" clear tubing for middle connection as it crimps up and water flow is affected. zip ties and panels come in white or black so you can match them to the color of your fan for a super slick look. AC pump can be used (i even bought a new one for this project *but ended up using a low power DC one). if you want to do this whole thing on DC i've got a video on how to make a 12v DC 20" box fan. it has the exact back grill so you hook on the fins the same way. a single 12v 100w solar panel (or 12v deep cycle battery) runs that DC fan and small DC pump. tips: video tips 1.) to easily install zip ties - bend them in the shape of a V before inserting into fan grill. hand tighten a little at first (to position the fins) then go around and fully hand tighten them. 2.) to get a flat smooth cut of the styrofoam use a thin sharp knife and saw a lot (push down a little) - let the knife do the work. i used six 3/4" thick blocks (1/2" to 3/4" works best) 3.) remember to use 3/8" (internal diameter) tubing (versus 3/8" outer diameter) 4.) only use styrofoam for the support. wood won't work well. condensation may lead to a rot issue plus it'll scratch up everything and probably move around. the styrofoam creates a bond 5.) use a relatively small pump. large ones (with larger motors) warm up the water unnecessarily fast 6.) run fan on low speed for max cooling times 7.) to extend the life of the ice use an insulated container or ice chest 8.) use water from cold source (fridge etc...) for coldest temps 9.) sticky tape works awesome for the side panels - holds tight but can easily be removed if desired.
Comments