Скачать с ютуб Create Automatic Long Shadows in Photoshop | Cast Shadow Text Tutorial в хорошем качестве
Create Automatic Long Shadows in Photoshop | Cast Shadow Text Tutorial
3 года назад
Из-за периодической блокировки нашего сайта РКН сервисами, просим воспользоваться резервным адресом:
Загрузить через ClipSave.ruСкачать бесплатно Create Automatic Long Shadows in Photoshop | Cast Shadow Text Tutorial в качестве 4к (2к / 1080p)
У нас вы можете посмотреть бесплатно Create Automatic Long Shadows in Photoshop | Cast Shadow Text Tutorial или скачать в максимальном доступном качестве, которое было загружено на ютуб. Для скачивания выберите вариант из формы ниже:
Загрузить музыку / рингтон Create Automatic Long Shadows in Photoshop | Cast Shadow Text Tutorial в формате MP3:
Если кнопки скачивания не
загрузились
НАЖМИТЕ ЗДЕСЬ или обновите страницу
Если возникают проблемы со скачиванием, пожалуйста напишите в поддержку по адресу внизу
страницы.
Спасибо за использование сервиса savevideohd.ru
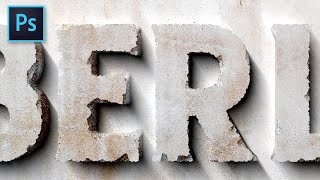
Create Automatic Long Shadows in Photoshop | Cast Shadow Text Tutorial
In this tutorial, we'll go through a few simple steps to set up an automatic cast shadow for text in Photoshop. Written instructions and free textures below... let me know if you have any thoughts or questions! FREE TEXTURES USED IN THIS TUTORIAL AND MORE: https://texturelabs.org/tutorials/aut... FONT USED IN THIS TUTORIAL: https://www.dafont.com/turnpike.font CONNECT AND SUPPORT TEXTURELABS! https://texturelabs.org/ Instagram - / texturelabs STEP BY STEP INSTRUCTIONS: 1) Select the layer you’d like to create a cast shadow for. 2) Open your Actions Tab in Window→Actions. 3) Optional: Create a new folder to put your custom actions in. 4) Click the New Action button in the Actions Tab, name it “Cast Shadow”, and press the Record button. 5) Control (Mac: Command) Click on the layer icon of your selected layer to make a selection in the shape of the text. 6) Create a new layer. 7) Press D to set colors to default. 8) Press Alt Backspace (Mac: Option Delete) to Fill with Black 9) Control D (Mac: Command D) to Deselect. 10) Control [ (Mac: Command [ ) to Move the Layer Down. 11) Press V for the Move Tool. 12) Press the Down Arrow key once, then press the Left Arrow key once. 13) Control J (Mac: Command J) to Duplicate the Layer. 14) Control [ (Mac: Command [ ) to Move the Layer Down. 15) Press the Down Arrow key once, then press the Left Arrow key once. 16) Repeat steps 13-15 eight times, until you have your original text layer, plus a total of ten copies. 17) Press Alt Shift ] (Mac: Option Shift ] ) nine times to Select all of the layer copies. 18) Control E (Mac: Command E) to Merge Selected Layers. 19) Double Click on the merged layer and rename it “Shadow”. 20) Your action is ready! Select any text layer and press the Play Button in the Actions Tab. OPTIONAL VINTAGE EFFECT: 21) Control (Mac: Control) Click on the original text layer to make a selection in the shape of the text. 22) Select the Shadow layer and press Backspace (Mac: Delete) 23) Use Control T (Mac: Command T) to Transform and move one of the layers, creating some misalignment between the Text and Shadow layers. 24) Control (Mac: Control) Click on the Text layer to make a selection in the shape of the text. 25) Click the layer’s eye icon to hide the Text layer. 26) With the selection still active, create a new Solid Color in your Fill and Adjustment Layers menu (at the bottom of the layers tab). 27) With the mask of the new Solid Color layer selected, use Filter→Filter Gallery. In the Brush Strokes section, use Spatter with Spray Radius at 10 and Smoothness at 15. 28) In the Properties Tab, press the Select and Mask button. 29) In the Global refinements section, set Smooth to 50 and Contrast to 40. 30) Repeat steps 24-29 on the Shadow layer. 31) Open the Texturelabs Paper 151, and press Control A (Mac: Command A) to select all, then Control C (Mac: Command C) to make a copy. 32) Back in your main document, use Control V (Mac: Command V) to Paste the texture above the top layer . 33) Use Filter→Other→High Pass at 200 to create an average value of 50% grey. 34) Set the Blending Mode of the texture layer to Linear Light.
Comments