Скачать с ютуб 1983 Mk1 Golf GTI Complete Restoration Timelapse 1.8 20v t Engine Swap в хорошем качестве
1983 Mk1 Golf GTI Complete Restoration Timelapse 1.8 20v t Engine Swap
1 год назад
Скачать бесплатно 1983 Mk1 Golf GTI Complete Restoration Timelapse 1.8 20v t Engine Swap в качестве 4к (2к / 1080p)
У нас вы можете посмотреть бесплатно 1983 Mk1 Golf GTI Complete Restoration Timelapse 1.8 20v t Engine Swap или скачать в максимальном доступном качестве, которое было загружено на ютуб. Для скачивания выберите вариант из формы ниже:
Загрузить музыку / рингтон 1983 Mk1 Golf GTI Complete Restoration Timelapse 1.8 20v t Engine Swap в формате MP3:
Если кнопки скачивания не
загрузились
НАЖМИТЕ ЗДЕСЬ или обновите страницу
Если возникают проблемы со скачиванием, пожалуйста напишите в поддержку по адресу внизу
страницы.
Спасибо за использование сервиса savevideohd.ru
1983 Mk1 Golf GTI Complete Restoration Timelapse 1.8 20v t Engine Swap
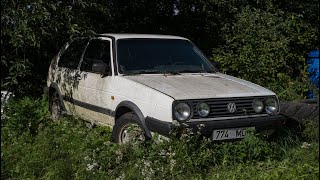
Here is a timelapse of the last 17 months (on and off) work that has gone into saving this 1983 Mk1 Golf GTI Campaign. On first inspection it didn't seem too bad. A little rust here and there yes but a quick tidy up, some fresh fluids and stick an MOT on it. The plan was to use it for the summer then do a light restoration to it. As soon as we started removing parts it was obvious that it was so so much worse than we thought, Rust on nearly every panel meant a massive amount of work and parts was going to be needed. Once it was determined that the car needed a full restoration I set about stripping the car down to a shell and sent it off to be paint stripped and sand blasted to show up every area that required work. This ended up being a lit! Thankfully the guys at Heritage Parts Centre (Link below and a 10% discount code) came in and sponsored the channel and the build providing me with all of the top quality parts I would need to restore the shell. A small list of panels replaced are: Inner sills, Outer sills, Both front floors, Spare wheel tub, Rear panel, Both rear arches, Both inner Rear arches, Scuttle, Front panel, Inner wing, Bonnet, Both wings and we even had to change the roof as the original one was completley rusted out. Once the shell was welded back up and solid again I gave the underside a coat of Upol Etch primer followed by seam sealer and then a coating of Upol Gravitex Stonechip/undersealer. We then set about sanding the outside of the car back to bare metal and with the support of the guys from Breakwells Paints we got the shell primed with a coat of epoxy primer. The shell was then dry guide coated and blocked/sanded back with a 240 grit sand paper to show any high/low spots. Once these were identified we seat about applying the Upol 2k Filler and blocked/sanded those areas flat with 80 grit then 180 grit finishing with 240 grit. Once the filler had been sanded another coat of epoxy primer was added to seal in all of the filler work. The next step was to spray the car with high build primer, dry guide coat it and block/sand the panels so they were all flat and straight. When we were happy with that we build a temporary spray booth with filters in and out to help keep the booth as clean as possible. Now was the time to set about spraying the colour onto the shell. We started off by spraying the underside of the shell then the inside followed by the engine bay and the outside was the final part of the shell. Once dry the shell was removed from the booth and the doors, Boot, Bonnet, Wings, Sun roof were placed in the booth and given the same treatment. The direction of the car changed during the process as the original plane was a concours restoration but as the project went on I realised that this direction was not what I wanted to do. The new direction was to build the show car I have always wanted to, A Shaved bay, 1.8t 20V Mk1 Golf GTI campaign in mars red on air ride. This Time lapse documents the whole restoration start to 'finish' (Are they ever really finished?!) Thank you for watching and thank you to the series sponsors Heritage Parts Centre GT Air Breakwells Paints Tony's Refinishing Dodo Mat Ben's Trim Shop Watch the series from the beginning here: • Mk1 Golf GTI Restoration Watch the episode that follows on from this timelapse: • Painting The Engine 1983 Mk1 Golf GTI... Link to the Dan & Abi YouTube Channel / danabi Link To Heritage Parts Centre Where you can get 10% off your order by using code 'CHAMBERS' at checkout: http://bit.ly/danchambers Link to Breakwells Paints: https://breakwellspaints.co.uk/ Link to GT Air: https://gtair.co.uk/ The compressor I have: https://gtair.co.uk/air-compressors/1... Hi Flow Kit Video: • Supercharge your air compressor tools... Link to Tony’s Refinishing: / tonysrefinishingtv Link to the lift I have: Website: https://trommelberg.co.uk/ Instagram: / trommelberguk_ned Facebook: / 2postlift Link To Heritage Parts Centre Thank you for the jigging points: http://bit.ly/danchambers Where you can get 10% off your order by using code 'CHAMBERS' at checkout. How nice of them! Want to support the channel? DAC Industries Hoodies, T-Shirts, Wooly Hats, Snapbacks & Stickers are available to buy from my website: https://www.dacind.com My Instagram Account: @dan.a.chambers
Comments