Скачать с ютуб Replace the spokes of a motorcycle model バイク模型のスポーク交換 в хорошем качестве
Replace the spokes of a motorcycle model バイク模型のスポーク交換
1 год назад
Из-за периодической блокировки нашего сайта РКН сервисами, просим воспользоваться резервным адресом:
Загрузить через ClipSave.ruСкачать бесплатно Replace the spokes of a motorcycle model バイク模型のスポーク交換 в качестве 4к (2к / 1080p)
У нас вы можете посмотреть бесплатно Replace the spokes of a motorcycle model バイク模型のスポーク交換 или скачать в максимальном доступном качестве, которое было загружено на ютуб. Для скачивания выберите вариант из формы ниже:
Загрузить музыку / рингтон Replace the spokes of a motorcycle model バイク模型のスポーク交換 в формате MP3:
Если кнопки скачивания не
загрузились
НАЖМИТЕ ЗДЕСЬ или обновите страницу
Если возникают проблемы со скачиванием, пожалуйста напишите в поддержку по адресу внизу
страницы.
Спасибо за использование сервиса savevideohd.ru
Replace the spokes of a motorcycle model バイク模型のスポーク交換
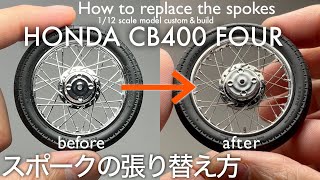
Replace the spokes of a motorcycle model バイク模型のスポーク交換 #replacespokes #motorcyclemodel #wheel I made a jig to increase the efficiency of spoke replacement. It is recommended to separate the rim and hub when replacing the hub with a disc brake type, when wanting to clean and paint the rim seam, or when drilling holes on the hub side is difficult. Then replace the spokes. Therefore, I needed a jig to align the hub with the center of the rim, so I made my own jig for replacing spokes on BMW wheels. The spokes passing through the hub side of BMW are not bent spokes, so drilling is troublesome. Impressions of spoke replacement using a jig I recommend it because it was beautiful and easy to make, such as painting, finish condition, time to completion. It's nice to be able to change from drum brakes to disc brakes as long as you have a hub. Material 3mm thick plastic plate 5mm plastic square bar insect pin brass tube 12 cm square plate with a thickness of 3 mm Four 2 cm x 5 cm rectangular plates with a thickness of 3 mm 5mm plastic square bar Wheel and rim offset spacers as needed The shaft that penetrates the rim is a brass pipe that matches the shaft diameter. Method Drill holes in the rim and hub Same drilling angle on rim and hub Two sets of spokes facing each other Set it on a jig and check the center Assemble the next two pairs of spokes face-to-face and secure with instant glue. After assembling the four pairs of spokes, separate them from the jig and assemble the remaining spokes. Set it on the jig, check the center and fix it with adhesive. It can accommodate motorcycle wheel sizes from 1/12 to 1/6. Thank you very much. オートバイ 模型のスポークの交換 スポーク交換の効率を上げるために、治具を作りました。 ハブをディスクブレーキタイプに交換したいとか、リムの合わせ目処理や塗装をもっと綺麗にしたいとか、ハブ側の穴あけが大変だと思った時、ハブとリムを分離してスポークを変えた方がいいです。 そのためにはハブをリムの中心に置く治具が必要になりますので、治具を作ってBMWのホイールのスポークを交換しました。 BMWのハブ側に通すスポークは、ベントされたスポークではないので、スポークを通す穴あけが大変です。 治具を作ってスポークを交換した感想は、塗装や仕上がり状態や完成までの時間も含めて綺麗に楽に短く終わりましたので、お勧めします。 ハブさえあればドラムブレーキをディスクブレーキに変えられるのも嬉しいです。 材料 3mm厚のプラ板 5mmのプラ角棒 虫ピン 真鍮パイプ 3mm厚の12cmの正方形の板 1枚 3mm厚の2cm×5cmの長方形の板 4枚 5mmのプラ角棒 ホイールとリムのオフセット用のスペーサー 適時 リムに通すシャフトはシャフト径に合わせた真鍮パイプ 方法 リム、ハブに穴を開ける リムとハブの穴あけの角度は同じにする 対向したスポーク2組を組んで 治具にセットし中心確認して 次の対向したスポーク2組を組み、瞬間接着剤で固定。 4組のスポークを組んだら治具から離して残りのスポークを組む。 治具にセットして中心を確認して接着剤で固定 1/12から1/6オートバイのホイールの大きさまでできます。 いつもありがとうございます!
Comments


![№179 [Взгляд строителя] HASEGAWA1/12 YAMAHA'89YZR500 LUCKY STRIKE в стадии строительства](https://i.ytimg.com/vi/9aLZRdt-ON8/mqdefault.jpg)