Скачать с ютуб How to Reseal a Leaking Aquarium в хорошем качестве
How to Reseal a Leaking Aquarium
1 год назад
Скачать бесплатно How to Reseal a Leaking Aquarium в качестве 4к (2к / 1080p)
У нас вы можете посмотреть бесплатно How to Reseal a Leaking Aquarium или скачать в максимальном доступном качестве, которое было загружено на ютуб. Для скачивания выберите вариант из формы ниже:
Загрузить музыку / рингтон How to Reseal a Leaking Aquarium в формате MP3:
Если кнопки скачивания не
загрузились
НАЖМИТЕ ЗДЕСЬ или обновите страницу
Если возникают проблемы со скачиванием, пожалуйста напишите в поддержку по адресу внизу
страницы.
Спасибо за использование сервиса savevideohd.ru
How to Reseal a Leaking Aquarium
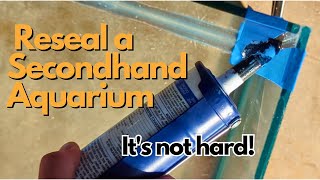
Resealing a fish aquarium with new silicone is fairly easy. Most of the work goes into the process of removing all the old silicone and prepping the glass for the new silicone. First, start by peeling out all the old remaining silicone in the fish tank. Second, use a flat razor blade to ensure you get all the silicone residue off the glass. Third, use acetone to remove remaining residue and oils from the glass. Finally, apply new bead of aquarium grade silicone and allow 24 hour dry time. Products: ➡ Live Plants - https://amzn.to/3VwMqFZ ➡ Popular Aquariums - https://amzn.to/3VNuPLu ➡ Rock & Wood - https://amzn.to/4emMp0d ➡ Best Lighting - https://amzn.to/3KNx8Yz Can a leaking aquarium be patched or repaired? A leaking fish aquarium cannot be patched but the entire tank can be resealed with new silicone. Silicone does not re-adhere to old silicone and thus is why we need to remove all the old silicone and replace with new silicone. So if your aquarium is leaking you have to just remove all the old silicone. Step 1: Remove Old Silicone from Aquarium Using a flat razor blade you need to get the blade in between the glass and the silicone. Slide the flat razor blade back-and-forth and allow the blade to cut the silicone away from the glass. Try to remove the silicone in sections. Step 2: Remove the Silicone Residue from Glass After you have removed the silicone beads from the pains of glass we now have to remove the residue that the silicone left behind. It may be difficult to see but there’s actually a residue that’s left behind from the silicone. Using that flat razor blade carefully scrape away all of the residue that silicon left behind. Step 3: Clean and Vacuum Pieces of Silicone Now that you have removed all the silicone and residue on the glass we need to clean everything up. Use a vacuum to suck up all the small pieces of silicone left behind from cleaning. We do not want any of this old silicone mix with the new silicone we are adding to the tank. Step 4: Degrease Glass with Acetone Next we need to clean the glass with acetone to remove oils and degrease it. For a small amount of acetone onto a paper towel and gently clean all the scenes where the old silicone used to be. This will remove all oils and waxes from the glass and make it ready for our new silicone to be applied. Step 5: Apply New Silicone to Aquarium Seams Cut the tip of the new silicone and use the caulking gun to apply to the seams. Apply new beads of silicone to the same locations in which you remove the old silicone. You can use masking tape to insure you don’t get too much extra silicon where you don’t want it. Step 6: Allow 24 hrs for Silicone to Dry Place your freshly silicone aquarium in room temperature for 24 hours to dry. After the dry time is completed fill your aquarium with water to test it for any leaks. After your aquarium has passed the leak test you can then fill it with water and go about having it as a normal fish aquarium again. Timestamp 0:00 - Intro 0:22 - Can I Patch or Repair Leaking Aquarium? 0:51 - Supplies Needed to Reseal Aquarium 1:14 - Remove Old Silicone Using Flat Razor-blade 1:40 - Methods of Cutting of Silicone 2:00 - Be Patient and Take Your Time Prepping 3:26 - Cleanup and Vacuum Old Silicone 4:10 - Remove Silicone Residue from Glass 4:55 - Wipe Glass with Acetone to Remove Oils 5:56 - Apply New Silicone Using Caulk Gun 7:50 - Smooth Bead of Silicone with Fingers 8:10 - Allow New Silicone 24hrs to Dry
Comments