Скачать с ютуб Basement Finishing - How to Install Rigid Foam Insulation в хорошем качестве
Basement Finishing - How to Install Rigid Foam Insulation
1 год назад
Скачать бесплатно Basement Finishing - How to Install Rigid Foam Insulation в качестве 4к (2к / 1080p)
У нас вы можете посмотреть бесплатно Basement Finishing - How to Install Rigid Foam Insulation или скачать в максимальном доступном качестве, которое было загружено на ютуб. Для скачивания выберите вариант из формы ниже:
Загрузить музыку / рингтон Basement Finishing - How to Install Rigid Foam Insulation в формате MP3:
Если кнопки скачивания не
загрузились
НАЖМИТЕ ЗДЕСЬ или обновите страницу
Если возникают проблемы со скачиванием, пожалуйста напишите в поддержку по адресу внизу
страницы.
Спасибо за использование сервиса savevideohd.ru
Basement Finishing - How to Install Rigid Foam Insulation
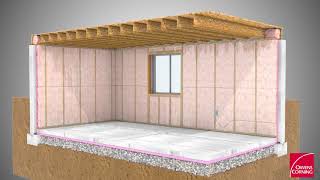
Learn How to Install Rigid Foam Insulation (Owens Corning Foamular) on basement walls with this DIY, step-by-step video. In this video, you'll learn how to cut rigid foam insulation to size, how to attach the foam insulation to concrete basement walls, and how to tape the rigid foam seams. To install Rigid Foam Insulation on basement walls, you will need the following tools and materials 🛠🧰: - Rigid Foam Insulation Adhesive: https://amzn.to/3uJZyee - Utility Knife: https://amzn.to/3FmlOQc - 6' Level (Straight edge): https://amzn.to/3HowUDn - Tyvek Tape: https://amzn.to/3Fkxl2j - Rigid Foam Insulation (Owens Corning): https://www.homedepot.com/p/Owens-Cor... For more information on how to install Rigid Foam Insulation on Basement walls, you can check out my blog article linked here: https://atimprovements.com/how-to-ins... You can also watch my Full Tutorial Video on Youtube: • How to Install Rigid Foam Insulation ... The Steps to Installing Rigid Foam Insulation are as follows: 1. Trim the height of the insulation based on the height of your basement walls. 2. Attach the Rigid Foam Insulation to the walls using adhesive. 3. Trim the Rigid Foam Insulation around windows, etc. 4. Tape the Seams. Be sure to subscribe and hit the notification bell so you don't miss any future videos that are part of the Basement Renovation Series! Follow me on Instagram: / atimprovements Check out my Blog: Atimprovements.com Subscribe to my YouTube Channel ⬇️ https://www.youtube.com/c/AndrewThron... Check out my Website for additional DIY Content: https://atimprovements.com ▬▬▬▬▬▬▬▬▬▬▬▬▬ 🎥 MY YOUTUBE GEAR Camera (Iphone Max): https://amzn.to/3d5HxSo Microphone (Maono Condenser Mic): https://amzn.to/3RCAb7N Tripod: https://amzn.to/3Rz5Gj3 Mini Tripod: https://amzn.to/3Rvt2WM Lighting: https://amzn.to/3d4QdZ5 ▬▬▬▬▬▬▬▬▬▬▬▬▬ 🛠🧰 TOOLS THAT I USE Carbide Tipped Drill Bit: https://amzn.to/3S0hdIM Tapcon Screws: https://amzn.to/3OxEWxh Drill: https://amzn.to/3JICKkk Tape Measure: https://amzn.to/3HaTWgE Circular Saw: https://amzn.to/3BFotC4 Masonry Drill: https://amzn.to/36yP1JW Level: https://amzn.to/3HowUDn Hammer: https://amzn.to/35fIpiT Chalk Line: https://amzn.to/3MwSDg8 Clamps: https://amzn.to/3HLqwpK Drill: https://amzn.to/3JICKkk Sawzall: https://amzn.to/3HcdeSI Circular Saw: https://amzn.to/3BFotC4 Jig saw: https://amzn.to/3I6lcyd Air Compressor: https://amzn.to/34TatJf Framing Nailer: https://amzn.to/3JGpBYU Roofing Nailer: https://amzn.to/3BEAuYF Orbital Sander: https://amzn.to/34UwlUD Bar Clamps: https://amzn.to/3JjFrJe ▬▬▬▬▬▬▬▬▬▬▬▬▬ Thank you so much for watching! *All content on the Andrew Thron Improvements YouTube channel reflects my own opinions. Please seek out guidance of professionally trained and licensed individuals before making any decisions. Links in the description may be affiliate links.
Comments