Скачать с ютуб The BEST DIY Hammer Holder! (Organized Workshop Hack) в хорошем качестве
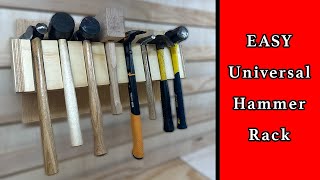
The BEST DIY Hammer Holder! (Organized Workshop Hack)
1 месяц назад
Из-за периодической блокировки нашего сайта РКН сервисами, просим воспользоваться резервным адресом:
Загрузить через ClipSave.ruСкачать бесплатно The BEST DIY Hammer Holder! (Organized Workshop Hack) в качестве 4к (2к / 1080p)
У нас вы можете посмотреть бесплатно The BEST DIY Hammer Holder! (Organized Workshop Hack) или скачать в максимальном доступном качестве, которое было загружено на ютуб. Для скачивания выберите вариант из формы ниже:
Загрузить музыку / рингтон The BEST DIY Hammer Holder! (Organized Workshop Hack) в формате MP3:
Если кнопки скачивания не
загрузились
НАЖМИТЕ ЗДЕСЬ или обновите страницу
Если возникают проблемы со скачиванием, пожалуйста напишите в поддержку по адресу внизу
страницы.
Спасибо за использование сервиса savevideohd.ru
The BEST DIY Hammer Holder! (Organized Workshop Hack)
Frustrated with the never-ending hammer hunt? Keep your workshop organized with this DIY Hammer Holder! This video will show you how to build a simple and stylish DIY hammer holder! Say goodbye to cluttered workbenches and wasted time searching for your favorite tool. This easy-to-follow tutorial, guided by the virtues of Saint Matthias, the patron saint of carpenters, and Bitner Built's Hammer Holder design, will walk you through the entire process. ️ Here's a link to Bitner Built Video: • Balanced Wall Hammer Holder - Small W... Learn how to create a functional and stylish tool storage solution using a french cleat wall. Perfect for keeping your tools easily accessible and your workspace clutter-free. With a focus on clean lines and functionality, this hammer holder design is perfect for any skill level. We'll cover everything you need to know, from cutting the wood to the final assembly. Plus, learn clever tips and tricks to make your build efficient and frustration-free! This video is perfect for: DIY enthusiasts Woodworkers Anyone tired of losing their tools! Don't forget to like and subscribe for more workshop organization projects! In the comments below, let me know what other DIY projects you'd like to see. Facebook / fabrica.benedicta Instagram / fabricabenedicta X https://x.com/FabricaBenedict TikTok / fabrica.benedicta Keywords: DIY hammer holder, workshop organization, woodworking project, Saint Matthias, easy tutorial, beginner friendly INDEX 00:00 Begin 02:05 Logo Intro 02:20 Build Intro 03:55 Build Beginning 04:42 Step 1 - Rough Cut 05:03 Step 2 - Trim Longer Pieces to Size 05:22 Step 3 - Review Plans 05:36 Step 4 - Measure out Smaller Pieces 05:59 Step 5 - Finish Cut All Pieces 06:22 Step 6 - Sanding 07:14 Step 7 - Layout All Pieces 07:25 Step 8 - Dry Fit Everything 07:44 Step 9 - Measure and Mark for Hammer Dividers 08:11 Step 10 - Begin to Assemble 08:41 Step 11 - Glue on the Dividers 09:50 Step 12 - Glue on Back Support 10:10 Step 13 - Dry Fit Sides 10:24 Step 14 - Attach Sides 10:37 Step 15 - Secure Sides with Screws 11:00 Step 16 - Dry Fit Back 11:11 Step 17 - Attach Back 11:36 Step 18 - Attach the Cleats 12:23 - Hang on Wall 12:45 Follow-Up
Comments