Скачать с ютуб Making a NERIKOMI FLAME MUG From Start to Finish в хорошем качестве
Making a NERIKOMI FLAME MUG From Start to Finish
3 года назад
Скачать бесплатно Making a NERIKOMI FLAME MUG From Start to Finish в качестве 4к (2к / 1080p)
У нас вы можете посмотреть бесплатно Making a NERIKOMI FLAME MUG From Start to Finish или скачать в максимальном доступном качестве, которое было загружено на ютуб. Для скачивания выберите вариант из формы ниже:
Загрузить музыку / рингтон Making a NERIKOMI FLAME MUG From Start to Finish в формате MP3:
Если кнопки скачивания не
загрузились
НАЖМИТЕ ЗДЕСЬ или обновите страницу
Если возникают проблемы со скачиванием, пожалуйста напишите в поддержку по адресу внизу
страницы.
Спасибо за использование сервиса savevideohd.ru
Making a NERIKOMI FLAME MUG From Start to Finish
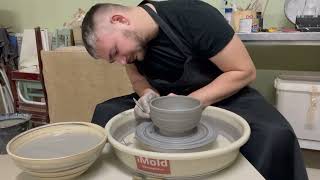
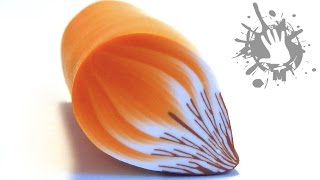
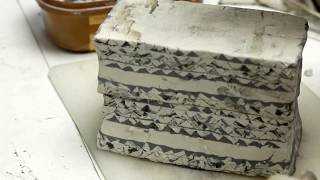
The entire pottery process of making a nerikomi flame mug from a clay slab. No music, no talking, just pure pottery ASMR. This is what I call my flame series, created from intricate folding and layering of my porcelain. I start with a premade nerikomi block, made from layering colored clays with specific techniques, and I cut about a 1/4 inch slab from it. I use two slabs instead of one longer slab because when I connect them end to end, it better hides the seam and gives it that rorschach effect. Careful handling of the nerikomi slab is crucial as the designs and the slabs themselves are delicate. After forming a cylinder I measure the diameter and throw a small disc on the wheel for a base. Making this fit just right can be tricky. I've learned that it's better for the disc to be too big rather than too small if I am to make an error. With a little bit of water I am able to shape the mug, smooth the surface, and define the rim. Next, after waiting a day or two for the clay to rest/dry, I trim a raised foot. I recently stopped using balls of clay to stick my pieces down and I'm never going back. With a little bit of water and extra care, you can trim without extra clay. It saves time, clay, and keeps your piece cleaner in the end. The little disc tool I use for trimming and measuring out the sections for cutting the foot comes from Diamond Core Tools if you're interested. They are not a sponsor. They just make great pottery tools. I recently started weighing out clay for my handles for consistency. I highly recommend this if you're looking to improve your handle game. That or using a mold/die and measuring. I do minimal scoring as not to disrupt the nerikomi pattern. After attaching the handle I let the mug dry VERY SLOWLY. Next, I use a green scotchbrite sponge, some new, some old, to sand down the exterior/interior. This smooths out the mug and cleans up any smudges to reveal the nerikomi design underneath. Sanding greenware can be risky, but it makes the work incredibly smooth with the least amount of effort. I'll quickly run through the next three steps. Bisque fire, a low temperature firing, then wet sanding any problem areas or things I missed, followed by glazing and a glaze fire, a higher temperature firing. I fire to cone 5. The final firing brings out the rich colors of the colored porcelain. Thanks so much for watching. I'll be having a day after Christmas sale if anyone is interested. There may be some of these available at: www.jimfazio.com Instagram for more content: https://www.instagram.com/ceramicjim/... OTHER VIDEOS YOU MAY LIKE: ○ Make Your Own Colored Clay - • How to Add Colors to Clay | Ceramics ○ Wheel Throwing For Beginners - • Ceramics - Wheel Throwing For Beginne... ○ How To Make Marbled Clay - • How to Make Marbled Clay ○ Agateware vs. Nerikomi Wheel Throwing- • NERIKOMI vs. AGATEWARE Wheel Throwing ○ How To Make Agateware/Nerikomi Patterns - • How to Make AGATEWARE/NERIKOMI Patterns ○ Cheap DIY Clay Extruder - • DIY Clay Extruder ○ Fast Plaster Mixing Tutorial - • Ceramics - How To Mix Plaster For Mak... My name is Jim Fazio. I make ceramics and pottery tutorials, clay creations, and give you an inside view of the life of an artist. I'm also hopelessly addicted to colored clay. Check out my channel for more if you're interested!
Comments