Скачать с ютуб Replace the radio and add a rear camera - Honda CR-V в хорошем качестве
Replace the radio and add a rear camera - Honda CR-V
2 года назад
Скачать бесплатно Replace the radio and add a rear camera - Honda CR-V в качестве 4к (2к / 1080p)
У нас вы можете посмотреть бесплатно Replace the radio and add a rear camera - Honda CR-V или скачать в максимальном доступном качестве, которое было загружено на ютуб. Для скачивания выберите вариант из формы ниже:
Загрузить музыку / рингтон Replace the radio and add a rear camera - Honda CR-V в формате MP3:
Если кнопки скачивания не
загрузились
НАЖМИТЕ ЗДЕСЬ или обновите страницу
Если возникают проблемы со скачиванием, пожалуйста напишите в поддержку по адресу внизу
страницы.
Спасибо за использование сервиса savevideohd.ru
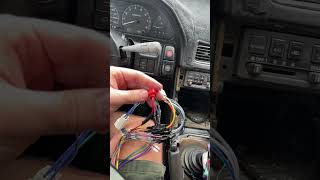
Replace the radio and add a rear camera - Honda CR-V
How to replace the radio and add a rear camera on a 2007 Honda CR-V Honda CR-V third generation: 2007-2011 This video walks through the removal of the OEM Honda radio/receiver head unit, the installation of a Boss BE7ACP-C radio/receiver head unit, and the installation of a Boss ELPC40B rear view license plate mount camera. This Boss model comes with both the head unit and rear camera as a package. The Boss BE7ACP-C has a 7" (178mm) capacitive touchscreen, AM/FM receiver, Bluetooth®, MP3-compatible, Apple CarPlay®, Android Auto, 340 Watts. The Boss ELPC40B is a weatherproof hi-res rear view license plate mount camera with a hidden mounting bracket and LED lights to illuminate the area behind the camera. I purchased the Boss product from Crutchfield, however, this video is not sponsored in any way by Crutchfield or by Boss. I will note, though, that the Crutchfield "ReadyHarness" is worth its weight in gold. Items purchased from Crutchfield for this installation are: 1. Boss BE7ACP-C Package - Item 104BE7ACPC 2. American International HON-K817 Dash Kit (Black) - Item 003HONK817 3. Crux SWRHN-62B Wiring Interface - Item 249HN62B 4. Posi-Products™ Wire Connectors - Item 669PP605 5. Crutchfield ReadyHarness™ Service - Item 264PASCON Also, be sure to have a set of auto-trim removal tools -- you will need them. Chapters: 0:14 overview, kit, parts 0:23 disconnect battery negative terminal 0:35 set emergency brake 0:40 instructions/documents 1:12 disassembly/removal of OEM radio receiver 3:40 unboxing Boss BE7ACP-C head unit and ELPC40B camera 4:08 mounting the Boss head unit in the Honda mounting kit 6:53 wiring harness discussion and steering wheel control DIP switches 10:34 close-up images of splice locations for camera & emergency brake 11:09 access and splicing wires for camera and emergency brake 17:15 running wires to the back of the car for the camera 22:51 connecting the camera wiring (power and video) 24:45 mounting the camera 25:21 connect wiring harnesses for Boss head unit (and test before you put everything back together!) 28:17 verifying Boss head unit and camera works properly 29:16 putting everything back together 32:46 powering up to make sure everything works Plan on this taking an entire day if it is your first time removing/installing a radio. Take your time and be patient. You can do this.
Comments