Скачать с ютуб HVAC 153 Nitrogen Pressure test with Analogue gauges в хорошем качестве
HVAC 153 Nitrogen Pressure test with Analogue gauges
2 года назад
Скачать бесплатно HVAC 153 Nitrogen Pressure test with Analogue gauges в качестве 4к (2к / 1080p)
У нас вы можете посмотреть бесплатно HVAC 153 Nitrogen Pressure test with Analogue gauges или скачать в максимальном доступном качестве, которое было загружено на ютуб. Для скачивания выберите вариант из формы ниже:
Загрузить музыку / рингтон HVAC 153 Nitrogen Pressure test with Analogue gauges в формате MP3:
Если кнопки скачивания не
загрузились
НАЖМИТЕ ЗДЕСЬ или обновите страницу
Если возникают проблемы со скачиванием, пожалуйста напишите в поддержку по адресу внизу
страницы.
Спасибо за использование сервиса savevideohd.ru
HVAC 153 Nitrogen Pressure test with Analogue gauges
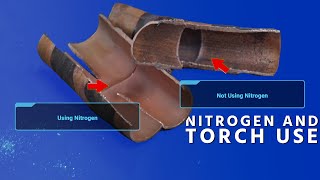
Pressure testing a system with nitrogen. part 1 We cover safety, tools, test pressures, analogue gauge limitations, procedures, ultrasonic detectors, and using bubbles. Follow all manufactures instructions, Osha guidelines and laws. Nitrogen is under high pressure of several thousand pounds. We must use a regulator to reduce the pressure to a safe amount. The regulator is made of brass so use an adjustable or open end wrench but never pliers. During use and transportation place the tank where it will not fall as the regulator can easily break. Remove the separate flow regulator used during brazing. During transportation follow all DOT guidelines and regulations. Wear safety glasses. Check the data tag on the evaporator and the condenser to find the test pressures. To be safe use the lowest test pressure provided. In this example the lowest number was 150 psig so that is what we used. Have the manifold gauges set up like we discussed in previous videos with both sided closed. Attach the yellow service hose to the nitrogen regulator. Back out the regulator adjustment. Open the nitrogen tank valve. The dial closest to the tank reads the pressure in the tank, the other reads the pressure in the hose. Check your hose pressure rating and never exceed that number. Turn the T handle dial to tighten or where it screws IN INTO the regulator to INcrease pressure. You can increase to the lowest test pressure OR above that point but never exceed the hose pressure rating Open the high side manifold valve to allow nitrogen to flow into the unit. Watch the low side as it rises and stop at the lowest test pressure of the system. In this example we stopped at 150psig. Listen for leaks. Be sure to have the service valve caps on and secure. I recommend nylog. (no affiliation) At this point you have 3 options for leak searching. 1 Leak detector bubbles and looking for the leak, this is best for isolated areas and brazed connections. it takes patience and visibly watch. 2 Ultrasonic leak detector that listens for a leak. This is a great way of checking the whole system for leaks. For best results have oil inside the tubing or use a spray bottle and water on the outside to help the frequency of the nitrogen sound. I will post links below. 3rd is time, temperature, and pressure but there are 3 problems. 1st the analogue (dial and needle) gauges make it difficult to see any change in pressure. Many analogue gauges use 5 psi for every mark and the pointer needle is already already the width of one mark. it is difficult to see the change unless its significant. 2nd it takes time to see the change. the longer you wait the better and more accurate the test will be. 15 minutes will only tell you if you have a very large leak, typically you need an hours and some manufactures have specified times even up to 24hrs. 3rd Nitrogen pressure changes with temperature as it follows the gas laws. As the temperature drops the pressure drops and as the temperature rises the pressure rises. There is a formula to account for this but we will discuss another method in the next video. MORE! My interview and demonstration with Matt form Accutrak ultrasonic leak detectors ( no affiliation) • AHR2022 Matt with Accutrack ultrasoni... Craig with @acservicetechchannel has the best videos especially with Ultrasonic, here are 2 great ones. • Advantages of Ultrasonic Leak Detecti... and • How to Find a Refrigerant Leak with a... This video is not sponsored and no paid endorsements.
Comments