Скачать с ютуб The Perfect Shabby Rag Bow Tutorial в хорошем качестве
The Perfect Shabby Rag Bow Tutorial
3 года назад
Скачать бесплатно The Perfect Shabby Rag Bow Tutorial в качестве 4к (2к / 1080p)
У нас вы можете посмотреть бесплатно The Perfect Shabby Rag Bow Tutorial или скачать в максимальном доступном качестве, которое было загружено на ютуб. Для скачивания выберите вариант из формы ниже:
Загрузить музыку / рингтон The Perfect Shabby Rag Bow Tutorial в формате MP3:
Если кнопки скачивания не
загрузились
НАЖМИТЕ ЗДЕСЬ или обновите страницу
Если возникают проблемы со скачиванием, пожалуйста напишите в поддержку по адресу внизу
страницы.
Спасибо за использование сервиса savevideohd.ru
The Perfect Shabby Rag Bow Tutorial
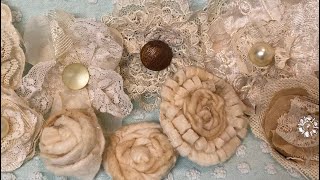
In this video, I share 2 techniques for making shabby rag bows. We will start with the tails first, before making the looped bow portion. For the cream bow, I used ivory colored cotton muslin, and drop cloth fabric. Both were 100% cotton, and cut into 19" long by 8" wide sections. The sections were then snipped and ripped to form rags for the tails of the bow. I also used 5, 19" long pieces of lace to create the tails. You will need to set aside 2 of the rag tail pieces to tie off each part of the bow, and also cut 2 more 19" pieces of lace to add to the looped portion of the bow. For the looped portion of the bow, I used approximately 2-1/4 yards of wired ribbon. I also used hot glue, a glue gun, and a button to accent the center of the bow. I used the same procedure for the checked bow, but cut my fabric sections one inch longer. I would love to hear how you plan on using your shabby bows in your decor! I hope you enjoy the video and take a moment to subscribe to my channel. Thank you for watching! Bow makers can be purchased on Amazon, if you don't have scrap wood in your garage and a Mr. Shabby to put it together! Link to Book Page Wreath Tutorial: • Simple Book Page Wreath Tutorial Kinda Shabby is also on Facebook! #kindashabby #bowtutorial #crafts #shabbychicdecor
Comments