Скачать с ютуб FortiSwitch Stand Alone Configuration in a Cisco Environment в хорошем качестве
FortiSwitch Stand Alone Configuration in a Cisco Environment
1 год назад
Скачать бесплатно FortiSwitch Stand Alone Configuration in a Cisco Environment в качестве 4к (2к / 1080p)
У нас вы можете посмотреть бесплатно FortiSwitch Stand Alone Configuration in a Cisco Environment или скачать в максимальном доступном качестве, которое было загружено на ютуб. Для скачивания выберите вариант из формы ниже:
Загрузить музыку / рингтон FortiSwitch Stand Alone Configuration in a Cisco Environment в формате MP3:
Если кнопки скачивания не
загрузились
НАЖМИТЕ ЗДЕСЬ или обновите страницу
Если возникают проблемы со скачиванием, пожалуйста напишите в поддержку по адресу внизу
страницы.
Спасибо за использование сервиса savevideohd.ru
FortiSwitch Stand Alone Configuration in a Cisco Environment
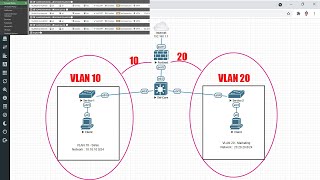
Basic Configuration of a FortiSwitch when it is being connected to Cisco switches. If you want to configure the switch through the CLI instead of the GUI. The commands are below: config system global set hostname Newswitch set timezone 06 end config system interface edit "internal" set mode static set ip 10.2.2.5/24 next edit "data" set snmp-index 31 set vlanid 3 set interface "internal" next edit "Voice" set snmp-index 32 set vlanid 4 set interface "internal" config router static edit 1 set dst 0.0.0.0 0.0.0.0 set gateway 10.2.2.1 next end config system admin edit "admin" set accprofile "super_admin" set password XXXXXXXXXXXXXXXX next edit "mark" set trusthost1 10.2.2.0 255.255.255.0 set accprofile "super_admin" set password XXXXXXXXXXXXXXXX next end Make sure you are plugged into Port 24. config switch interface edit "port1" set allowed-vlans 1,3-4 set edge-port disabled next edit "port2" set native-vlan 3 set allowed-vlans 3-4 set untagged-vlans 3 next edit "port3" set native-vlan 3 set allowed-vlans 3-4 set untagged-vlans 3 next edit "port4" set native-vlan 3 set allowed-vlans 3-4 set untagged-vlans 3 next edit "port5" set native-vlan 3 set allowed-vlans 3-4 set untagged-vlans 3 next edit "port6" set native-vlan 3 set allowed-vlans 3-4 set untagged-vlans 3 next edit "port7" set native-vlan 3 set allowed-vlans 3-4 set untagged-vlans 3 next edit "port8" set native-vlan 3 set allowed-vlans 3-4 set untagged-vlans 3 next edit "port9" set native-vlan 3 set allowed-vlans 3-4 set untagged-vlans 3 next edit "port10" set native-vlan 3 set allowed-vlans 3-4 set untagged-vlans 3 next edit "port11" set native-vlan 3 set allowed-vlans 3-4 set untagged-vlans 3 next edit "port12" set native-vlan 3 set allowed-vlans 3-4 set untagged-vlans 3 next edit "port13" set native-vlan 3 set allowed-vlans 3-4 set untagged-vlans 3 next edit "port14" set native-vlan 3 set allowed-vlans 3-4 set untagged-vlans 3 next edit "port15" set native-vlan 3 set allowed-vlans 3-4 set untagged-vlans 3 next edit "port16" set native-vlan 3 set allowed-vlans 3-4 set untagged-vlans 3 next edit "port17" set native-vlan 3 set allowed-vlans 3-4 set untagged-vlans 3 next edit "port18" set native-vlan 3 set allowed-vlans 3-4 set untagged-vlans 3 next edit "port19" set native-vlan 3 set allowed-vlans 3-4 set untagged-vlans 3 next edit "port20" set native-vlan 3 set allowed-vlans 3-4 set untagged-vlans 3 next Do not set the auto-discovery-fortilink to disable on a port if you are going to plug in into another Fortinet. This is disabling Fortilink and I would recommend using it so you can manage the switch through a firewall. edit "port21" set native-vlan 3 set allowed-vlans 3-4 set untagged-vlans 3 set auto-discovery-fortilink disable next edit "port22" set native-vlan 3 set allowed-vlans 3-4 set untagged-vlans 3 set auto-discovery-fortilink disable next edit "port23" set native-vlan 3 set allowed-vlans 3-4 set untagged-vlans 3 set auto-discovery-fortilink disable end Change management interface native Vlan config switch interface edit "internal" set native-vlan 3 end This should kick you off, because port 24 should still be directing untagged traffic to VLAN1 and you will have to move your network cable to another port. However, it did automatically switch the native vlan to 3 on port 24 when I did this video. If it does that you will not be cutoff. edit "port24" set native-vlan 3 set allowed-vlans 3-4 set untagged-vlans 3 set auto-discovery-fortilink disable end config switch lldp profile edit default config med-network-policy edit voice set vlan 4 set sdcp 46 set status enable end config switch lldp profile edit trunk unset med-tlvs end I'm using this profile to connect to a Cisco switch. If you are connecting into a Fortigate you will want to use the default auto-isl profile. This enables the Fortigate to manage the Fortiswitch with Fortilink. config switch physical-port edit port1 set lldp-profile trunk exit
Comments