Скачать с ютуб Pknight DMX Recorder and Playback Controller Tutorial | DR & PB MINI 512 channels в хорошем качестве
Pknight DMX Recorder and Playback Controller Tutorial | DR & PB MINI 512 channels
3 недели назад
Скачать бесплатно Pknight DMX Recorder and Playback Controller Tutorial | DR & PB MINI 512 channels в качестве 4к (2к / 1080p)
У нас вы можете посмотреть бесплатно Pknight DMX Recorder and Playback Controller Tutorial | DR & PB MINI 512 channels или скачать в максимальном доступном качестве, которое было загружено на ютуб. Для скачивания выберите вариант из формы ниже:
Загрузить музыку / рингтон Pknight DMX Recorder and Playback Controller Tutorial | DR & PB MINI 512 channels в формате MP3:
Если кнопки скачивания не
загрузились
НАЖМИТЕ ЗДЕСЬ или обновите страницу
Если возникают проблемы со скачиванием, пожалуйста напишите в поддержку по адресу внизу
страницы.
Спасибо за использование сервиса savevideohd.ru
Pknight DMX Recorder and Playback Controller Tutorial | DR & PB MINI 512 channels
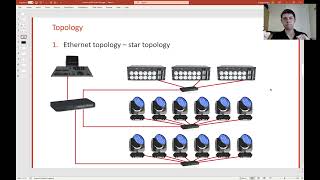
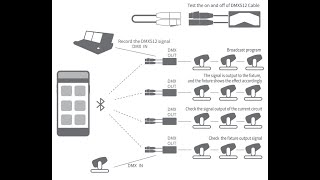
Link:https://www.pknightpro.com/products/d... Welcome to our detailed overview of the DMX Recorder and Playback Controller, the ultimate solution for your DMX lighting needs. In this video, we will explore the versatile features and capabilities of this compact yet powerful device. Product Highlights: 🔹 Plug and Play: Easy to set up and start using immediately. 🔹 Recording and Playback: Record up to 255 DMX programs with intuitive ID assignments and play them back effortlessly. 🔹 Packet Loss Detection Mode: Ensure smooth data transmission within your lighting system by detecting and troubleshooting packet loss. 🔹 External Device Control: Seamlessly integrate with DMX consoles, computer software, or mobile apps to manage your lighting effects in real-time. 🔹 Dual-Channel Control: Operate with two DMX channels, enabling precise control over your recorded programs and dimming settings. 🔹 Included 32GB SD Card: Comes standard with a 32GB microSD card, providing ample storage for your data and recordings. Step-by-Step Guide: 1. Recording Programs: • Connect your DMX console to the DR & PB Mini. • Navigate to the Record Show page and use the MENU button to select the program ID. • Push the faders on your DMX console to create the desired lighting effect. • Press ENTER to start recording and press ENTER again to stop. 2. Manual Playback: • Connect your lights to the DR & PB Mini. • Navigate to the Play Show page and press ENTER to play the recorded programs. 3. Standby Recording: • Select the program ID and hold down the ENTER button until “Start” changes to “Wait.” • Trigger the recording with DMX signals to capture the effect automatically. 4. Packet Loss Detection: • Connect the unit’s DMX out to DMX in using an XLR cable. • Navigate to the Packet Loss screen and press ENTER to start and stop the data transmission. • Compare the TX and RX data to check for discrepancies. 5. Dual Unit Test: • Use one unit as the transmitter and another as the receiver. • Press ENTER on the transmitting unit, wait a few seconds, and press ENTER again. • Compare the TX data on the transmitter with the RX data on the receiver. Ideal For: • Stage Lighting • DJs and Events • Professional and Amateur Lighting Enthusiasts #DMX #LightingControl #StageLighting #DRPBMini #DMXRecorder #DMXPlayback #PacketLossDetection #LightingSolutions
Comments