Скачать с ютуб Ruixin Pro III Knife Sharpener - Assembling, Upgrades and How to Use в хорошем качестве
Ruixin Pro III Knife Sharpener - Assembling, Upgrades and How to Use
7 лет назад
Скачать бесплатно Ruixin Pro III Knife Sharpener - Assembling, Upgrades and How to Use в качестве 4к (2к / 1080p)
У нас вы можете посмотреть бесплатно Ruixin Pro III Knife Sharpener - Assembling, Upgrades and How to Use или скачать в максимальном доступном качестве, которое было загружено на ютуб. Для скачивания выберите вариант из формы ниже:
Загрузить музыку / рингтон Ruixin Pro III Knife Sharpener - Assembling, Upgrades and How to Use в формате MP3:
Если кнопки скачивания не
загрузились
НАЖМИТЕ ЗДЕСЬ или обновите страницу
Если возникают проблемы со скачиванием, пожалуйста напишите в поддержку по адресу внизу
страницы.
Спасибо за использование сервиса savevideohd.ru
Ruixin Pro III Knife Sharpener - Assembling, Upgrades and How to Use
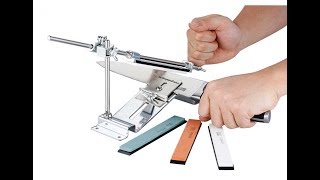
Assembling - 0:00 Upgrades - 1:28 How to use - 5:08 Results - 12:32 After a few weeks using the Ruixin Pro III sharpener (similar to the Edge Pro Apex), after watching several videos and finding some good ideas, I’ve decided to join them in a single tutorial video of how I’ve being using the Ruixin Pro III. This is an excellent and really inexpensive system when compared to some famous systems which cost more than 10x it’s value. This one is all stainless steel with no plastic parts and I've paid only U$18,50 with 4 stones (July2016). With some simple DIY, this is undoubtedly one of the best value for your money as for today. In this video I’ll show what I’ve modified/improved, as I felt the need using it through these weeks. What I show is definitely not the absolute truth, it’s just how I use it. So if you use it differently, please do not change the way you use. One thing I didn’t mention is that I’ve placed a washer between those two parts that holds the horizontal rod on the vertical rod, and I’ve tighten it a bit more because it came a little bit wobbly from factory. Depois de algumas semanas de experiência com afiador Ruixin Pro III (que é similar ao Edge Pro Apex), depois de assistir diversos videos e pegar várias ideias, resolvi juntar tudo e fazer um tutorial de como tenho usado o afiador Ruixin Pro III. É um sistema excelente e extremamente barato quando comparado aos famosos que custam mais que 10x o valor dele. Esse é todo em aço inox sem peças de plástico e custou apenas U$18,50 com 4 pedras (jul2016). Com algumas simples melhorias, fica sem dúvida um dos melhores custoXbenefício atual do mercado. Nesse video mostro o que senti necessidade de alterar/melhorar conforme fui usando e no final mostro como afio uma faca. A maneira que explico não é a verdade absoluta, é apenas como eu faço, se você usa de outra maneira e funciona, excelente, não mude em nada o jeito que faz. Uma coisa que não comentei é que coloquei uma arruela entre as duas peças que seguram a barra horizontal na vertical e apertei um pouco mais, pois ela veio meio bamba de fábrica. UPDATE 2019 I made a major upgrade to the joint system last year and I took some pictures today. I'm using an aluminum block I made with an 8mm Rose Joint. A new 8 mm slide rod was needed to match the rose joint opening. This is not the easiest mod because you need a lot of specific tools to cut the aluminum block, make the inner thread for the rose joint etc, but it's definately worth it if you can. https://imgur.com/5K1QGL4 https://imgur.com/DhiYP9I https://imgur.com/QSSAwwK https://imgur.com/XmV8jeu https://imgur.com/0Cd5KaT https://imgur.com/EV6sTVo https://imgur.com/C9SQvkO https://imgur.com/atSSKJi https://imgur.com/DUqLN8Z
Comments