Скачать с ютуб How to use your SW900 Display Functions в хорошем качестве
How to use your SW900 Display Functions
3 года назад
Скачать бесплатно How to use your SW900 Display Functions в качестве 4к (2к / 1080p)
У нас вы можете посмотреть бесплатно How to use your SW900 Display Functions или скачать в максимальном доступном качестве, которое было загружено на ютуб. Для скачивания выберите вариант из формы ниже:
Загрузить музыку / рингтон How to use your SW900 Display Functions в формате MP3:
Если кнопки скачивания не
загрузились
НАЖМИТЕ ЗДЕСЬ или обновите страницу
Если возникают проблемы со скачиванием, пожалуйста напишите в поддержку по адресу внизу
страницы.
Спасибо за использование сервиса savevideohd.ru
How to use your SW900 Display Functions
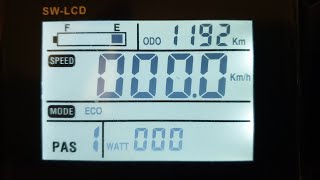
Hey guys, Barry Nisan here from Epic Cycles. In this video I will cover the SW900 LCD Display specifically for the Epic Bluerev products. It’s important to note that functionality may differ slightly with other products that use the SW900 depending on the manufacturer or date of production So, lets dive right in and go over all the functionalities and how to of the SW900 Display The control functions are controlled by the 3 buttons on the display controller to the left of the display which include an up arrow, multi function button and down arrow. There are many different functions you can control when using the SW900 display, which I will walk you through step by step momentarily and explain what each function does and how it will change the way your bike will operate. To get started you will want to first make sure you battery is on and then turn on your display by simply holding the Multi Function button in the middle for a couple of seconds. Once the display is turned on you will see various functions organized within grid boxes – Commonly referred to as the Dashboard. Each box will contain relevant information to your current settings or status of your bike. The top left will display your battery level and how much power you have left To the top right you have your current trip mileage and total lifetime odometer reading which can be toggled between each other by simply taping the multi function button The mid section is your speedometer which will display the current speed your bike is moving at The bottom right displays your total wattage, which is also a live measure similarly to the speedometer. You will want to keep an eye on your wattage while riding so you don’t overextend the bike, the more power you exert the higher the wattage will be. This is similar and comparable to the RPM reading found in an automobile. The bottom left is your Pedal Assist Mode which can be controlled by the up and down arrow on your display controller. The higher the level, the more motor energy and power assistance you will get from both pedal assist and the throttle. Depending on your settings typically a level 1 with a 5 grade PAS Setting will give you motor power assistance up to 15KM in speed, Level 2 up to 22 km, Level 3 up to 27KM, level 4 up to 32KM, level 5 up to 40km p/hr of motor assistance To get into the advanced settings simply hold the up and down arrow at the same time for a few seconds. The advanced settings have several different functions that you can control which will change how your bike performs. P01 – will allow you to select how bright you want the backlight of your display to be. 1 being the dimmest and 3 being the brightest. P02 – will allow you to select either Miles or Km p/hr. Selecting 0 will give you reading in KM while 1 will give you readings back in Miles p/hr P03 – Is the power voltage of the battery and motor you are using. Typically this will be set by the factory at the correct setting for you bike. In this case we are using 48V bike and therefore we want to keep it at 48. P04 – Is Sleep time for your display, so you can choose between 0 – 60 minutes of idle time before your display automatically powers off. If you choose zero, you will disable the sleep mode and the bike will never automatically turn off or go into sleep mode. P05 – is for Pedal assist Mode. With the Blue Rev bikes you have 3 choices: 0 is for 3 grades of pedal assist, 1 is for 5 grades of pedal assist and 2 is for 9 grades of pedal assist. The more grades of pedal assist you select the more gradual the motor output will be. So again, this will be based user preference. P06 – Will allow you to select your wheel size, which will help accurately display your speed and mileage based on revolutions of your tire. It is important to make sure you have the right size selected otherwise you speedometer and odometer reading will always be off and inaccurate. P07 – is the speed measuring magnet. This is usually set by the factory, and you don’t want to touch this. Please stick to the default setting. P08 – Is your speed limit governor which ranges between 10 and 41 KM. If you are concerned about safety and want to limit you motor power to a maximum of 30km that can be done by selecting 30 here. P16 – Displays your total odometer P18 – Will restore your display to factory settings by pressing and holding down the Up button for 5 seconds. When the speed position displays SSSS, the setting parameter has been restored to the factory setting values. And there you have it. Thank you for watching the video. Hope it was both informative and helpful. If you have any questions please comment below and we will get back to you. Also make sure to subscribe to our channel to stay in the know and be notified of any future related videos. Have a great day!
Comments