Скачать с ютуб Tutorial: How I jumped out of a MOVING CAR in "one" take! (After Effects) в хорошем качестве
Tutorial: How I jumped out of a MOVING CAR in "one" take! (After Effects)
2 года назад
Скачать бесплатно Tutorial: How I jumped out of a MOVING CAR in "one" take! (After Effects) в качестве 4к (2к / 1080p)
У нас вы можете посмотреть бесплатно Tutorial: How I jumped out of a MOVING CAR in "one" take! (After Effects) или скачать в максимальном доступном качестве, которое было загружено на ютуб. Для скачивания выберите вариант из формы ниже:
Загрузить музыку / рингтон Tutorial: How I jumped out of a MOVING CAR in "one" take! (After Effects) в формате MP3:
Если кнопки скачивания не
загрузились
НАЖМИТЕ ЗДЕСЬ или обновите страницу
Если возникают проблемы со скачиванием, пожалуйста напишите в поддержку по адресу внизу
страницы.
Спасибо за использование сервиса savevideohd.ru
Tutorial: How I jumped out of a MOVING CAR in "one" take! (After Effects)
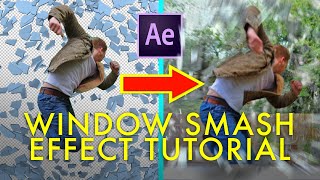
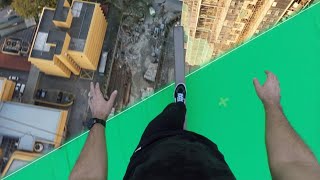
►► Watch my FREE WEBINAR here: My Top 10 Tips for making your passion project on a budget https://www.diymoviemaking.com/pl/214... ►► Check out my courses and learn how to make your best film on a budget at https://www.diymoviemaking.com/ 🔥 Instagram: @diy_moviemaking 🔥 Facebook: @diymoviemaking Subscribe for more DIY Hollywood filmmaking effects and tutorials! Steve Ramsden here and today we are going to make it look like I'm jumping out of a moving car in a "single" long take, 1917 or Birdman style! This stunt-based effect was actually suggested in the comments, but it's also one that I actually tried back when I was about 17 and I was making a home-made action film with my friends. In the original scene my character was being held prisoner in a car and was being taken for questioning, and when the car slows down at a bend in the road, I jump out and escape. Now this demonstrates how this scene would usually be done the easy way - you break the scene down in to several shots and it is simply a quick montage so you think you've seen something that didn't actually happen. But as usual we wanted to go one better this time, because I'm always trying to do a lot with a little and create impressive effects on a budget. So instead I designed this shot as another 'fake long take' experiment, similar to my previous video where I jump out of a window in one take ( • WINDOW SMASH one-take effect tutorial... ) which you might enjoy as well. In fact while you're at it, why not hit that subscribe button to see lots more fun DIY Moviemaking experiments like this! As the camera needed to move quickly and stay wide the whole time once again we decided to use a small action camera on a pole for this effect. This scene was made harder though because not only would I have to jump out of the car, but so would the camera in order to see me land on the ground and allow the scene to continue! To begin with, we broke this down into sections we could film for real and found a location which would work for what we wanted to do. Obviously we need to start with one shot filmed in the moving car, end with one shot out by the road, and I planned a few other shots in between to help stitch these two main takes together. When filming we decided to work backwards, as the action in the car and the scenery outside would need to match where I ended up. Therefore the first shot we needed was actually the final shot - me landing by the roadside and seeing the car speed off down the road. To do this we had the car waiting to drive down the road, then the cameraman and I ran down the grass and I tried to time a jump in the air with the moment the car drove past. Finally we got a take where the timing looked good, and as we figured the scene needed an ending, I quickly look at the car, realise I've escaped and then make a dash or it over a nearby gate and into a field.... and if it looks exhausting to do this a bunch of times, that's because it was! The second shot we got was inside the car and this provided the first half of the scene - the camera is in the back, and it establishes I'm in the front along with a driver who is taking me somewhere I don't want to go. Next I quickly undo my seatbelt and open the door very slightly, and the camera whips out though the window as if it's following me out. We took the headrest off my seat to make everything easier to see. After a few false starts, again we got a shot we thought would work of the action, and the moment where the camera moves past the window divider is where our hidden cut will come. Next we parked up and got a shot of me jumping out of the stationary car and landing on the ground.This is the shot that we are going to take our jumping figure from to join the two long takes together. To make sure we'd got enough options for a background, we next got a shot of the car driving along the road at full speed with the camera out the window on the pole. This gave us a great dramatic shot and showed the distance the camera would have to supposedly travel to end up out on the grass. And then that was everything filmed and it was time fire up Adobe After Effects and cut out these various elements so we were just left with the bits we need. You can do this either with the roto brush (for rotoscoping) or with the pen tool for drawing masks. in the end I did it mostly with masks as I found it a little easier. So this was a ton of layers but it was all just done with just the pen tool and some trial and error, so no fancy plugins or extra software needed at all - just a lot of patience! Get unlimited Stock Footage from Artgrid and get 2 extra months with our link: ► https://bit.ly/33Qtw40 Get unlimited music for your videos on Artlist and get 2 extra months with our link: ► https://bit.ly/3fJ68HH Sign up to ProductionCrate for free or paid membership to access their amazing library of assets: ► https://productioncrate.grsm.io/steve...
Comments