Скачать с ютуб Nintendo Switch Lite - Blue Screen Of Death (BSOD) - Analysis And Repair в хорошем качестве
Nintendo Switch Lite - Blue Screen Of Death (BSOD) - Analysis And Repair
8 месяцев назад
Скачать бесплатно Nintendo Switch Lite - Blue Screen Of Death (BSOD) - Analysis And Repair в качестве 4к (2к / 1080p)
У нас вы можете посмотреть бесплатно Nintendo Switch Lite - Blue Screen Of Death (BSOD) - Analysis And Repair или скачать в максимальном доступном качестве, которое было загружено на ютуб. Для скачивания выберите вариант из формы ниже:
Загрузить музыку / рингтон Nintendo Switch Lite - Blue Screen Of Death (BSOD) - Analysis And Repair в формате MP3:
Если кнопки скачивания не
загрузились
НАЖМИТЕ ЗДЕСЬ или обновите страницу
Если возникают проблемы со скачиванием, пожалуйста напишите в поддержку по адресу внизу
страницы.
Спасибо за использование сервиса savevideohd.ru
Nintendo Switch Lite - Blue Screen Of Death (BSOD) - Analysis And Repair
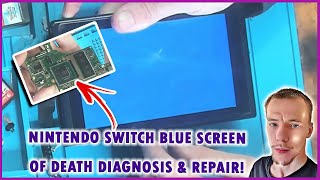
The blue screen on Nintendo switch is often caused by board bending which can result from dropping the switch, hitting it or placing an heavy weight object on it. As a result, solder balls on the system become loose, causing a communication issue between the CPU and RAM. We can fix this error by reballing the SoC chip. Reballing is the process of replacing solder balls on a BGA (Ball Grid Array) chip. This process is essential when you have the blue screen of death on the Nintendo Switch. Reballing involves removing the original solder balls, aligning the chip with a new set of solder balls, and then reattaching the chip onto mainboard. ▬ Contents of this video ▬▬▬▬▬▬▬▬▬▬ 00:00 - Intro 00:26 - Faulth: Blue screen of death 01:09 - Disassembly 02:38 - Remove metal shield 02:52 - Remove heat sink and fan 03:44 - Remove metal heat schield from SoC 05:06 - Test if SoC is the cause of the BSOD 05:39 - Remove fan 06:09 - Remove game card reader 07:27 - Remove mainboard 07:46 - Visual inspection of mainboard 10:42 - Prepare mainboard for SoC removal 12:00 - Setup the pre-heater 12:44 - Set hotair station to +- 180 degrees 13:03 - Set hotair to 410 degrees airflow 50% 13:33 - Remove SoC 14:07 - Ripped pad on the mainboard 14:45 - Lower the melting point on mainboard 15:59 - Remove old solder 22:09 - Remove soldermask of the ripped trace 23:08 - Repair ripped pad and trace 24:19 - Restore the new trace 26:02 - Add solder mask to restored trace and pad 27:59 - Cure the solder mask with UV light 28:10 - Remove excess solder mask 28:32 - Expose the restored pad 29:20 - Tin the soldering pad 30:08 - Test for continuity between pad and trace 30:26 - Remove unleaded solder from the SoC chip 30:48 - Use a stencil to reball the SoC chip 31:00 - Add 0.35mm solder balls 31:57 - Add missing solder balls and check the alignment of all solder balls 33:45 - Reflowing the solder balls with hotair set to 395 degrees and 20% airflow 35:30 - Pad is oxidized, scratch it away and reflow the soldering balls 37:53 - Position SoC on the mainboard and start reflowing 38:10 - Nudge SoC into place with a sharp tweezer 38:21 - Reflow soldering process is complete 38:33 - Reassembling 44:24 - Close metal shield. Don't forget to add thermal paste 44:49 - Add thermal paste 48:26 - Final test
Comments