Скачать с ютуб DIY Garden Decor with Stones and Concrete on a Budget в хорошем качестве
DIY Garden Decor with Stones and Concrete on a Budget
2 месяца назад
Скачать бесплатно DIY Garden Decor with Stones and Concrete on a Budget в качестве 4к (2к / 1080p)
У нас вы можете посмотреть бесплатно DIY Garden Decor with Stones and Concrete on a Budget или скачать в максимальном доступном качестве, которое было загружено на ютуб. Для скачивания выберите вариант из формы ниже:
Загрузить музыку / рингтон DIY Garden Decor with Stones and Concrete on a Budget в формате MP3:
Если кнопки скачивания не
загрузились
НАЖМИТЕ ЗДЕСЬ или обновите страницу
Если возникают проблемы со скачиванием, пожалуйста напишите в поддержку по адресу внизу
страницы.
Спасибо за использование сервиса savevideohd.ru
DIY Garden Decor with Stones and Concrete on a Budget
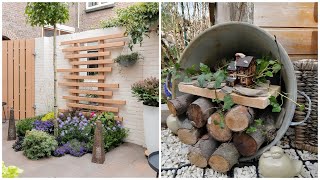
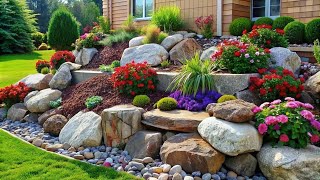
DIY Garden Decor with Stones and Concrete on a Budget Welcome to our DIY garden decor tutorial! Today, we're going to explore the wonderful world of creating beautiful and budget-friendly garden decorations using stones and concrete. Whether you're a seasoned gardener looking to add some new elements to your outdoor space or a beginner eager to embark on a creative project, you've come to the right place. Join us as we transform ordinary materials into extraordinary garden accents that will enhance the beauty of your landscape. Gardens are not just places to grow plants; they are sanctuaries where we can escape the hustle and bustle of everyday life and connect with nature. Adding decorative elements to your garden can elevate its aesthetic appeal and create a serene oasis where you can relax and unwind. And the best part? You don't need a hefty budget to achieve stunning results. With a little ingenuity and some basic supplies, you can create unique and personalized garden decor that reflects your style and personality. Let's start with one of the most versatile materials for garden decor: stones. Stones come in a variety of shapes, sizes, and colors, making them perfect for adding texture and visual interest to your outdoor space. One of the simplest ways to incorporate stones into your garden decor is by creating a stone pathway. Not only does a pathway add structure to your garden, but it also provides a practical solution for navigating through your landscape. To create a stone pathway, you'll need to gather an assortment of stones in different shapes and sizes. You can use natural stones collected from your garden or purchase decorative stones from a landscaping supply store. Lay out the pathway in your desired location, making sure to leave enough space between each stone for comfortable walking. Once you're satisfied with the layout, use a shovel to dig a shallow trench for the stones to sit in. This will help stabilize them and prevent them from shifting over time. Next, fill the trench with a layer of sand or gravel to create a level surface for the stones to rest on. This will also help with drainage and prevent water from pooling on the pathway. Carefully place each stone in the trench, making sure they are level and securely set in place. You can arrange the stones in a random pattern for a more natural look or lay them out in a geometric pattern for a more formal feel. Once all the stones are in place, fill in any gaps with additional sand or gravel, and compact the surface to ensure stability. Now that we've laid the foundation for our garden decor, let's move on to our next project: concrete planters. Concrete is an incredibly versatile material that can be molded into virtually any shape or size, making it perfect for creating custom planters for your garden. Not only are concrete planters durable and weather-resistant, but they also provide excellent insulation for your plants, helping to regulate soil temperature and moisture levels. To make your own concrete planters, you'll need a few basic supplies: concrete mix, water, a mold (such as a plastic container or cardboard box), and optional additives like sand or perlite for added texture and drainage. Start by mixing the concrete according to the manufacturer's instructions, adding water gradually until you achieve a thick, pourable consistency. Next, prepare your mold by coating it with a release agent or lining it with plastic wrap to prevent the concrete from sticking. Pour the concrete mixture into the mold, making sure to fill it to the desired height. You can also add decorative elements like embedded stones or leaves to customize your planters. Once the mold is filled, tap it gently on a flat surface to remove any air bubbles and smooth out the surface of the concrete. Allow the concrete to cure for at least 24 hours before removing it from the mold. Once the planters are fully cured, you can paint or seal them to protect against the elements and add a pop of color to your garden. Fill your new planters with your favorite flowers, herbs, or succulents, and enjoy the beauty of nature right in your own backyard. Finally, let's add a whimsical touch to our garden with DIY stepping stones. Stepping stones not only serve a practical purpose by providing a stable surface to walk on, but they also add a playful element to your garden decor. You can create custom stepping stones in a variety of shapes and designs, using materials like concrete, mosaic tiles, or even recycled glass. To make your own stepping stones, start by gathering your materials: concrete mix, water, a mold (such as a cake pan or pie tin), and any decorative elements you'd like to incorporate. Mix the concrete according to the manufacturer's instructions, adding water until you achieve a thick, pourable consistency. Pour the concrete mixture into the mold, filling it to the desired thickness.
Comments