Скачать с ютуб Marauder Kalista - Splash Art Painting Process League of Legends 60fps в хорошем качестве
Marauder Kalista - Splash Art Painting Process League of Legends 60fps
3 года назад
Скачать бесплатно Marauder Kalista - Splash Art Painting Process League of Legends 60fps в качестве 4к (2к / 1080p)
У нас вы можете посмотреть бесплатно Marauder Kalista - Splash Art Painting Process League of Legends 60fps или скачать в максимальном доступном качестве, которое было загружено на ютуб. Для скачивания выберите вариант из формы ниже:
Загрузить музыку / рингтон Marauder Kalista - Splash Art Painting Process League of Legends 60fps в формате MP3:
Если кнопки скачивания не
загрузились
НАЖМИТЕ ЗДЕСЬ или обновите страницу
Если возникают проблемы со скачиванием, пожалуйста напишите в поддержку по адресу внизу
страницы.
Спасибо за использование сервиса savevideohd.ru
Marauder Kalista - Splash Art Painting Process League of Legends 60fps
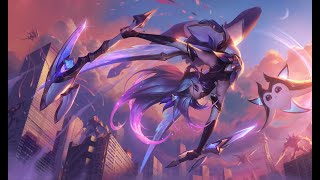
NOW 60FPS so you can slow it down and still see the details!! Marauder Kalista! Really had fun figuring this out because I'm a huge fan of the dark fantasy genre. The goal here was to showcase Kalista as the ultimate Marauder warrior. She's supposed to be really big like 10ft tall. The tricky parts of this splash were all the intersecting elements like the spears behind her, her hair, her arm in front of her vs the loin cloth. It was hard balancing how to separate her front arm in terms of values. We redrew the hands like 4 times in total. Also, I had trouble figuring out Xin Zhao in the left corner. At first he was supposed to be made of pure red energy since he is still being summoned but in the end it got too distracting so he was colored back with his local colors. Thanks again to everyone at Riot and West Studio! Thanks for watching! ______________________________________________________ 𝗠𝗬 𝗧𝗨𝗧𝗢𝗥𝗜𝗔𝗟𝗦 𝗔𝗡𝗗 𝗕𝗥𝗨𝗦𝗛𝗘𝗦 𝗔𝗩𝗔𝗜𝗟𝗔𝗕𝗟𝗘 𝗛𝗘𝗥𝗘!! • https://www.artstation.com/a/1142983 𝗔𝗙𝗙𝗜𝗟𝗜𝗔𝗧𝗘 𝗧𝗨𝗧𝗢𝗥𝗜𝗔𝗟𝗦: Level Up Your Digital Painting Skills 2.0: New Upgrade • https://www.wingfox.com/c/8695_33516_... (15% off coupon code : WFR15 ) Ancient Fantasy Character Design: Dark Angel • https://www.wingfox.com/c/8584_33516_... (15% off coupon code : WFR15 ) Level Up Your Digital Painting Skills: Beginner to Advanced by 黄裕仁Fishman • https://www.wingfox.com/c/8294_33516_... (15% off coupon code : WFR15 ) ______________________________________________________ 𝗣𝗮𝗶𝗻𝘁𝗶𝗻𝗴 𝗯𝘆: David Villegas (Deiv Calviz) 𝗜𝗻 𝗖𝗼𝗹𝗹𝗮𝗯𝗼𝗿𝗮𝘁𝗶𝗼𝗻 𝘄𝗶𝘁𝗵 𝗥𝗶𝗼𝘁 𝗚𝗮𝗺𝗲𝘀 𝗖𝗹𝗶𝗲𝗻𝘁: Riot Games 𝗥𝗶𝗼𝘁 𝗚𝗮𝗺𝗲𝘀 𝗔𝗗: Jessica Oyhenart 𝗪𝗲𝘀𝘁 𝗦𝘁𝘂𝗱𝗶𝗼 𝗔𝗗: Mingchen Shen 𝗙𝗶𝗻𝗮𝗹 𝗣𝗼𝗹𝗶𝘀𝗵: League Splash Team ______________________________________________________ 𝗙𝗢𝗟𝗟𝗢𝗪 𝗠𝗘 𝗛𝗘𝗥𝗘: • INSTAGRAM: / deivcalviz • TWITTER: / deivcalviz • FB: / deivcalviz • PORTFOLIO: http://www.deivcalviz.com ______________________________________________________ 𝗦𝗣𝗟𝗔𝗦𝗛 𝗙𝗔𝗤 ► A splash takes 4-5 weeks. 1st week for multiple sketches. 2nd week to figure out the colors. 3rd to 5th week to render and polish. ► I paint with the canvas size 8,000 x 4,500 px but it is shrunk down to 7,000 x 3938 for final. ► This video is 50x speed up. Do the math based on this video's time. Usually, the real time is around 40-80+ hours. (if the other thumbnails were added in). Actual work hours are more than 100+ hrs when you factor in the other thumbnails, research, and contemplating time. ► The toolbar at the left side is called Lazy Nezumi. It helps me get smoother lines and have perspective guides. ► To quickly color a grayscale, I use two methods. GRAYSCALE COLORING 1ST METHOD: • Layer on top: The grayscale set to multiply. Brighten it up and colorize depending on the mood you want. This Acts as an AO pass. • Layer below: Use a solid brush to paint in the flat local colors. GRAYSCALE COLORING 2ND METHOD: (Messier) • Layer on top: Set this layer to softlight and add in your colors. This makes it a bit look dull on the highlights so you need to manually fix the highlight colors. • Layer below: Grayscale here. ► Tip for revisions. You can use liquify on multiple layers. Right after you do it on one layer. You can press Alt+Ctrl+F to apply it again to a different layer. Make sure not to deselect your selection if you are doing this. ► I use color dodge and sometimes linear dodge blending mode to add in lighting layers. ► I group layers using this logic: 1. Post processing 2. VFX, magic 3. Character 4. Some fog 5. Background people, elements, etc 6. Sky and far background ► Here are my tools: 2008-2020: • Wacom Intuos 3 6″x8″ • Samsung T190 • Intel Core i7 3.50GHz, 16GB RAM, Windows 7 • Photoshop CS6, DAZ 3D, Alchemy 2021: • XP Pen Artist 24 PRO • Dell UltraSharp • AMD Ryzen 7 3700X 8-Core, 32 GB RAM, Windows 10 • Force Series Gen.4 PCIe MP600 500GB NVMe M.2 SSD (this is important for faster everything) • Photoshop CC, Daz 3D, Zbrush, Maya ► To open a second window of your artwork in Photoshop it is located in Window - Arrange - New Window. ► To temporarily convert your artwork into grayscale. Go to View - Proof Setup - Custom - Select Dot Gain 20%. Then Press Ctrl + Y to toggle this view. ► I am not going to upload longer or shorter versions of this because that takes too much of my personal time. I'm already giving this away for FREE.
Comments