Скачать с ютуб JBugs - 1600cc Engine Build Series - Part 2 - Top End Assembly в хорошем качестве
JBugs - 1600cc Engine Build Series - Part 2 - Top End Assembly
8 месяцев назад
Скачать бесплатно JBugs - 1600cc Engine Build Series - Part 2 - Top End Assembly в качестве 4к (2к / 1080p)
У нас вы можете посмотреть бесплатно JBugs - 1600cc Engine Build Series - Part 2 - Top End Assembly или скачать в максимальном доступном качестве, которое было загружено на ютуб. Для скачивания выберите вариант из формы ниже:
Загрузить музыку / рингтон JBugs - 1600cc Engine Build Series - Part 2 - Top End Assembly в формате MP3:
Если кнопки скачивания не
загрузились
НАЖМИТЕ ЗДЕСЬ или обновите страницу
Если возникают проблемы со скачиванием, пожалуйста напишите в поддержку по адресу внизу
страницы.
Спасибо за использование сервиса savevideohd.ru
JBugs - 1600cc Engine Build Series - Part 2 - Top End Assembly
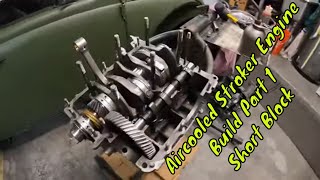
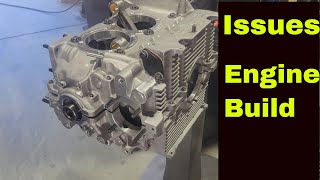
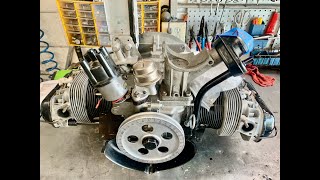
View our complete selection of air-cooled VW parts on the JBugs website: http://www.jbugs.com/ Sam picks up right where we left our short block and builds the top end of our unassembled 1600cc engine. While he was hoping to leave the mistakes from the prior video behind, it seems that one more, well two more things actually, got overlooked while building the top end. Before the push rod tubes were installed, the cylinder deflect tin should have been installed! So after removing the heads for a moment to fix that mistake and install the tin at both sides, the long block finally gets assembled all the way out to the valve covers. Follow along and watch the steps Sam takes, and the mistakes he makes while building this all new, EMPI Unassembled Long Block 1600cc engine. EMPI's Stock 1600cc Engine Kit comes with everything you'll need to build your own Type 1, 2 or 3 VW long block. The engine kit includes a new aluminum Universal engine case, a 69mm 4140 Chromoly Crankshaft, forged stock connecting rods, a stock camshaft, dual port cylinder heads, chromoly pushrods, solid shaft 1.1:1 rockers with swivel ball adjusters, a 26mm Schadek Oil Pump, chromoly head studs, Mahle Rod Bearings, Silverline Main Bearings, Cam Bearings, a complete Elring Engine Gasket Kit (although ours was missing the sump plate cap nut sealing washers), 12 Volt Flywheel, valve covers and bales, and most all the hardware needed to assembly your new 1600cc VW long block engine. A few extra pieces will be needed to complete the engine, such as flywheel shims (available in a kit here - https://www.jbugs.com/type-1-1300-160...) but you'll use only 3 pieces to set the crankshaft end play. We also used some additional rocker shaft shims to get our rocker assemblies set up correctly - https://www.jbugs.com/product/4058.html - Rocker Shaft Shims. Our engine gasket kit was missing the sump plate cap nut sealing washers, but that is not typical, that was Elring's mistake in packaging the gasket kit. Intro: 0:00 Head studs prep: 2:23 Head studs installation: 3:13 Pistons and cylinder breakdown: 4:09 Checking deck height: 5:00 Checking compression ratio of the cylinder head: 7:03 Checking deck height (opposite side): 8:29 Pistons and cylinder prep: 10:45 Pistons and cylinder installation: 12:35 Push rod tubes installation: 13:38 Cylinder head installation: 14:40 Repeating the process on the opposite side: 16:33 Rocker assembly assembly: 17:33 Rocker assembly test fit: 18:47 Pushrods prep: 22:55 Pushrods installation: 23:48 Rocker assembly adjustment: 26:30 Valve adjustment procedure: 27:45 Finishing up opposite side: 30:00 Flywheel installation: 31:03 Engine case studs installation: 33:08 Closing thoughts: 34:05 ------------------------------------------------------------- Parts used in this video: https://www.jbugs.com/product/98-0470... - Unassembled 1600cc Long Block https://www.jbugs.com/product/5015.html - Engine Stand https://www.jbugs.com/product/5756.html - Deck Height Measuring Tool https://www.jbugs.com/product/16-9603... - Head CC Measuring Kit https://www.jbugs.com/VW-Tech-Article... - JBugs Engine Calculator https://www.jbugs.com/product/5764.html - Piston Ring Compressor https://www.jbugs.com/product/4058.html - Rocker Shaft Shims https://www.jbugs.com/product/5770.html - 36mm Gland Nut Socket https://www.jbugs.com/product/5124.html - Gasgacinch https://www.jbugs.com/product/5774.html - Flywheel Seal Installation Tool All parts used in this video are available at: http://www.jbugs.com/ ------------------------------------------------------------- Follow us on our social media accounts! Instagram - / jbugs_california_pacific Facebook - / jbugsvwparts Twitter - / jbugsvwparts ------------------------------------------------------------- Music Provided By: Keep It Real by Audionautix is licensed under a Creative Commons Attribution license (https://creativecommons.org/licenses/...) Artist: http://audionautix.com/ ------------------------------------------------------------- Videos are intended for entertainment purposes. Factory specifications should be followed when performing any task on your vehicle.
Comments


![4g63 Engine assembly [4k]](https://i.ytimg.com/vi/JGibQxlaQ80/mqdefault.jpg)