Скачать с ютуб BMW Custom Shadow Headlights DIY Tutorial | E92 335i 328i | LED Halos | RGB Projectors | CF Eyelids в хорошем качестве
BMW Custom Shadow Headlights DIY Tutorial | E92 335i 328i | LED Halos | RGB Projectors | CF Eyelids
9 месяцев назад
Скачать бесплатно BMW Custom Shadow Headlights DIY Tutorial | E92 335i 328i | LED Halos | RGB Projectors | CF Eyelids в качестве 4к (2к / 1080p)
У нас вы можете посмотреть бесплатно BMW Custom Shadow Headlights DIY Tutorial | E92 335i 328i | LED Halos | RGB Projectors | CF Eyelids или скачать в максимальном доступном качестве, которое было загружено на ютуб. Для скачивания выберите вариант из формы ниже:
Загрузить музыку / рингтон BMW Custom Shadow Headlights DIY Tutorial | E92 335i 328i | LED Halos | RGB Projectors | CF Eyelids в формате MP3:
Если кнопки скачивания не
загрузились
НАЖМИТЕ ЗДЕСЬ или обновите страницу
Если возникают проблемы со скачиванием, пожалуйста напишите в поддержку по адресу внизу
страницы.
Спасибо за использование сервиса savevideohd.ru
BMW Custom Shadow Headlights DIY Tutorial | E92 335i 328i | LED Halos | RGB Projectors | CF Eyelids
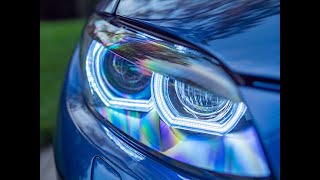
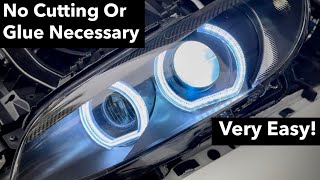
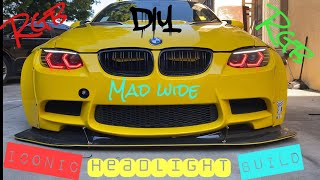
Upgrade your car by decades with the most influential single mod you can do. This is a complete step-by-step DIY guide with full custom diagrams, wiring tutorials, and installation tips. This build is affordable, fun, and the results are a game changer. I definitely modernized my car with these new headlights. I chose to do RGB bluetooth controlled projector lights to get the infamous "BMW demon eyes." I used 2 stage LED halos that flash orange when signaling. I deleted various OEM components, fully painted all retro chrome housings, and I used real carbon fiber eyelids to create an aggressive look that offset my new halos. I installed new projector lenses which dramatically improved the cutoff, clarity, and throw distance. I also demonstrate how to sand, buff, reinforce, and UV protect your headlights for the ultimate new car look. SUBSCRIBE for more to come, and thank you for the support! 🙃 I don’t get anything for making these videos, but I like helping people out. These links below may pay me a TINY commission 🤣, but no cost to you. These are the things I used, or should’ve used, and I did my best to find comparable, decent angel eyes. Good luck on yours! TOOLS AND MATERIALS USED: Multi-color 18 gauge wire kit: https://amzn.to/3Mk2MOD Long roll of heat shrink to fix all the wiring: https://amzn.to/3QdOlwK High-temp electrical tape: https://amzn.to/3FGQBrf Wiring cap kit (multi-sized): https://amzn.to/3MjyknG Butyl tape to seal headlights: https://amzn.to/3tQT1kA My Torx bit set (it has held up great): https://amzn.to/3Qg54iV Microfiber (scratch free) cleaning cloth: https://amzn.to/3MiZtr5 Tiny screwdriver set: https://amzn.to/45OLdNB PARTS FOR BUILD: Hexagonal Angel Eyes (2 stage signal): https://amzn.to/3QJonlJ Horseshoe Angel Eyes: https://amzn.to/3seUzEs Round Angel Eyes (x2): https://amzn.to/3FyeOzY Asymmetrical Horseshoe Angel Eyes (like mine): https://amzn.to/3ShGrVx RGB Projector LED (demon eyes): https://amzn.to/3Qx3QkC Real Carbon Fiber eyelids for E92: https://amzn.to/499asgv New headlight covers (used to be $50 each lol): https://amzn.to/45OSbC3 Upgraded projector lenses E90: https://www.bavgruppedesign.com/produ... PAINTING AND SANDING: Oil-Based Spar Urethane: https://amzn.to/40fufXx 1 Quart of Mineral Spirits: https://amzn.to/3sj3O6B Multi-sized sand paper I used: https://amzn.to/49c0sCX Matte black spray paint (for all other parts): https://amzn.to/493Zetw Matte clear spray paint (I should’ve used): https://amzn.to/3FAGYug High temp enamel paint (for bracket and shield): https://amzn.to/40b34gx High temp primer paint: https://amzn.to/40dsNVu Regular primer paint: https://amzn.to/475Nrt1 Painter’s tape: https://amzn.to/46OUSVD CHAPTERS: 0:00 Before and After Example 0:32 Step 1 - Remove headlight adjustment brace 0:54 Step 2 & 3 - How to wet sand and buff the covers (optional) 3:04 Step 4 - Remove the headlight lens covers 4:21 Step 5 - Remove the OEM projector halo ring 4:55 Step 6 – Remove the projector shroud 5:16 Step 7 – Remove the adaptive headlight housing 6:28 Step 8 & 9 – Remove the rear cover and projector light housing 8:37 Step 10 – Dismantle the adaptive headlight housing 9:47 Step 11 – Prep the adaptive headlight bezel for paint 10:15 Step 12 – Dismantle the projector housing 11:49 Step 13 – Remove the lens bracket and cutoff shield plate 12:34 Step 14 – Remove the lens from the bracket 13:34 Step 15 & 16 – Remove the bezel and signal light housing 14:35 Step 17 & 18 – Remove extra OEM parts and repeat for other headlight 14:52 Overview of all the parts and a visual log of it 16:21 Step 19 – Prep and paint the parts (list of parts) 17:24 Step 20 – Clean the old sealant from the headlight 18:07 Step 21 – Assemble the projector, adaptive, and new lens units 19:55 Step 22 – How to fix the brittle BMW wiring (optional) 22:25 Step 23 – Create your “demon eyes” or RGB LED install 23:17 Step 24 - Cut the base for new halo rings and align 25:23 Step 25 - Mount the new halo rings with tape 26:22 Step 26 & 27 - Reinforce the halo rings with silicone and wire 30:19 Step 28 – Wire and splice inside the headlight 31:24 Colton’s custom headlight wiring DIAGRAM 32:04 Step 29 – Reinstall the projector and adaptive units in the headlight 34:00 Step 30 – Drill a place for the halo wire 34:36 Step 31 & 32 – How to wire the relay for the RGB projector and test it 36:53 Step 33 – How to wire the new halo rings (angel eyes) 37:13 Colton’s OEM Wiring diagram pinout of the headlight 37:41 Step 34 – Test the new halos 38:27 Step 35 – Add custom eyelids (optional) 39:45 Step 36 – How to clear coat and UV protect the lights (optional) 41:18 Step 37 – Reassemble the headlight cover parts 42:40 Step 38 – How to seal the headlight housing with butyl tape 44:08 Step 39 – Reinstall the brace and run harness through (optional) 44:50 Step 40 – Adjust the headlight angle and tips 45:54 Before and after (final results) footage and photos 47:41 Difficulty Scale
Comments