Скачать с ютуб Ninebot Max G30 solid tire: REAR WHEEL - How to mount a puncture-proof tyre? в хорошем качестве
Ninebot Max G30 solid tire: REAR WHEEL - How to mount a puncture-proof tyre?
1 год назад
Скачать бесплатно Ninebot Max G30 solid tire: REAR WHEEL - How to mount a puncture-proof tyre? в качестве 4к (2к / 1080p)
У нас вы можете посмотреть бесплатно Ninebot Max G30 solid tire: REAR WHEEL - How to mount a puncture-proof tyre? или скачать в максимальном доступном качестве, которое было загружено на ютуб. Для скачивания выберите вариант из формы ниже:
Загрузить музыку / рингтон Ninebot Max G30 solid tire: REAR WHEEL - How to mount a puncture-proof tyre? в формате MP3:
Если кнопки скачивания не
загрузились
НАЖМИТЕ ЗДЕСЬ или обновите страницу
Если возникают проблемы со скачиванием, пожалуйста напишите в поддержку по адресу внизу
страницы.
Спасибо за использование сервиса savevideohd.ru
Ninebot Max G30 solid tire: REAR WHEEL - How to mount a puncture-proof tyre?
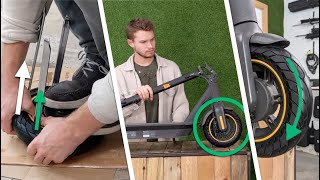
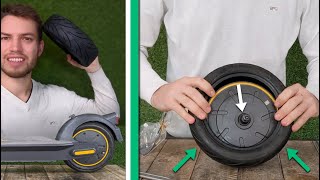
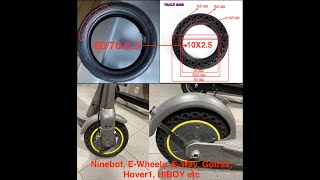
How to mount a solid tyre on the rear wheel of a Ninebot G30 Max? In this tutorial, we show you our method for: Part 1: Removing the punctured tubeless tyre from the rear wheel. Part 2: Installing a 10-inch solid tyre on the motor. Tutorial for all Ninebot Max G30 KickScooter Powered By Segway: Max G30 - Max G30P - Max G30LP - G30D - MAX G30E II - MAX G30LE II - Etc. We know that this is not an easy job. We hope you will find this tutorial useful. Please feel free to tell us if you succeeded in the comments, it's always nice to have your feedback (positive or negative) 💚🛴🔧💪 The MoovMoov Team. ⬇️ If there is a product in this tutorial that you need, check out the purchase links below: For our American friends (amazon.com🇺🇸) 🛒 ✅ Solid Tire for Ninebot G30 : https://pixelfy.me/pGlW24 For our friends in the United Kingdom (amazon.co.uk🇬🇧) 🛒 ✅ Solid Tyre for Ninebot G30 : https://pixelfy.me/LaZFap 🛒 ✅ Hercules Tyre Levers: https://pixelfy.me/9fEwkH -------- 👉 If you are interested in the repair and maintenance of electric scooters and want to follow our work, then please subscribe to our channel by clicking on this link: / @moovmoov.global 👉 We have done other tutorials on how to change and install Ninebot scooter tyres. Here is the link to the playlist: • NINEBOT - ℹ️⏱ Below are the major steps in this video for installing a FULL 60/70-6.5 (10 inch) tyre on the Rear wheel of a Ninebot G30 Max Scooter Powered by Segway: 00:00 - Introduction of Ninebot Max G30 solid tyre Rear wheel 00:37 - Removing the rear fork covers 02:00 - Accessing the battery compartment 03:31 - Disconnecting the motor 06:17 - Removing the rear wheel 07:20 - Removing the tyre from the rim 11:31 - Removing tubeless tyre 60/70-6.5 14:23 - Preparing to mount 10-inch solid tyre 15:31 - Mounting the puncture-proof tyre (Phase 1) 18:02 - Fitting the puncture-proof tyre (Phase 1) 20:36 - Mounting the solid tyre (Phase 2) 24:02 - Fitting the puncture-proof tyre (Phase 2) 25:24 - Remounting the solid wheel on the scooter 26:10 - Reconnecting the motor 27:45 - Closing the scooter 28:40 - Finishing touches
Comments