Скачать с ютуб How I build a guitar body using hand tools only 1/2 - GGBO 2021 - Part 2 в хорошем качестве
How I build a guitar body using hand tools only 1/2 - GGBO 2021 - Part 2
3 года назад
Скачать бесплатно How I build a guitar body using hand tools only 1/2 - GGBO 2021 - Part 2 в качестве 4к (2к / 1080p)
У нас вы можете посмотреть бесплатно How I build a guitar body using hand tools only 1/2 - GGBO 2021 - Part 2 или скачать в максимальном доступном качестве, которое было загружено на ютуб. Для скачивания выберите вариант из формы ниже:
Загрузить музыку / рингтон How I build a guitar body using hand tools only 1/2 - GGBO 2021 - Part 2 в формате MP3:
Если кнопки скачивания не
загрузились
НАЖМИТЕ ЗДЕСЬ или обновите страницу
Если возникают проблемы со скачиванием, пожалуйста напишите в поддержку по адресу внизу
страницы.
Спасибо за использование сервиса savevideohd.ru
How I build a guitar body using hand tools only 1/2 - GGBO 2021 - Part 2
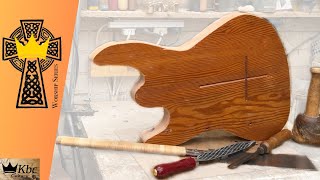
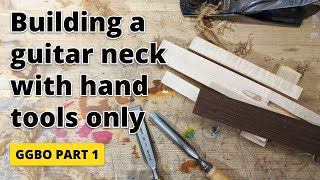
In this second episode of my Great Guitar Build Off 2021 entry, I’m building a guitar body with hand tools, as always. Well, most of a guitar body. The edit was getting too long, so I had to split the video in two parts. The body build took over 60 hours in total. I’ve been accused of having inefficient processes, and with this footage I will do absolutely nothing to redeem myself. Almost every part of the process could be done faster, even with hand tools. My processes make sense to me though, and I enjoy them, and that’s what counts. For the body I have some beautifully figured Black Limba. I start by rough dimensioning the body blanks. It makes sense to not have more material than absolutely necessary when you’re planing by hand. Next I mark out the depth for the body using an engineer's square as a guide for my pencil. I resaw the top using an ECE frame saw with a TurboCut blade. With this saw I was able to do each cut in about 45 minutes. The same cut in the same Black Limba with my Japanese Ryoba took twice as long. After resawing I plane the blanks down using my number 4 handplane with a rounded scrub blade, as well as a number 6. I want them to be mostly the same thickness before glue-up. Next, I make sure the glue joint is straight and square using my number 6. A good glue joint makes the glue-up much easier. I glued the body halves together in my vise. This worked really well and felt easier than laying them down. Since I only work at night, I tend to time my glue-ups for the end of the evening, that way they’re ready the next time I get into the workshop - and it doesn’t bother me when they’re in the way. After the glue-up I planed everything even again. The grain was quite crossed in places, but luckily I recently found a vintage low angle block plane which helped a bit. Next I marked the final body shape from my paper template and starting roughing out the shape with the frame saw and my vintage hand-cranked pillar drill. Once the rough shape was cut out, I proceeded to refine the shape using my spoke shave, chisels, gouges, rasps, scrapers and even the number 4 hand plane. The spoke shave is a great way to remove the material quickly, but I think using a coping saw would have been the better way to go about it - especially in the tight corners. After shaping the body, I measure and mark the neck and pickup cavities. The rounded corners for the pickups are created with the pillar drill. I wanted a tight fit because I’m planning on direct mounting the pickups, so I used different sized bits for the corners of the pickup body and the legs. I removed the bulk of the waste with a forstner bit, before moving on to chisels. Getting the pickup cavities to size with neat sides was a lengthy affair. It took roughly 2 hours per cavity. I used chisels for the sides and a router plane for the bottom, then I finished it all up with small files and a small sanding block. The neck cavity is actually easier than the pickup cavities. Here I used chisels and gouges to hack away the material, then the router plane to get the bottom flush with the pickup cavity. To fit the neck, I start with a slightly too small neck pocket, which I then widen slowly to get the position just right. This involves a lot of measuring, sanding and scraping, but the end result is a tightly fitting neck pocket and a well aligned neck. Next you’ll see me taking a perfectly fine guitar body and drill holes through it. This felt very, very wrong, but since I wanted to build a thinline style guitar it had to be done. After drilling I cut the cavities with the frame saw before refining the shapes with the usual tools. I spent a lot of time getting the cavities shaped nicely, even though they won’t really be visible. I’ll know that they’re good though and that’ll help me sleep at night. The big benefit of glueing a top onto the body is that it makes the control cavity work much easier. Instead of using a router plane and working inside a cavity, you can work through the cavity. That’s a big difference. Stay tuned for the next part where I’ll bend the top using an iron and get the body completed. Timestamps: 0:15 - Marking and rough-cutting the body blanks 1:10 - Resawing the guitar top with a frame saw 3:22 - Glueing the body blanks together 5:02 - marking and rough cutting the body shape 7:07 - Shaping the guitar body with hand tools 11:13 - Measuring and marking the pickup cavities 11:45 - Cutting pickup cavities with hand tools 15:37 - Cutting a neck pocket with hand tools 17:10 - Adding comfort carves 18:50 - Fitting the guitar neck 20:50 - Chambering the guitar body 24:55 - Pickup cavity using hand tools 26:40 - Final reveal If you have any question about the process, the press itself or the materials used, please leave a comment. Also please add any suggestions on improvements or better workflows! Subscribe for more content! #greatguitarbuildoff #greatguitarbuildoff2021#ggbo2021 #handtoolsonly
Comments