Скачать с ютуб Making a River Table - Start to Finish в хорошем качестве
Making a River Table - Start to Finish
3 года назад
Скачать бесплатно Making a River Table - Start to Finish в качестве 4к (2к / 1080p)
У нас вы можете посмотреть бесплатно Making a River Table - Start to Finish или скачать в максимальном доступном качестве, которое было загружено на ютуб. Для скачивания выберите вариант из формы ниже:
Загрузить музыку / рингтон Making a River Table - Start to Finish в формате MP3:
Если кнопки скачивания не
загрузились
НАЖМИТЕ ЗДЕСЬ или обновите страницу
Если возникают проблемы со скачиванием, пожалуйста напишите в поддержку по адресу внизу
страницы.
Спасибо за использование сервиса savevideohd.ru
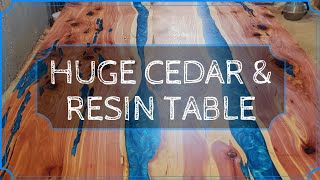
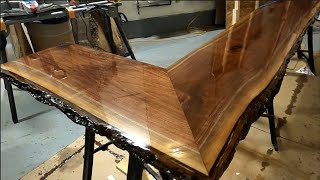
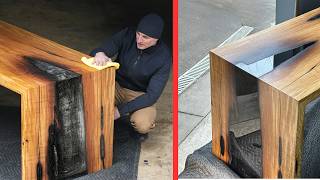
Making a River Table - Start to Finish
This is a river table tutorial that covers everything from selecting your slab of wood to how to get a flawless epoxy finish. This description contains affiliate links. An affiliate link means I may earn commissions for items you purchase through links in this post (at no additional cost to you). As an Amazon Associate I earn from qualifying purchases. Some of the products used in making this table: Stone Coat Countertops Stone Coat Epoxy we used (heat and yellowing resistant) for the seal coats and top final flood coat can be found using this link: https://amzn.to/481NVAr Stone Coat Countertops Super Cast Epoxy (designed to be poured over 3/4" and up to 2" in a single pour) used on the river can be found using this link: https://amzn.to/3pgtGJN This is the epoxy typically used to seal the edges of the boards before pouring the river as well as to fill holes and voids (Stone Coat Countertops). https://amzn.to/37dCqsG Metallic powder additive used with the super cast epoxy https://amzn.to/3oec7sy Router bit used for planing the slab https://amzn.to/3sSV2Yv Quality brush used to chop out the epoxy flood coat https://amzn.to/39cfNGM or if you are planning on doing a couple epoxy projects or working with bark on, I suggest this bulk pack of 12 (you save over $1 per brush) https://amzn.to/3qMgegR Burn in wax sticks used to fill stubborn pinholes between seal coats of epoxy https://amzn.to/3a1GQny and https://amzn.to/3c6f7Vp You can keep reusing your trowel by simply letting the epoxy drain off the square notches. This 1/8 x 1/8 x 1/8 square notch trowel is the size you need for the flood coat https://amzn.to/2M0SiYv In this video I use this 2-1/4 hp Dewalt Router with a fixed base - this link is to kit I bought (it includes the same router with the fixed base and an additional plunging base - which has many applications) https://amzn.to/36bMjqy When using a 1:1 ratio epoxy, measuring your amounts is extremely important. Here is the brand of mixing cup I trust and has never let me down https://amzn.to/3iGUHU0 I use Diablo 5" random orbital sanding discs (I use different grits, working my way up to 220 - there is no need to go beyond 220 grit when using epoxy) https://amzn.to/2MizlAv With the exception of a little hand sanding, I use this Dewalt Random Orbital Sander https://amzn.to/3iJVxzx This is an epoxy cleaner which I use before delivering any epoxy product to a client. It also contains an epoxy polish to help maintain your finish. https://amzn.to/3iHRYd6 These are the metal sanding disks I use on my 4 1/2 grinder with the grinder conversion attachment. I use 50 grit. https://amzn.to/3jTTB89 To remove router lines, excess epoxy, and/or hardened epoxy drips, I use this conversion grinder attachment on my 4 1/2 grinder and attach low grit metal sanding disks. https://amzn.to/3pueJ5Y Use this self igniting propane torch to pop air bubbles. https://amzn.to/34yBXzV Alumilite Dye This is the dye I use to color epoxy when metallic flakes aren't enough or not wanted. https://amzn.to/4bkUFLq
Comments