Скачать с ютуб Hydro Dip/ColourArte & Epoxy Resin DIY Jewelry/Key Chains в хорошем качестве
Hydro Dip/ColourArte & Epoxy Resin DIY Jewelry/Key Chains
3 года назад
Скачать бесплатно Hydro Dip/ColourArte & Epoxy Resin DIY Jewelry/Key Chains в качестве 4к (2к / 1080p)
У нас вы можете посмотреть бесплатно Hydro Dip/ColourArte & Epoxy Resin DIY Jewelry/Key Chains или скачать в максимальном доступном качестве, которое было загружено на ютуб. Для скачивания выберите вариант из формы ниже:
Загрузить музыку / рингтон Hydro Dip/ColourArte & Epoxy Resin DIY Jewelry/Key Chains в формате MP3:
Если кнопки скачивания не
загрузились
НАЖМИТЕ ЗДЕСЬ или обновите страницу
Если возникают проблемы со скачиванием, пожалуйста напишите в поддержку по адресу внизу
страницы.
Спасибо за использование сервиса savevideohd.ru
Hydro Dip/ColourArte & Epoxy Resin DIY Jewelry/Key Chains
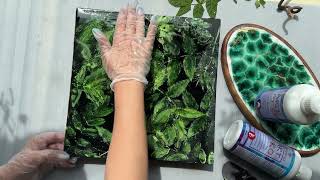
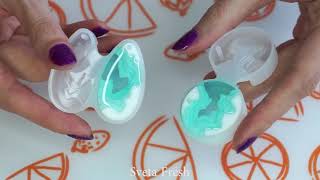
#hydrodipping #jewellery #custom #diy Hydro Dip/ColourArte and Resin Jewelry/Key Chains My sister sent me a video of hydro dipping and I found it fascinating. Unfortunately, the video didn’t provide much detail (like it was a highly kept secret or something), but thankfully I found other videos that provided more information and was instantaneously hooked. I immediately purchased the concentrated spray paints and played with them the day they arrived (to very little success). After much trial and error, I finally realized the instructions the maker of the paints provided is wrong. Using cold water makes the paint set way too fast and gets all kinds of chunky and nasty. Switching to hot/warm water fixed that problem. You really need to experiment with the colors and make sure you put enough to offer the right contrast. It’s a really wasteful hobby, as much of the paint gets wiped away with the paper I use between dips, but the effect it generates is priceless. The best part … it’s so fast and easy. From start to finish (to create the inner pieces I hydro dipped) was about 20 minutes. Using the quick set resin to give a nice white, clean piece to work with was a smart way to use the technique, I think (but I’m totally biased). 😊 I love these molds too. They provide a way to create a very unique piece in a simplistic way. Just create the first piece and once it’s set, move it to the other side to complete a 2-dimensional looking piece of art. As I always caution, using a mold release is essential. I know when working with such small molds it’s not a good idea to use heat, but I typically cannot help myself; hence mold release is required. Technique Used: Much of my technique I already explained in the intro, but to ensure it’s clear here are the bulleted steps: Hydro Dip: • Prep the molds with mold release • Use Alumilite Quick Cast resin • Allow to cure and remove from the mold • Pour warm to hot water into a bucket or container of adequate size • Add Easy Marble colors to the water (3-5 colors were used) • Use a skewer to move the colors into the desired form • Dip the white casted piece in the colored water at an angle TIP: If doing multiple dips, use a piece of plain white paper to soak up excess colors so you are able to use the same vat of water for multiple uses • Move to a mat and allow to dry thoroughly NOTE: Resin and water do not mix. Make sure your casting is completely dry before moving on to the next step • Place the hydro dipped castings into the other side of the mold • Add clear resin to fill the mold • Allow curing and demold • Use fasteners to make into a necklace or keychain or any other product you choose ColourArte Pigment: • Prep the molds with mold release • Use epoxy resin and ColourArte pigment • Use multiple shades of a similar color to create the gradient effect • Allow curing • Place the ColourArte piece on the other side of the mold • Add resin of your color choice to fill the mold • Allow curing and demold • Use fasteners to make into a necklace or keychain or any other product you choose Products Used: Craft Resin craft-resin.co.uk/MICHELLE_Z discount code: 10% off code: MICHELLE_Z 📌 Alumilite Amazing Casting Resin: https://amzn.to/3Bh7mI0 📌 Hydro Dip Container: https://amzn.to/3Ye2Pjt 📌 Marabu Easy Marble Paint: https://amzn.to/3Bh63sq 📌 Drying Mat: https://amzn.to/3ULCpmb 📌 Island Jewelry Resin Mold: https://amzn.to/3Bhgyw3 📌 Jewelry Fasteners: https://amzn.to/3VL88oQ 📌 ColourArte Pigment: https://amzn.to/3UA3ZT7 📌 Eye Candy Pigment: https://amzn.to/3FwJjqS 📌 ColorBerry Pigment: https://amzn.to/3iDAZwt 📌 Key Chain Fasteners: https://amzn.to/3BpNaUq Standard Project Items: 📌 Mini Heat Gun: https://amzn.to/3Ydkh7q 📌 Level: https://amzn.to/3FGfPHl 📌 Bamboo Skewer: https://amzn.to/3FFXRof 📌 Nitrile Gloves: https://amzn.to/3W5qgcN 📌 Wood Stir Sticks: https://amzn.to/3Yfjl2K 📌 Silicone Brush: https://amzn.to/3VKY3Z7 📌 Paper Towels: https://amzn.to/3UJxMZJ 📌 10 OZ Disposable Cups: https://amzn.to/3UMbTZT 📌 16 OZ Disposable Cups: https://amzn.to/3FCEgp0 📌 32 OZ Disposable Cups: https://amzn.to/3uCauu7 📌 3 OZ Paper Disposable Cups: https://amzn.to/3HpepSJ 📌 4 OZ Paper Disposable Cups: https://amzn.to/3hbTt79 📌 99% Isopropyl Alcohol: https://amzn.to/3iF80IH 📌 Pipettes: https://amzn.to/3tycjIU 📌 Anti-static tweezers: https://amzn.to/3hgjaDC 🆓 Get Amazon Prime Free for 30 Days: https://amzn.to/3Fh9VuT Disclaimer: This video is intended for entertainment purposes and demonstration only. We do not make any warranties about an individual's results or safety. We recommend reading all product instructions thoroughly before beginning any project. Any action you take upon the information on this video is strictly at your own risk, and we will not be liable for any damages or losses. The viewer's responsibility is to use judgment, care, and precautions; if one plans to replicate.
Comments