Скачать с ютуб Como fazer um roupeiro basculante de MDF! How to make a tilting wardrobe out of MDF! в хорошем качестве
Como fazer um roupeiro basculante de MDF! How to make a tilting wardrobe out of MDF!
2 года назад
Из-за периодической блокировки нашего сайта РКН сервисами, просим воспользоваться резервным адресом:
Загрузить через ClipSave.ruСкачать бесплатно Como fazer um roupeiro basculante de MDF! How to make a tilting wardrobe out of MDF! в качестве 4к (2к / 1080p)
У нас вы можете посмотреть бесплатно Como fazer um roupeiro basculante de MDF! How to make a tilting wardrobe out of MDF! или скачать в максимальном доступном качестве, которое было загружено на ютуб. Для скачивания выберите вариант из формы ниже:
Загрузить музыку / рингтон Como fazer um roupeiro basculante de MDF! How to make a tilting wardrobe out of MDF! в формате MP3:
Если кнопки скачивания не
загрузились
НАЖМИТЕ ЗДЕСЬ или обновите страницу
Если возникают проблемы со скачиванием, пожалуйста напишите в поддержку по адресу внизу
страницы.
Спасибо за использование сервиса savevideohd.ru
Como fazer um roupeiro basculante de MDF! How to make a tilting wardrobe out of MDF!
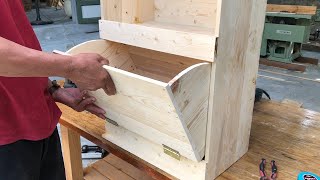
Nesse vídeo você vai aprender como fazer um roupeiro basculante de MDF! Com técnicas simples e básicas da marcenaria moderna, ensino com linguagem fácil de se absorver o conhecimento e por em prática! Vale lembrar que é muito importante assistir o vídeo na integra para não perder nenhuma informação... Esse roupeiro fica muito robusto, pratico e bonito em qualquer casa!!! Você que gosta dos nossos vídeos e quer nos incentivar a produzir mais vídeos... inscreva-se no nosso canal é só um clique e não custa nada! A sua inscrição é muito importante para o crescimento do canal! Deixo abaixo os links dos vídeos que citei nesse vídeo, que vão te ajudar a fazer o seu roupeiro basculante com perfeição! Como colar fita de borda • Como colar fita de borda Como colocar puxador perfil de alumínio! • Como colocar puxador perfil de alumínio! Rodízios, cálculo, capacidade?#shorts • Rodízios, cálculo, capacidade?#shorts Gabarito para montagem de móveis em mdf • Gabarito para montagem de móveis em mdf Como fazer gabarito para montagem de móveis • Como fazer gabarito para montagem de ... MDF como montar e fixar com parafuso. • MDF como montar e fixar com parafuso. O que é um armário tamponado • O que é um armario tamponado Lembre-se que a sua inscrição é muito importante para o canal!!! Abaixo o memorial descritivo para confecção do seu roupeiro basculante de MDF. Estrutura do roupeiro: Laterais 2 = 684 x 422 x 15 mm Tampos 2 = 434 x 422 x 15 mm Fundo 1 = 714 x 464 x 6 mm Tamponamento: Laterais 2= 714 x 450 x 18 mm Tampos 2 = 500 x 450 x 18 mm Porta 1 = 708 x 430 x 18 mm Cesto: Laterais 2 = 630 x 400 x 15 mm Frente 1= 630 x 395 x 15 mm Base 1 = 400 x 395 x 15 mm Traseiro 1 = 470 x 452 x 15 mm Lembrando que essas medidas foram calculadas para as espessuras de materiais que usei nesse projeto, vale a pena fazer os seus cálculos de acordo com os seus materiais e necessidades. Ferragens: 01 perfil de alumínio 426 mm (puxador) 02 dobradiças de caneca 35 mm curva 04 rodízios 75 mm, dois com freios 02 cantoneiras ou roldanas para limitador de curso do cesto Parafusos diversos conforme cito ao longo do vídeo. In this video you will learn how to make an MDF tilting wardrobe! With simple and basic techniques of modern woodworking, I teach with easy language to absorb the knowledge and put it into practice! It's worth remembering that it's very important to watch the video in full so you don't miss any information... This wardrobe is very robust, practical and beautiful in any home!!! You who like our videos and want to encourage us to produce more videos... subscribe to our channel, it's just a click and it doesn't cost anything! Your subscription is very important for the growth of the channel! I leave below the links of the videos that I mentioned in this video, which will help you to make your tilting wardrobe with perfection! How to glue edge ribbon • Como colar fita de borda How to install aluminum profile handle! • Como colocar puxador perfil de alumínio! Casters, calculation, capacity?#shorts • Rodízios, cálculo, capacidade?#shorts Mdf furniture assembly template • Gabarito para montagem de móveis em mdf How to make a template for furniture assembly • Como fazer gabarito para montagem de ... MDF how to assemble and fix with screw. • MDF como montar e fixar com parafuso. What is a buffered closet • O que é um armario tamponado Remember that your subscription is very important for the channel!!! Below is the descriptive memorial for making your MDF tilting wardrobe. Wardrobe structure: Sides 2 = 684 x 422 x 15 mm Tops 2 = 434 x 422 x 15 mm Bottom 1 = 714 x 464 x 6 mm buffering: Sides 2 = 714 x 450 x 18 mm Tops 2 = 500 x 450 x 18 mm Port 1 = 708 x 430 x 18 mm Basket: Sides 2 = 630 x 400 x 15 mm Front 1= 630 x 395 x 15 mm Base 1 = 400 x 395 x 15 mm Rear 1 = 470 x 452 x 15 mm Remembering that these measurements were calculated for the thicknesses of materials I used in this project, it is worth making your calculations according to your materials and needs.
Comments