Скачать с ютуб 1998 - 2007 GM NP8 NP246 Transfer Case Complete Tear Down & Disassembly (Chevy & GMC) в хорошем качестве
1998 - 2007 GM NP8 NP246 Transfer Case Complete Tear Down & Disassembly (Chevy & GMC)
2 года назад
Скачать бесплатно 1998 - 2007 GM NP8 NP246 Transfer Case Complete Tear Down & Disassembly (Chevy & GMC) в качестве 4к (2к / 1080p)
У нас вы можете посмотреть бесплатно 1998 - 2007 GM NP8 NP246 Transfer Case Complete Tear Down & Disassembly (Chevy & GMC) или скачать в максимальном доступном качестве, которое было загружено на ютуб. Для скачивания выберите вариант из формы ниже:
Загрузить музыку / рингтон 1998 - 2007 GM NP8 NP246 Transfer Case Complete Tear Down & Disassembly (Chevy & GMC) в формате MP3:
Если кнопки скачивания не
загрузились
НАЖМИТЕ ЗДЕСЬ или обновите страницу
Если возникают проблемы со скачиванием, пожалуйста напишите в поддержку по адресу внизу
страницы.
Спасибо за использование сервиса savevideohd.ru
1998 - 2007 GM NP8 NP246 Transfer Case Complete Tear Down & Disassembly (Chevy & GMC)
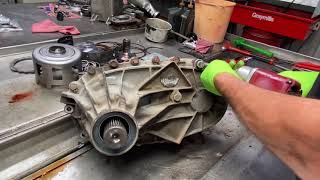
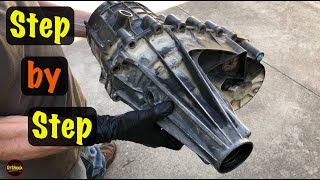
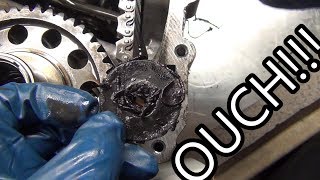
In this EPIC level of detail video we do a COMPLETE step by step tear down and disassembly of the New Process Gear 246 (aka NP246) transfer case as used by GM starting in 1998. This NP246 example is a first generation transfer case known as the Auto-Trak (or Auto-Trak I), or as regular production option (RPO) NP8. The NP246 transfer case is very similar to the NP236, and we will call out those differences between the NP236 and the NP246 as we go where we can, but we're focused on showing the NP246 disassembly here. These transfer cases were built by New Process Gear for both GM and Chrysler, later changing their name to New Venture Gear. After the name change, this model became the NV246 (or NVG246). The NV246 was also used on several Dodge and Jeep model trucks as a result of the Chrysler partnership, so this video will have some value there as well. However, we will be using the genuine GM factory service information for the steps involved, referencing any special tools required along the way. This particular NP246 was not exhibiting any functional issues whatsoever, but did have a long term multi-year leak from the rubber plug for the spring clip access port on the top of the rear case half that warranted attention (leaks in this area are not uncommon). Upon opening up this 246 transfer case we find the unit still had fluid, though significant portions of this aged fluid had become more of a varnished hardened mud or goo from heat and age. Fortunately, this is the only problem with this NP246 transfer case so it was caught in time, and a full rebuild with all genuine GM parts will have it back into service quickly. Link to rebuild video: • 1998 - 2007 GM NP8 NP246 Transfer Cas... The eBay and Amazon search links below are paid links, for which I may be compensated and earn a commission, if you choose to buy the parts and tools shown in this video thru them: Paint marker: https://ebay.us/yhT0AO and https://amzn.to/3msANz4 Blind hole puller kit: https://ebay.us/a6kEB1 and https://amzn.to/3xgtTlr Wilde G409.NP wide opening snap ring pliers: https://ebay.us/HoJPiE and https://amzn.to/46KrVuC Heat gun: https://ebay.us/nI5Fpj and https://amzn.to/3QcX1CI Bushing driver / remover kit: https://ebay.us/mg3eDw and https://amzn.to/3mz6zKF GM Transfer case unit repair manual (use 1999 and later only): https://ebay.us/BDBaJe And if I've saved you some $$ here, consider some coins for the coffee tip-jar! https://ko-fi.com/drshock 1998 1999 2000 2001 2002 2003 2004 2005 2006 2007 Chapters: 0:00 - Disassembly overview 3:30 - Removing fill & drain plugs 5:14 - Removing the vent and encoder motor 7:24 - Removing speed sensors 9:13 - Removing the access plug and output shaft seal 11:04 - Removing the transfer case bolts 14:18 - Separating the case halves 16:56 - Removing the pump wear sleeve 17:25 - Removing the drive chain, sprockets, and pump assy 26:12 - Removing the rear output shaft assembly 27:00 - Removing the clutch lever and shift fork assembly (Part I) 29:32 - Removing the shift detent assembly 30:55 - Remove and disassembly the front output shaft assy and seal 40:00 - Removing the clutch lever and shift fork assembly (Part II) 42:20 - Removing the input shaft seal and planetary assembly 47:10 - Disassembly of the planetary assembly 49:00 - Removing the input bearing 50:12 - Removing control actuator assembly 51:34 - Removing the front case half ring gear retaining ring 52:31 - Removing the input gear pilot bearing 53:45 - Removing front case ring and front output shaft bearing 1:00:13 - Removing the control actuator bearing 1:02:00 - Removing the rear output shaft bushing 1:03:45 - Disassembling the rear output shaft assembly 1:21:01 - Removing the identification plate 1:21:24 - Cleaning and inspection tips #drshock #np246 #obstruck #obstrucks Disclaimer: DrShock, the alias for the human content creator for this YouTube channel, is not responsible for any damages, injuries, losses, or liabilities associated with any repairs, upgrades, or maintenance performed on yours, or any other, vehicle whatsoever. No warranty, express or implied, is made as to the accuracy or completeness of any information provided within this channel. Viewing and using the “as-is" information of this channel is totally at your own risk. Always wear personal protection equipment and follow appropriate vehicle manufacturer service manual guidelines with original manufacturer parts only when performing any repairs, upgrades, or maintenance upon any vehicle.
Comments