Скачать с ютуб The Safe Way to Rewire A Table Lamp в хорошем качестве
The Safe Way to Rewire A Table Lamp
4 года назад
Скачать бесплатно The Safe Way to Rewire A Table Lamp в качестве 4к (2к / 1080p)
У нас вы можете посмотреть бесплатно The Safe Way to Rewire A Table Lamp или скачать в максимальном доступном качестве, которое было загружено на ютуб. Для скачивания выберите вариант из формы ниже:
Загрузить музыку / рингтон The Safe Way to Rewire A Table Lamp в формате MP3:
Если кнопки скачивания не
загрузились
НАЖМИТЕ ЗДЕСЬ или обновите страницу
Если возникают проблемы со скачиванием, пожалуйста напишите в поддержку по адресу внизу
страницы.
Спасибо за использование сервиса savevideohd.ru
The Safe Way to Rewire A Table Lamp
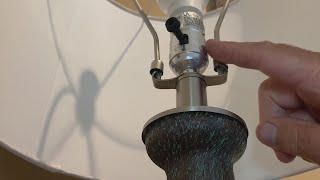
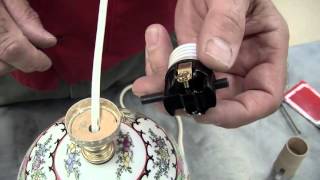
POLARITY MATTERS! Shocking - but true (pun intended)! For many years, I thought it didn’t matter how you wired a table lamp, just as long as you got the wire securely affixed to the terminal screws, you used an Underwriter’s Knot, and everything was tucked away so nothing shorted out. It turns out, there’s a bit more to it than that, and that “bit more” REALLY matters. Robert Ibbotson, who I met at a Woodsmith® Workshop in Iowa, told me about what’s overlooked many times, and that’s POLARITY. I was able to put his insight to use when I needed to rewire a lamp. Thanks, Robert! To be honest, what I’m going to show you is right there on the product package when you buy a replacement light bulb base. Yep. All of it. But if you’re like many people, we don’t take much time to look at directions, especially if what we see looks like it needs no explanation. The basics are you need to install the new part with the correct polarity and you need to assure that any tugs on the lamp cord are resisted by a knot in the cord under the lamp base, NOT the terminal screws. We’ll show you the knot in the video, but let’s explain a bit about polarity. Lamp cord has two conductors, one that is designed to be “hot”, and the other is the “neutral.” To designate which is which, the hot side has a smooth surface, and the neutral has a rib. It’s not that easy to see, but you can readily feel it when you handle the cordage. The ribbed side will get wired to the silver terminal, and the smooth (hot) side will get wired to the brass-colored terminal. Of course, to have this work correctly, if you are rewiring the plug end as well, you’ll need to follow the same wiring protocol. Wiring it this way will greatly reduce any shock hazard once the lamp is plugged in. That’s because the electricity goes to the switch in the lamp base FIRST. This means that when the lamp is off, there is no electricity present in the base, or the shell surrounding the threads of the bulb. It’s “hot” only at the bottom of the bulb, where it’s very difficult to touch. If it’s wired with the neutral to the brass, and the hot to the silver, then the shell around the lamp threads are energized, with the circuit “waiting” to be completed at the base. The risk of YOU completing the circuit by grasping the shell is greatly increased. That’s not a good experience. Manufacturers provide a cardboard sleeve in between the inner threaded and outer shell. The outer shell is made of metal as well, typically in nickel, chrome, brass or deep bronze color. It is both decorative and structural. Because it is metal, it also conducts electricity. So, the cardboard sleeve between the inner and outer shells is another level of protection to reduce the risk of shock. So, be sure to get it safe, and right. For the protection of those around you, as well as yourself! Sure, you can either discard the lamp or take it in for repair, but why? With what you've learned, you can JUST DO IT YOURSELF!
Comments