Скачать с ютуб Day 3 - Part 1: 300 TDI Conversion - Modifying the Bell Housing and Flywheel Housing в хорошем качестве
Day 3 - Part 1: 300 TDI Conversion - Modifying the Bell Housing and Flywheel Housing
6 лет назад
Скачать бесплатно Day 3 - Part 1: 300 TDI Conversion - Modifying the Bell Housing and Flywheel Housing в качестве 4к (2к / 1080p)
У нас вы можете посмотреть бесплатно Day 3 - Part 1: 300 TDI Conversion - Modifying the Bell Housing and Flywheel Housing или скачать в максимальном доступном качестве, которое было загружено на ютуб. Для скачивания выберите вариант из формы ниже:
Загрузить музыку / рингтон Day 3 - Part 1: 300 TDI Conversion - Modifying the Bell Housing and Flywheel Housing в формате MP3:
Если кнопки скачивания не
загрузились
НАЖМИТЕ ЗДЕСЬ или обновите страницу
Если возникают проблемы со скачиванием, пожалуйста напишите в поддержку по адресу внизу
страницы.
Спасибо за использование сервиса savevideohd.ru
Day 3 - Part 1: 300 TDI Conversion - Modifying the Bell Housing and Flywheel Housing
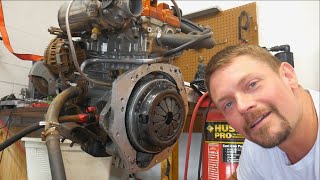
The installation of the 300TDI will require you to pull the clutch from your old Series rover (or replace if in bad condition) and mate it to your 300TDI's flywheel. The wonderful thing about this modification is that your original bell housing and transmission will work great for the project. You will have to modify your flywheel housing to remove the "ears" for the motor mounts so that the front drive shaft and clutch do not get fouled. You will also need to either: A: Mark the bell housing pattern onto your 300TDI flywheel housing and drill and tap holes to accommodate the stud pattern of the bell housing, or B: Mark the 300TDI flywheel housing's stud pattern onto the bell housing and drill out 1 or 2 holes into the bell. I chose this process, simply because I did not have the proper size for tapping new stud holes into my flywheel. I am also going to abandon a few of the unneeded 300TDI studs and will be drilling 2 new holes into the bell (in the video you see me drill 1 out, but I decided one more along the bottom might be a wise idea with the added torque of the new engine, simply because it's so easy to do . . . but there is not a real need to drill out any more than this). In Part 2 of Day 2 we will discuss some of the other modifications to the engine's motor mounts as we set the engine in place to take measurements and mark installation locations for the frame's new motor mount brackets.
Comments