Скачать с ютуб 2023 Nissan Frontier Pro4X RC Killa Lift Kit Wheels and Tires Installation (Part 1 of 3) в хорошем качестве
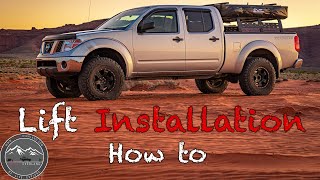
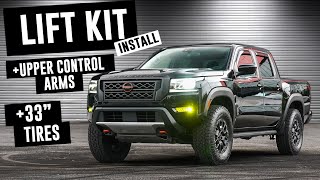
2023 Nissan Frontier Pro4X RC Killa Lift Kit Wheels and Tires Installation (Part 1 of 3)
10 месяцев назад
Скачать бесплатно 2023 Nissan Frontier Pro4X RC Killa Lift Kit Wheels and Tires Installation (Part 1 of 3) в качестве 4к (2к / 1080p)
У нас вы можете посмотреть бесплатно 2023 Nissan Frontier Pro4X RC Killa Lift Kit Wheels and Tires Installation (Part 1 of 3) или скачать в максимальном доступном качестве, которое было загружено на ютуб. Для скачивания выберите вариант из формы ниже:
Загрузить музыку / рингтон 2023 Nissan Frontier Pro4X RC Killa Lift Kit Wheels and Tires Installation (Part 1 of 3) в формате MP3:
Если кнопки скачивания не
загрузились
НАЖМИТЕ ЗДЕСЬ или обновите страницу
Если возникают проблемы со скачиванием, пожалуйста напишите в поддержку по адресу внизу
страницы.
Спасибо за использование сервиса savevideohd.ru
2023 Nissan Frontier Pro4X RC Killa Lift Kit Wheels and Tires Installation (Part 1 of 3)
Hello everyone! 👋 In this video I’ll be showing highlights of what I did when installing the All Dogs Off-road RC Killa lift kit on my 3rd Gen Frontier. Also installed the ADO Upper Control Arms. I didnt get all the footage id like to of got, im still learning to make YouTube videos, so bare with me, there are parts that are missing but i will include my personal written plan in this description. Time Stamps 👇👇👇👇👇👇👇👇👇👇👇👇 0:00 Intro 0:19 Discussion of lift kit 2:10 Discussion of Wheels and Tires 4:52 Comparing old and new tires 5:38 Front Suspension removal 6:54 Removing steering rod to access UCA 10:21 Ball joint separator for UCA 11:00 Lining up passenger shock 11:31 Adding oil to UCA ball joint 11:52 Torquing coil bucket bolts 12:25 Putting passenger coilover in 13:34 Front end comepleted (minus trimming) 14:17 Torquing ASMR lol My personal written instructions i made for myself to follow : 👇👇👇👇👇👇👇👇👇👇👇👇👇👇 Get truck on level ground. Maybe pull have the truck into the garage? Driveway may be okay. Get 3 ton lever jack, jack stands, and wheel chocks. Break loose the wheel bolts before jacking up the truck. Chock the back wheels. Find a good place on the frame to lift the front end up. Place jacks to hold up the truck. Take the stock wheels off. Keep the bolts in a gallon sized bag labeled for which tires it came off of, then tape to tire with duct tape. Put tires in garage. Remove front sway bar. Remove front coil over. Need a 14mm for the 3 top bolts on the shock 17mm to take sway bar end link off. 19mm for lower shock bolt. Then you can remove coil over spring and shock. Replace lower control arm cam bolts with adjustable cam bolts. 19mm on front end of bolt and 22mm on back end. Cam bolt torque spec :100 ft/lbs THIS IS THE MOST DANGEROUS PART. Swap stock coil spring with ADO springs. Start by compressing the stock spring with spring compressors until loose enough to remove shock. Then comoress new spring and place shock inside new spring. Pay attention to orientation of the shock so it can be properly reinstalled. Then reinstall coil over and shock into the truck. 14mm top 3 bolts are: 30 ft/lbs 19mm lower shock mount bolt : 155 ft/lbs Sway bar link : 62 ft/lbs Cam bolts : 100 ft/lbs truck needs to be on the ground and weight on the vehicle before torquing all the way with cam bolts. More to come in part 2 , the rear suspension!
Comments