Скачать с ютуб Home Decor Idea - DIY Chandelier from PVC Pipe в хорошем качестве
Home Decor Idea - DIY Chandelier from PVC Pipe
2 года назад
Скачать бесплатно Home Decor Idea - DIY Chandelier from PVC Pipe в качестве 4к (2к / 1080p)
У нас вы можете посмотреть бесплатно Home Decor Idea - DIY Chandelier from PVC Pipe или скачать в максимальном доступном качестве, которое было загружено на ютуб. Для скачивания выберите вариант из формы ниже:
Загрузить музыку / рингтон Home Decor Idea - DIY Chandelier from PVC Pipe в формате MP3:
Если кнопки скачивания не
загрузились
НАЖМИТЕ ЗДЕСЬ или обновите страницу
Если возникают проблемы со скачиванием, пожалуйста напишите в поддержку по адресу внизу
страницы.
Спасибо за использование сервиса savevideohd.ru
Home Decor Idea - DIY Chandelier from PVC Pipe
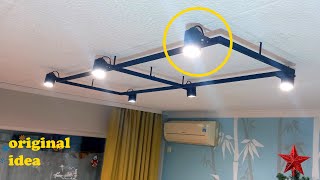
Home Decor Idea - DIY Chandelier from PVC Pipe Hello dear viewers! I made a Chandelier use PVC Pipe with my own hands. This chandelier has a spectacular appearance, but it is not to very easy to do it yourself! But if you want to make this chandelier, you will definitely be able to do. If you want to do something like that, watch this video! If you liked the video, please subscribe to my channel!👇👇👇👍 / @ardodiy Thanks! 00:00 Video started 00:04 We need a pipe with a diameter of 160mm, length 50cm + a pipe with a diameter of 110mm and a length of 150cm 00:09 cut off the broken ends of the pipe 00:24 mark 36 cm on the pipe and cut the pipes 3pcs 00:37 Cut the large pipe 12 cm high 00:54 mark the center on the small pipe 01:02 further from the center we make markings on both sides by 4 cm 01:14 We cut the paper exactly along the perimeter of the pipe and divide it into three even parts 01:37 cut out the middles 02:05 further from the center of the pipe we mark 6 cm 02:16 further from a small piece of pipe we cut off 9 strips 10 cm high and 2 cm wide 02:35 we clean the edges of the strips with sandpaper 02:43 to get a smooth cutting surface of the pipe, we grind the pipe on glass with sandpaper 03:08 marks all strips and fixes on the pipe surface 03:27 we bend the strips by heating with a construction hairdryer according to the markings 03:38 make another fold on the strip 04:04 glue the strips with a large pipe 04:27 remove the strip from the pipe with a knife 04:31 clean pencil marks with acetone solvent 04:43 cut out circles from the board along the inner diameter of the pipe 05:07 mark the center of the circles and make a hole for the bulb holder 05:20 on each circle, make 3-4 holes to remove the heat of the light bulb 05:32 glue the wooden circle using superglue with an activator 05:41 for the base of the chandelier, we need either a board or chipboard or plywood measuring 50 * 50 cm with a thickness of 2.5 cm 05:49 mark a circle with a diameter of 47-48 cm 05:52 divide the circle into 6 equal parts 06:13 cut a circle out of the board 06:19 make markings and drill holes for wires and ceiling mounts 07:06 mark the center of the circle on the back side and make a recess about 10 cm in diameter for the wires 07:39 in a similar way, we make a recess for the wires to the center 07:56 smooth the surface with wood putty 08:20 sand the surface 08:29 before painting we clean the pipes with acetone solvent 08:39 paint the details in 2-3 layers 09:27 after painting, we begin assembly, first connect the electrical wires to the bulb holders 09:40 glue the bulb holder in place 09:54 slight backlash will help you not to scratch the paint on the pipe 09:59 you have to work neatly even use tweezers 10:18 mark the wires at the height you want 10:24 fix the wires with hot glue 10:40 dimensions 10:42 sample photos and videos #chandelier #pvc #pipe #ardodiy
Comments