Скачать с ютуб How Stone Lithography Works в хорошем качестве
How Stone Lithography Works
8 лет назад
Скачать бесплатно How Stone Lithography Works в качестве 4к (2к / 1080p)
У нас вы можете посмотреть бесплатно How Stone Lithography Works или скачать в максимальном доступном качестве, которое было загружено на ютуб. Для скачивания выберите вариант из формы ниже:
Загрузить музыку / рингтон How Stone Lithography Works в формате MP3:
Если кнопки скачивания не
загрузились
НАЖМИТЕ ЗДЕСЬ или обновите страницу
Если возникают проблемы со скачиванием, пожалуйста напишите в поддержку по адресу внизу
страницы.
Спасибо за использование сервиса savevideohd.ru
How Stone Lithography Works
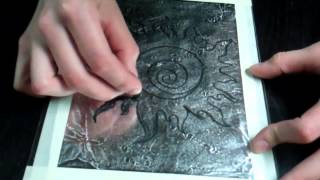
Please watch: "Little Angel Picture Book on iBooks with Movie" • Little Angel Picture Book on iBooks w... ~-~~-~~~-~~-~ How Stone Lithography Works. In this video I show you how I have made my first stone print and also explain the origins of stone lithography. Win one of the stone prints I have made by answering this question. Who invented stone lithography? Subscribe to my channel and leave your answer in the comments. I will handpick a winner! Watch the video about the stone lithography of Michael Parkes here: http://bit.ly/1OY15Q6 So how does Stone Lithography work? You draw on a grinded limestone with a very smooth surface. You can sketch with a graphite pencil on the stone to set up your drawing. The graphite pencil won’t be printed, because it is not greasy. You have to protect the stone from your hands and fingers, because they can be greasy. So I made this sketch of an otter on the stone with a normal pencil. But you need a greasy pencil for the Stoneprinting to work. You have 5 different pencils you can work with 1 is the most greasy pencil and you can make very dark strokes with it and no 5 is the most precise and subtle pencil you can use. I drew this picture with a no. 4. I used some different techniques just to try out how it would work out. I did some cross-hatching and some gradients with little points. I also tried to make a smooth gradient with the greasy pencil. Just to see how it would end up in the print. When you are finished with your drawing the stone is prepared with French chalk powder, this helps to protect it for the further process. The stone is then processed with a mixture of gum Arabic and nitric acid. The gum separates the image area from the non-image areas. This is the etching of the stone. The drawing will receive the ink and will repel water. Everything that is not drawn will receive water. Usually you have to leave the stone for one day, so the etching can take place on the surface of the stone. Then the stone is placed on the printing press. With turpentine oil the image will be washed off the stone. After that the stone is prepared with a thin layer of oily ink. Then you remove the water-soluble gum etch is removed. Now the stone is ready for print. The drawn image receives ink and the rest of the image receives water. Before printing you have to keep the stone wet so that the ink will not print the empty areas. On a piece of glass you mix the ink and roll it with an inkroller. Before applying the ink onto the stone. The stone needs to be wet. You roll several times on the stone with the ink. Then you need to fan the stone so that the water dries. Then you can apply the paper onto the stone. On top of the paper a plate of leather is placed with a bit of Ox gall. This helps the stone glide under the printing press. You move the stone under the press and then turn the lever to press down the paper onto the stone. With the turning wheel you move the stone and paper under the press. Then you release the press with the lever. Then you remove the leather plate and carefully remove the paper from the stone. This is my first stone print I have made. For each print you have to repeat the same steps. Wetting the stone Apply ink Fanning the stone Paper on the stone and printing the stone onto the paper. Music: Mesmerize by Kevin MacLeod is licensed under a Creative Commons Attribution license (https://creativecommons.org/licenses/...) Source: http://incompetech.com/music/royalty-... Artist: http://incompetech.com/
Comments