Скачать с ютуб Mold Making Tutorial: How To Make a Brush-On Rubber Mold of a Bust в хорошем качестве
Mold Making Tutorial: How To Make a Brush-On Rubber Mold of a Bust
15 лет назад
Скачать бесплатно Mold Making Tutorial: How To Make a Brush-On Rubber Mold of a Bust в качестве 4к (2к / 1080p)
У нас вы можете посмотреть бесплатно Mold Making Tutorial: How To Make a Brush-On Rubber Mold of a Bust или скачать в максимальном доступном качестве, которое было загружено на ютуб. Для скачивания выберите вариант из формы ниже:
Загрузить музыку / рингтон Mold Making Tutorial: How To Make a Brush-On Rubber Mold of a Bust в формате MP3:
Если кнопки скачивания не
загрузились
НАЖМИТЕ ЗДЕСЬ или обновите страницу
Если возникают проблемы со скачиванием, пожалуйста напишите в поддержку по адресу внизу
страницы.
Спасибо за использование сервиса savevideohd.ru
Mold Making Tutorial: How To Make a Brush-On Rubber Mold of a Bust
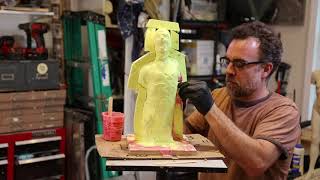
This mold making tutorial video demonstrates how to make a brush on mold of a 3 dimensional model using Brush On 40 urethane rubber. Step 1: Glue model to base. Step 2: Apply SuperSeal sealing agent to all surfaces. Step 3: Apply Universal Mold Release to all surfaces. Step 4: Properly measure Parts A & B. Dispense equal amounts of Brush-On 40. Step 5: Mix mold rubber. ** Mold Maker's Tip: Color pigment every other layer. This ensures thorough coverages and help avoid thin spots in the mold. ** Step 6: Apply mold rubber. First layer, or "detail coat" is applied thinly. Push or stipple rubber into detail. Mix and apply more material as needed. Step 7: Allow rubber to gel until "tacky" (30-40 minutes at room temperature). "Tacky" means sticky to touch but does not come off model. Step 8: Mix and apply second layer of rubber. Step 9: Allow rubber to gel until tacky. ** Mold Maker's Tip: Thicken Rubber with Cab-O-Sil or URE-FIL 9. Use thickened rubber to make parting shims. ** Step 10: Add Cab-O-Sil to thicken rubber. Use thickened rubber in undercuts and indentations. Use thickened rubber to create registration keys. Step 11: Mix and apply third layer of rubber. Mix and apply more rubber as needed. Step 12: Allow rubber to gel until tacky. Step 13: Build up parting shims and undercuts. Step 14: Mix and apply fourth layer of rubber. Step 15: Let all layers cure overnight at room temperature. Step 16: Applying the support shell or "mother mold." Purpose: provides rigid support to flexible rubber mold during casting. Draw parting lines. Use modeling clay to make support parting shims. Apply clay supports to other side. Fill in any open spaces and smooth clay pieces together. Complete clay shim around model. Apply clay supports on other side. ** Mold Maker's Tip: Use sculptor's tool or paper clip to carve registration keys into clay. ** Apply Sonite Wax over rubber surface, clay shims and base. Apply Universal Mold Release. Measure and mix Plasti-Paste II. Mix ratio: 1A:2B by volume. Mix thoroughly. Apply Plasti-Paste II to mold rubber. Let cure about 90 minutes. Next Step: Remove clay shim. Use clay to make second parting shim. This defines the second and third shell segments. Apply clay supports and smooth edges. Apply Sonite Wax. Apply Universal Mold Release. Measure and mix Plasti-Paste II. Let cure about 90 minutes. Remove clay shim. Apply Sonite Wax to Section 3. Apply Universal Mold Release. Measure and mix Plasti-Paste II. Let cure 90 minutes. Step 17: Demold. Remove shell segments. Remove rubber mold from model. Use razor knife to cut seam. Perfect detail is captured from the original model. Step 18: Ready to cast. Apply Universal Mold Release to all surfaces. "Seat" mold into shell making sure seam is aligned. Secure mold with straps or rubber bands. Mix and pour duoMatrix NEO into mold cavity. Mix ratio: 2A:1B by volume. Add more duoMatrix NEO as needed. Let all layers cure for about one hour. Step 19: Ready to demold. A perfect lightweight reproduction. Make It Now! with Smooth-On http://www.smooth-on.com/ / smoothon / smoothon http://www.google.com/+smoothon ~-~~-~~~-~~-~ Adult Supervision Required Keep Out Of Reach Of Children ~-~~-~~~-~~-~
Comments