Скачать с ютуб BLANK BASE FOLIO TUTORIAL ✨✨ | Album less than 2 hours | ~ Start to Finish | Scrapbook Mini Album в хорошем качестве
BLANK BASE FOLIO TUTORIAL ✨✨ | Album less than 2 hours | ~ Start to Finish | Scrapbook Mini Album
5 месяцев назад
Скачать бесплатно BLANK BASE FOLIO TUTORIAL ✨✨ | Album less than 2 hours | ~ Start to Finish | Scrapbook Mini Album в качестве 4к (2к / 1080p)
У нас вы можете посмотреть бесплатно BLANK BASE FOLIO TUTORIAL ✨✨ | Album less than 2 hours | ~ Start to Finish | Scrapbook Mini Album или скачать в максимальном доступном качестве, которое было загружено на ютуб. Для скачивания выберите вариант из формы ниже:
Загрузить музыку / рингтон BLANK BASE FOLIO TUTORIAL ✨✨ | Album less than 2 hours | ~ Start to Finish | Scrapbook Mini Album в формате MP3:
Если кнопки скачивания не
загрузились
НАЖМИТЕ ЗДЕСЬ или обновите страницу
Если возникают проблемы со скачиванием, пожалуйста напишите в поддержку по адресу внизу
страницы.
Спасибо за использование сервиса savevideohd.ru
BLANK BASE FOLIO TUTORIAL ✨✨ | Album less than 2 hours | ~ Start to Finish | Scrapbook Mini Album
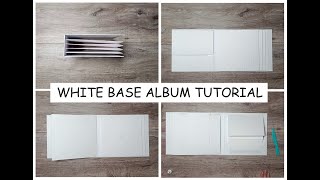
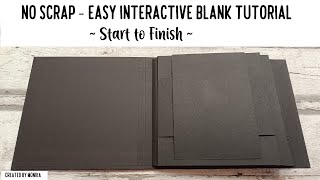
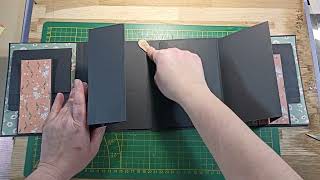
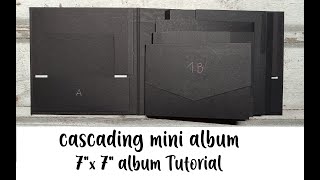
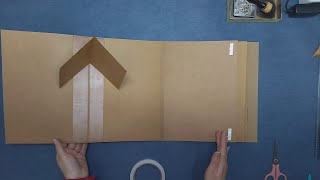
Hi, there! Welcome to my YouTube Channel! Hope you enjoy this video! Thank you so much for watching 💕 This folio measure is 6,50 x 8.50 inches. I made this less than 2 hours. Most of the time I used 8.5" x 11" Cardstock: 110 Lb./300 g/m2. But for this album I used a medium heavy one (8.5" x 11", 180 g/m2). I suggest to watch the video before preparing your pieces and working along. You should cut and prepares all your pieces before starting your album. My measurement is here in the description box down below -- › FREE Printable pdf version: https://drive.google.com/file/d/11oIa... ~~Some Products Mentioned~~ ✨Chipboard - I used pizza box LOL. (you can use 12 x 12 Chipboard - Heavy - 52pt) - https://www.scrapbook.com/store/sbc-c... ✨Base paper - A4-size any black cardstock from 92 Lb./ 250 g/m2, example - https://www.scrapbook.com/store/con-1... ✨For binding - A4-size any black cardstock from classic 180 g/m2., example - https://www.amazon.com/Cardstock-Prin... ✨Universal hobby glue - https://www.littlebiteverything.net/p... ✨Camera Clear Stamp - https://www.aliexpress.com/item/32889... ✨Photo Frame die - https://www.aliexpress.com/item/10050... ✨Corner Punch - 2 in 1 - https://www.amazon.com/Xcut-Corner-Pu... ✨ We R Memory Mini Envelope Puncher - https://www.amazon.co.uk/We-Memory-Ke... ✨Score Board - https://www.amazon.com/We-Memory-Keep... I hope you are love all the project what I shares. If you like my video be sure to let me know what you think in the comment section below. Please, give me a thumbs up! So if you haven't subscribe my chanel, clicking that little button right there :D And I'll see you the next time! --------------------------------------------------------------------------------------------------------------------- Here is my measurements: Chipboard: Cut (2) pieces at 6.50" x 8.5"; (1) pieces at 1.25 " x 8.50"; Black cardstock (1) piece at 15.50" x 9.50" or (2) piece at 8" x 9.50" (join together) Cover inside (left side): A: Cut (1) at 4.75" x 8.25" and score on the 4.75" side at 0.50" and at 0.75”. B: Cut (1) at 6" x 8.25" and score on the 6" side at 0.50" and at 0.75”. And I used my mini Envelope Punch Board to create an opening on the side. *** Follow my video. C: Cut (1) at 5.25" x 9.25" and score on the 9.25" side at 0.50" on each end and. Then I used my mini Envelope Punch Board to create an opening on the side, (pocket). *** Follow my video. D: Cut (2) at 6.25" x 4.50" and and score on the 4.50" side at 0.50". E: Cut (2) at 6.25" x 4.25" and and score on the 4.25" side at 0.50". F: Cut (2) at 6.25" x 4" and and score on the 4" side at 0.50". UNIT 3 (left side): 3A: Cut (1) at 7.50" x 8.25" and score on the 7.50" side at 5/8 " and at 1.25”. 3B: Cut (1) at 6" x 6" and score on the 6" side at 0.50" on each end then rotate and score on the 6" side at 0.50" on each end. Than cut it in two piece as two triangle. *** Follow my video. UNIT 2 (right side): 2A: Cut (1) at 71/8" x 8.25" and score on the 71/8" side at 0.50" and at 7/8”. 2B: Cut (1) at 5" x 9.25" and score on the 9.25" side at 0.50" on each end and. Then mind the two corners with corner punch as me, (pocket actually). 2C: Cut (2) at 6.25" x 47/8" and and score on the 47/8" side at 0.50" and at 5/8”. 2D: Cut (2) at 6.75" x 41/8" and and score on the 6.75" side at 0.50". 2E: Cut (2) at 71/8" x 3.50" and and score on the 71/8" side at 0.50" on each end and then on the 3.50" side at 0.50" (pocket actually). 2F: Cut (2) at 61/8" x 41/8" and make a pencil mark from each end at 5/8" then cut this out like a window. ** optional Cut (1) at 57/8" x 37/8from Acetate Sheets. ** I didn’t use it. UNIT 1 (left side): 1A: Cut (1) at 7" x 8.25" and score on the 7" side at 0.50" and at 0.75”. 1B: Cut (2) at 12" x 4" and score on the 61/8". 1B2: Cut (2) at 1.25" x 4" and score on the 5/8". 1C: Cut (2) at 4.75" x 6.25" and score on the 4.75" side at 0.50". 1D: Cut (1) at 5.25" x 2.25" and and score on the 5.25" side at 0.50" on each end and then on the 2.25" side at 0.50" (pocket actually). Middle: G: Cut (1) at 6.25" x 7.75" and score on the 6.25" side at 0.50" then score on the 7.75" side at 0.50". (pocket actually). H: Cut (1) at 6.75" x 3.25" and and score on the 6.75" side at 0.50" on each end and then on the 3.25" side at 0.50" (pocket actually). Thanks for watching! P.S.: I never say that anything is my idea or invent things , I get inspired from pinterest and so many youtube videos same as you do . :) #base #scrapbooking #tutorial #interactivo #tuto #folio
Comments