Скачать с ютуб Crochet Bucket Hat Flower Pattern Tutorial в хорошем качестве
Crochet Bucket Hat Flower Pattern Tutorial
1 год назад
Скачать бесплатно Crochet Bucket Hat Flower Pattern Tutorial в качестве 4к (2к / 1080p)
У нас вы можете посмотреть бесплатно Crochet Bucket Hat Flower Pattern Tutorial или скачать в максимальном доступном качестве, которое было загружено на ютуб. Для скачивания выберите вариант из формы ниже:
Загрузить музыку / рингтон Crochet Bucket Hat Flower Pattern Tutorial в формате MP3:
Если кнопки скачивания не
загрузились
НАЖМИТЕ ЗДЕСЬ или обновите страницу
Если возникают проблемы со скачиванием, пожалуйста напишите в поддержку по адресу внизу
страницы.
Спасибо за использование сервиса savevideohd.ru
Crochet Bucket Hat Flower Pattern Tutorial
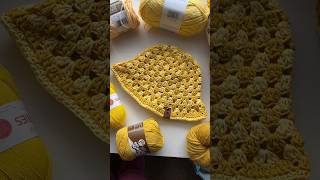
Im excited to share with you how to create your own stylish crochet flower bucket hat with this free video tutorial. I had been wanting to crochet a cute bucket hat the past couple years and finally sat down and took the time to come up with this pattern. I hope that you find the pattern easy to understand and follow. SIZING: This tutorial is for an adult size Large bucket hat. To make a size medium use a 4.5mm hook and to make it slightly smaller you can go down to a size 4mm crochet hook. I have found that most people prefer the medium size. US Stitches used: SS: Slip Stitch CH: Chain SC: Single Crochet sc2tog: Single Crochet 2 together HDC: Half Double Crochet DC: Double Crochet tc2tog: Triple Crochet 2 together tc3tog: Triple Crochet 3 together Materials used: 3 colors worsted weight size 4 medium yarn ( I used "I love this Yarn") Yellow White Linen H 5mm crochet hook https://amzn.to/3JI7zJl Scissors https://amzn.to/3ldINX0 Tapestry Needle https://amzn.to/3HzFWPO Stitch Marker https://amzn.to/3Ys1RiU MAKE 5 GRANNY SQUARE FLOWER BLOCKS R1: 0:36 With yellow, Start with CH3, SS into first CH, CH3 + 11DC into ring, Fasten off yellow R2: 3:24 Attach white into top of any Stitch, CH2 + tc2tog (counts as tc3tog) CH2, *tc3tog + CH2 into each stitch (repeat from * until you have 12 petals total) Fasten off white R3: 7:01 Attach linen into any CH2 space, CH2 +2DC into same space, *3HDC into next 2 CH2 spaces, 3DC + CH2 + 3DC into next CH2 space. (Repeat from * until you reach first corner.) Finish with 3DC + CH2, SS into first CH, CH1 R4: 10:27 Go back into CH2 space with a SC, CH1 + 2HDC into same space, work 3HDC into each space, 3HDC + CH2 + 3HDC into each corner ATTACH BLOCKS: 11:50 TOP OF HAT 16:05 R1: CH3, SS into first CH, CH2 (9HDC into ring created) SS into first CH R2: CH2 + 1HDC in same space, work 2HDC into each stitch R3: CH2 + 2HDC in next stitch, *1HDC in next stitch 2HDC in next stitch. Repeat from * until end R4: CH2 + 1HDC in next stitch, 2HDC in next stitch, *1HDC in next 2 stitches, 2HDC in next stitch, repeat from * until end R5: CH2 + 1HDC in next 2 stitches, 2HDC in next stitch, *1HDC in next 3 stitches, 2HDC in next stitch, repeat from * until end R6: CH2 + 1HDC in next 3 stitches, 2HDC in next stitch, *1HDC in next 4 stitches, 2 HDC in next stitch, repeat from * until end R7: CH2 + 1HDC in next 4 stitches, 2HDC in next stitch, *1HDC in next 5 stitches, 2 HDC in next stitch, repeat from * until end R8: CH2 + 1HDC in next 5 stitches, 2HDC in next stitch, *1HDC in next 6 stitches, 2HDC in next stitch, repeat from * until end R9: BRIM OF HAT R1: Place 1 SC into each stitch of sides of hat R2: SC in next 4 stitches, 2SC in next stitch, repeat R3: SC in next 5 stitches, 2SC in next stitch, repeat R4: SC in next 6 stitches, 2SC in next stitch, repeat R5-6: 1SC in every stitch R7: SC in next 7 stitches, 2SC in next stitch, repeat R8: 1SC in each stitch R9: CH1, Skip one stitch to the left and work 1 reverse SC in each stitch Let's stay connected; Website: https://jenoelleboutique.com email: [email protected] Instagram: / jenoellecreates Facebook: / jenoelleboutique
Comments


![(광고) [ENG SUB⭕] (#1) 코바늘로 만드는 무사슬 🌼데이지 버킷햇🌼 Daisy Bucket Hat with Crochet](https://i.ytimg.com/vi/T1IBjMd_Z9I/mqdefault.jpg)